7 Building a concurrent system
The concurrent examples you’ve seen so far have relied on a single server process instance. But typical Elixir and Erlang systems are powered by a multitude of processes—many of which are stateful server processes. It’s not uncommon for a moderately complex system to run a few thousand processes, whereas larger systems may be powered by hundreds of thousands, or even millions, of processes. Remember that processes are cheap, so you can create them in abundance. And owing to message-passing concurrency, it’s still fairly easy to reason about highly concurrent systems. Therefore, it’s useful to run different tasks in separate processes. Such a highly concurrent approach can often improve the scalability and reliability of your systems.
In this chapter, you’ll see an example of a more involved system powered by many processes that cooperate to provide the full service. Your ultimate goal is to build a distributed HTTP server that can handle many end users who are simultaneously manipulating many to-do lists. You’ll do this throughout the remaining chapters and reach the final goal in chapter 12. In this chapter, you’ll develop an infrastructure for handling multiple to-do lists and persisting them to disk.
But first, let’s look at how you can manage more complex projects with the mix tool.
7.1 Working with the Mix project
As code becomes more involved, placing all the modules in a single file becomes increasingly clumsy. This is the right time to start working with multifile projects.
Chapter 2 briefly mentioned that Elixir ships with the mix tool, which you can use to create, build, and run projects as well as manage their dependencies, run tests, and create custom project-based tasks. Here, you’ll learn just enough about mix to create and run a project. Additional mix features will be introduced as the need arises.
You’ll use mix to create a project for the to-do list. Type the following at the command line:
$ mix new todo
This creates the todo folder and a project structure under it. The result is a folder that contains only a handful of files, including a readme file, unit test support files, and the .gitignore file. Mix projects are extremely simple and don’t introduce too many autogenerated files.
Tip This book doesn’t provide a detailed treatment of the mix tool. Instead, essential features are introduced when needed. To find out more about mix, see the Introduction to Mix guide (https://mng.bz/A8do). Additionally, from the command line, you can run mix help to get a list of available commands and the mix help command to get detailed help for a particular command. Finally, the online reference for mix is available at https://hexdocs.pm/mix.
Once the project is in place, you can go to its folder and run mix tasks from there. For example, you can compile the project with the mix compile command, or you can run tests with mix test.
You can also use a special way of starting iex, which is useful when you want to play with Mix projects in the Elixir shell. When you run iex -S mix, two things happen. First, the project is compiled (just as with mix compile). If this is successful, the shell is started, and all modules from the project can be referenced and used.
Using mix, it’s possible to organize your code into multiple files and folders. You can place .ex files under the lib folder, and they’ll automatically be included in the next build. You can also use arbitrarily nested subfolders under the lib folder.
There are no hard rules regarding how files should be named and organized, but there are some preferred conventions:
-
You should place your modules under a common top-level alias. For example, modules might be called
Todo.List,Todo.Server, or similar. This reduces the chance of module names conflicting when you combine multiple projects into a single system. -
In general, one file should contain one module. Occasionally, if a helper module is small and used only internally, it can be placed in the same file as the module using it. If you want to implement protocols for the module, you can do this in the same file as well.
-
A filename should be an underscore-case (aka snake-case) version of the main module name it implements. For example, a
TodoServermodule would reside in a todo_server.ex file in the lib folder. -
The folder structure should correspond to multipart module names. A module called
Todo.Servershould reside in the lib/todo/server.ex file.
These aren’t strict rules, but they’re the ones used by the Elixir project as well as many third-party libraries.
With this out of the way, you can start adding code to the project. In chapter 4 you developed the module TodoList. In chapter 6, as a part of the exercises, you developed the TodoServer module, which implements a server process that maintains the state of a single to-do list. The final version of both modules resides in the todo_server.ex file from chapter 6.
Now, you’ll add the code of those modules to the newly generated todo project. Here’s what you need to do:
-
Place the
TodoListcode in the todo/lib/todo/list.ex file. Rename the module asTodo.List. -
Place the
TodoServercode in the todo/lib/todo/server.ex file. Rename the module toTodo.Server. -
Replace all references to
TodoServerwithTodo.Serverand all references toTodoListwithTodo.List.
The final version is available in the todo folder. Now, you can start the system with iex -S mix and verify that it works:
$ iex -S mix

iex(1)> {:ok, todo_server} = Todo.Server.start()

iex(2)> Todo.Server.add_entry(
          todo_server,
          %{date: ~D[2023-12-19], title: "Dentist"}
        )

iex(3)> Todo.Server.entries(todo_server, ~D[2023-12-19])
[%{date: ~D[2023-12-19], id: 1, title: "Dentist"}]
At this point, the to-do code is in the Mix project, and you can continue to extend it with additional features.
7.2 Managing multiple to-do lists
This section introduces support for managing multiple to-do lists. Before starting, let’s recap what you’ve built so far:
There are two approaches to extending this code to work with multiple lists:
-
Implement a pure functional abstraction to work with multiple to-do lists. Modify
Todo.Serverto use the new abstraction as its internal state. -
Run one instance of the existing to-do server for each to-do list.
The problem with the first approach is that you’ll end up having only one process to serve all users. This approach isn’t very scalable. If the system is used by many different users, they’ll frequently block each other, competing for the same resource—a single-server process that performs all tasks.
The alternative is to use as many processes as there are to-do lists. With this approach, each list is managed concurrently, and the system should be more responsive and scalable.
To run multiple to-do server processes, you need another entity—something you’ll use to create Todo.Server instances or fetch the existing ones. That “something” must manage a state—essentially a key-value structure that maps to-do list names with to-do server PIDs. This state will, of course, be mutable (the number of lists changes over time) and must be available during the system’s lifetime.
Therefore, you’ll introduce another server process: a to-do cache. You’ll run only one instance of this process, and it will be used to create and return a pid of a to-do server process that corresponds to the given name. The module will export only two functions: start/0, which starts the process, and server_process/2, which retrieves a to-do server process (its pid) for a given name, optionally starting the process, if it isn’t already running.
7.2.1 Implementing a cache
Let’s begin implementing the cache process. First, copy the entire Mix project (the todo folder) to the todo_cache folder. Then, add the new todo_ cache/lib/todo/cache.ex file, which is where the code for Todo.Cache will reside.
Now, you need to decide what the process state will be. Remember that the process will provide to-do server processes. You give it a name, and it returns the pid of the corresponding process. In this case, it seems reasonable to use a map that associates to-do list names with to-do server PIDs. This is implemented in the following listing.
Listing 7.1 Cache initialization (todo_cache/lib/todo/cache.ex)
defmodule Todo.Cache do
  use GenServer

  def init(_) do
    {:ok, %{}}
  end

  ...
end
With this in place, you can begin introducing the server_process request. You need to decide whether this request will be a call or cast. Because this request must return a result to the caller (a to-do server pid), there are no options—it needs to be a call.
Listing 7.2 Handling the server_process request (todo_cache/lib/todo/cache.ex)
defmodule Todo.Cache do
  ...

  def handle_call({:server_process, todo_list_name}, _, todo_servers) do
    case Map.fetch(todo_servers, todo_list_name) do
      {:ok, todo_server} ->                           ❶
        {:reply, todo_server, todo_servers}

      :error ->                                       ❷
        {:ok, new_server} = Todo.Server.start()       ❸

        {
          :reply,
          new_server,
          Map.put(todo_servers, todo_list_name, new_server)
        }
    end
  end

  ...
end
❶ The server exists in the map.
In this example, you use Map.fetch/2 to query the map. If there’s something for the given key, you return the value to the caller, leaving the state unchanged. Otherwise, you must start a server, return its pid, and insert an appropriate name-value pair in the process state. Finally, you shouldn’t forget to include interface functions.
Listing 7.3 Interface functions (todo_cache/lib/todo/cache.ex)
defmodule Todo.Cache do
  ...

  def start do
    GenServer.start(__MODULE__, nil)
  end

  def server_process(cache_pid, todo_list_name) do
    GenServer.call(cache_pid, {:server_process, todo_list_name})
  end

  ...
end
Notice how __MODULE__ is passed as the first argument to GenServer.start/2. During compilation, this expression is replaced with the name of the current module. This is a simple convenience—you could write Todo.Cache instead—but this approach removes this minor duplication and guards the code against a possible change of the module name.
At this point, the to-do cache is complete, and you can try it. Start the shell with iex -S mix, and do the following:
iex(1)> {:ok, cache} = Todo.Cache.start()

iex(2)> Todo.Cache.server_process(cache, "Bob's list")    ❶
#PID<0.69.0>                                              ❶

iex(3)> Todo.Cache.server_process(cache, "Bob's list")    ❷
#PID<0.69.0>                                              ❷

iex(4)> Todo.Cache.server_process(cache, "Alice's list")  ❸
#PID<0.72.0>                                              ❸
❶ The first retrieval starts a new process.
❷ The second retrieval returns the same process.
❸ A different name returns a different process.
The returned pid represents a to-do server process that manages a single to-do list. You can use it in the familiar way to manipulate the list:
iex(5)> bobs_list = Todo.Cache.server_process(cache, "Bob's list")

iex(6)> Todo.Server.add_entry(
          bobs_list,
          %{date: ~D[2023-12-19], title: "Dentist"}
        )

iex(7)> Todo.Server.entries(bobs_list, ~D[2023-12-19])
[%{date: ~D[2023-12-19], id: 1, title: "Dentist"}]
Of course, Alice’s list isn’t affected by these manipulations:
iex(8)> Todo.Cache.server_process(cache, "Alice's list") |>
          Todo.Server.entries(~D[2023-12-19])
[]
Having the cache in place makes it possible for you to manage many to-do lists independently. The following session creates 100,000 to-do list servers and verifies that you have that many processes running:
iex(1)> {:ok, cache} = Todo.Cache.start()

iex(2)> length(Process.list())
65

iex(3)> Enum.each(
          1..100_000,
          fn index ->
            Todo.Cache.server_process(cache, "to-do list #{index}")
          end
        )

iex(4)> length(Process.list())
100065
Here, you use the Process.list/0 function to get the list of currently running processes.
You might be puzzled about why you initially have 65 processes running, even though you started just 1. The remaining processes are those started and used internally by Elixir and Erlang.
7.2.2 Writing tests
Now that the code is organized in the Mix project, you can write automated tests. The testing framework for Elixir is called ex_unit, and it’s included in the Elixir distribution. Running tests is as easy as invoking mix test. All you need to do is write the test code.
Let’s look at a quick example by testing the behavior of Todo.Cache.server_process/2. First, you need to create the test file. The sketch is provided in the following listing.
Listing 7.4 Test file skeleton (todo_cache/test/todo/cache_test.exs)
defmodule Todo.CacheTest do
  use ExUnit.Case             ❶

  ...
end
❶ Prepares the module for testing
Take note of the file location and the name. A test file must reside in the test folder, and its name must end with _test.exs to be included in the test execution. As explained in chapter 2, the .exs extension stands for Elixir script, and it’s used to indicate that a file isn’t compiled to disk. Instead, mix will interpret this file every time the tests are executed.
The script file must define the test module that contains the tests. The expression use ExUnit.Case prepares the test module for testing. This expression injects some boilerplate that makes the module compliant with ex_unit and imports some helper test macros to the module.
One such macro is test, which can be used to define tests. You’ll use it to test the behavior of Todo.Cache.server_process/2.
Listing 7.5 Testing server_process (todo_cache/test/todo/cache_test.exs)
defmodule Todo.CacheTest do
  use ExUnit.Case

  test "server_process" do                                       ❶
    {:ok, cache} = Todo.Cache.start()
    bob_pid = Todo.Cache.server_process(cache, "bob")

    assert bob_pid != Todo.Cache.server_process(cache, "alice")  ❷
    assert bob_pid == Todo.Cache.server_process(cache, "bob")    ❷
  end

  ...
end
To define a test, you need to write test test_description do ... end. The test description is a string that’s included in the output if the test fails. The code of the test itself is included in the do block.
The test macro is an example of metaprogramming capabilities in Elixir. This macro will generate a function that contains some boilerplate and the code provided in the do block. This function will then be invoked by ex_unit when you execute tests.
In this particular test, you first start the cache process and then fetch one server process. Then, you verify the expected behavior. This is done with the help of the assert macro, which takes an expression and verifies its outcome. If the expression fails, assert will raise an error with a descriptive output. This error will be caught by ex_unit and displayed.
For example, take a look at the first assertion:
assert bob_pid != Todo.Cache.server_process(cache, "alice")
In this assertion, you’re verifying that Alice and Bob’s to-do lists are powered by different processes.
Just like test, assert is a macro and, therefore, is invoked during compilation. The macro introspects the expression and transforms it into different code. An approximation of the generated code could be something like this:
left_value = bob_pid
right_value = Todo.Cache.server_process(cache, "alice")

if left_value == right_value do
  # raise an error
end
In other words, the assert macro generates the code that will fail if the expression bob_pid != Todo.Cache.server_process(cache, "alice") returns false.
A great benefit of the way assert works is that you don’t need to learn a completely new set of functions, such as assert_equal, assert_not_equal, or assert_gt, to write your assertions. Instead, you use the same expressions as in the regular code to verify the desired behavior. You can assert on standard comparisons, such as ==, !=, >, <, and so on.
You can even assert that a pattern-matching expression succeeded. Let’s look at a quick example. You’ll add another test that verifies the behavior of to-do server operations. To keep things simple, you’ll include the test in the same file.
Listing 7.6 Testing to-do server operations (todo_cache/test/todo/cache_test.exs)
defmodule Todo.CacheTest do
  use ExUnit.Case

  ...

  test "to-do operations" do
    {:ok, cache} = Todo.Cache.start()

    alice = Todo.Cache.server_process(cache, "alice")
    Todo.Server.add_entry(alice, %{date: ~D[2023-12-19], title: "Dentist"})

    entries = Todo.Server.entries(alice, ~D[2023-12-19])
    assert [%{date: ~D[2023-12-19], title: "Dentist"}] = entries     ❶
  end
end
❶ Asserts a matching expression
Here, you create one to-do server, add a single entry, and then fetch the entries for the given date. Finally, using pattern matching, you assert that the list of entries has exactly one element, with date and title fields having proper values. Relying on pattern matching allowed you to check only the relevant fields and to verify the size of the result in a single expression.
At this point, you’ve created a single test file with a couple of tests. The test project in the todo_cache folder also includes another test file called test/todo/list_test.exs, which verifies the behavior of the Todo.List module. For the sake of brevity, that code isn’t presented here.
Note The example projects in this book aren’t test driven or particularly well tested. In this book, the focus is on extremely simple code that illustrates a point. Such code is often not very testable, and some improvisations have been used to ensure basic correctness.
Now, you can run all the tests with mix test:
$ mix test
.......

Finished in 0.05 seconds
7 tests, 0 failures
There are many other features available in ex_unit, but we’ll stop here. To learn more about unit testing in Elixir, check out the official ExUnit reference at https://hexdocs.pm/ex_unit and the mix test documentation at https://hexdocs.pm/mix/Mix.Tasks.Test.xhtml.
7.2.3 Analyzing process dependencies
Let’s reflect a bit on the current system. You’ve developed support for managing many to-do list instances, and the end goal is to use this infrastructure in an HTTP server. In the Elixir and Erlang world, HTTP servers typically use a separate process for each request. Thus, if you have many simultaneous end users, you can expect many BEAM processes to access your to-do cache and to-do servers. The dependency between processes is illustrated in figure 7.1.
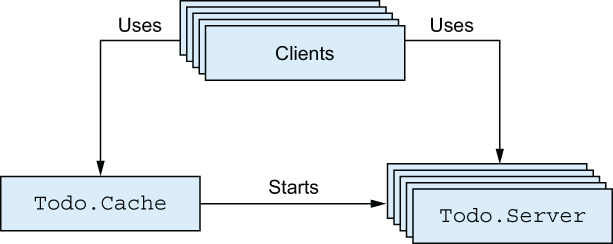
Figure 7.1 Cooperation of processes
Here, each box represents a single process. The client boxes are arbitrary clients, such as HTTP request-handler processes. Looking at this diagram, you can immediately spot some characteristics of your system’s concurrent behavior:
-
Several clients (possibly a large number of them) issue requests to the single to-do cache process.
-
Several clients communicate with multiple to-do server processes.
The first point identifies the possible source of a bottleneck. Because you have only one to-do cache process, you can handle only one server_process request at a time, regardless of how many CPU resources you have.
This problem may not be significant in practice. If your server_process takes, for example, one microsecond, the to-do cache could handle a load of up to 1,000,000 requests per second, which should be sufficient for most needs. But if request handling takes 100 milliseconds, you could process only 10 requests per second, and your system wouldn’t be able to handle higher loads.
It’s easy to reason about an individual process. Regardless of how many concurrent requests are coming in, a single process can handle only one request at a time. Thus, a process is good enough if its request-handling rate is at least equal to the incoming rate. Otherwise, you have to either optimize the process or do other interventions.
In this case, the to-do cache performs a very simple operation: a map lookup followed by an optional process creation and map update. According to a quick test on my machine, for 1 million to-do lists, it takes about 5 microseconds to start a new to-do server and put it in the map or 1.5 microseconds to fetch the existing one. This should be sufficient for a load of at least 200,000 requests per second, which seems like reasonable performance for this initial attempt. If you want to repeat the test on your machine, take a look at the instructions in todo_cache/lib/load_test.ex.
I’ll briefly cover a few topics related to client interactions with to-do servers. Once a client gets a to-do server PID, the list manipulation runs concurrently to all other activities in the system. Because you can expect list manipulations to be fairly involved, it’s beneficial to run those operations concurrently. This is where your system is concurrent and scalable—it can manipulate several lists, using as many resources as possible.
Also recall from chapter 5 that a process waiting for a message is suspended and doesn’t waste CPU resources. Thus, regardless of the number of processes, only those processes that are actually doing computations consume CPU. In this case, that means a client process doesn’t use CPU while it waits for a to-do server to finish.
Finally, you can be sure that a single list can’t be modified by two simultaneous clients. Recall that the list is managed by a single process. Even if a million clients try to modify the same list, their requests will be serialized in the corresponding to-do server and handled one by one. Because a process runs only one request at a time, its internal state is consistent. You know there can’t be multiple simultaneous updates of the process state, which makes race conditions in a single process impossible.
tip If you need to make sure part of the code is synchronized—that is, that there are no multiple simultaneous executions of critical code—it’s best to run that code in a dedicated process. When multiple clients want this code to run, they issue a request to that process. The process then serves as a synchronization point, making sure the critical code is run in a single process.
Now, you have a basic system you can use to manipulate many to-do lists. It’s time to include basic persistence so that your data can outlive server restarts.
7.3 Persisting data
In this section, you’ll extend the to-do cache and introduce basic data persistence. The focus here isn’t so much on the persistence itself but on exploring the process model—how you can organize your system into various server processes, analyze dependencies, and identify and address bottlenecks. You’ll start with the code from the todo_cache folder and extend it gradually. For data persistence, you’ll use simple disk-based persistence, encoding the data into the Erlang external term format. The complete solution is in the persistable_todo_cache folder.
7.3.1 Encoding and persisting
To encode an arbitrary Elixir or Erlang term, you use the :erlang.term_to_binary/1 function, which accepts an Erlang term and returns an encoded byte sequence as a binary value. The input term can be of arbitrary complexity, including deep hierarchies of nested lists and tuples. The result can be stored to disk, retrieved at a later point, and decoded to an Erlang term with the inverse function :erlang.binary_to_term/1.
Equipped with this knowledge, you’ll introduce another process: a database powered by the Todo.Database module. This will be a server process that supports two requests: store and get. When storing data, clients will provide a key and the corresponding data. The data will be stored in the file that bears the same name as the key. This approach is far from perfect and is error prone, but it’s simple enough to let us focus on the concurrency aspect of the problem. The full implementation of the database process is given in the following listing.
Listing 7.7 Database process (persistable_todo_cache/lib/todo/database.ex)
defmodule Todo.Database do
  use GenServer

  @db_folder "./persist"

  def start do
    GenServer.start(__MODULE__, nil,
     name: __MODULE__                                       ❶
    )
  end

  def store(key, data) do
    GenServer.cast(__MODULE__, {:store, key, data})
  end

  def get(key) do
    GenServer.call(__MODULE__, {:get, key})
  end

  def init(_) do
    File.mkdir_p!(@db_folder)                               ❷
    {:ok, nil}
  end

  def handle_cast({:store, key, data}, state) do            ❸
    key                                                     ❸
    |> file_name()                                          ❸
    |> File.write!(:erlang.term_to_binary(data))            ❸
                                                            ❸
    {:noreply, state}                                       ❸
  end                                                       ❸

  def handle_call({:get, key}, _, state) do                 ❹
    data = case File.read(file_name(key)) do                ❹
      {:ok, contents} -> :erlang.binary_to_term(contents)   ❹
      _ -> nil                                              ❹
    end                                                     ❹
                                                            ❹
    {:reply, data, state}                                   ❹
  end

  defp file_name(key) do
    Path.join(@db_folder, to_string(key))
  end
end
❶ Locally registers the process
This is mostly a synthesis of techniques mentioned earlier. First, you set the module attribute @db_folder to the hardcoded value of the database folder. As explained in section 2.3.6, this works as a compile-time constant, allowing you to encode the knowledge about the database folder in a single place in code.
The database server is locally registered under a name; this keeps things simple and relieves you from passing around the Todo.Database PID. Of course, a downside is that you can run only one instance of the database process.
It’s worth noting that the store request is a cast, whereas get is a call. In this implementation, I decided to turn store into a cast because the client isn’t interested in a response. Using casts promotes scalability of the system because the caller issues a request and goes about its business.
A huge downside of a cast is that the caller can’t know whether the request was successfully handled. In fact, the caller can’t even be sure the request reached the target process. This is a property of casts. Casts promote overall availability by allowing client processes to move on immediately after a request is issued. But this comes at the cost of consistency because you can’t be confident about whether a request has succeeded.
In this example, you’ll start with the store request being a cast. This makes the entire system more scalable and responsive, with the downside being that you can’t guarantee that all changes have been persisted.
During initialization, you use File.mkdir_p!/1 to create the specified folder if it doesn’t exist. The exclamation mark at the end of the name indicates a function that raises an error if the folder can’t be created for some reason. The data is stored by encoding the given term to the binary and then persisting it to the disk. Data fetching is the inverse of storing. If the given file doesn’t exist on the disk, you return nil.
7.3.2 Using the database
With the database process in place, it’s time to use it from your existing system. You have to do three things:
To start the server, you’ll plug into the Todo.Cache.init/1 function. This is a quick hack, but it’s sufficient for the moment.
Listing 7.8 Starting the database (persistable_todo_cache/lib/todo/cache.ex)
defmodule Todo.Cache do
  ...

  def init(_) do
    Todo.Database.start()
    {:ok, %{}}
  end

  ...
end
Here, you use the persist subfolder of the current folder as the place to store data.
Next, you need to persist the list after it’s modified. Obviously, this must be done from the to-do server. But remember that the database’s store request requires a key. For this purpose, you’ll use the to-do list name. As you may recall, this name is currently maintained only in the to-do cache, so you must propagate it to the to-do server as well. This means extending the to-do server state to be in the format {list_name, todo_list}. The code isn’t shown here, but these are the corresponding changes:
-
Todo.Server.startnow accepts the to-do list name and passes it toGenServer.start/2. -
Todo.Server.init/1uses this parameter and keeps the list name in the process state. -
Todo.Server.handlecallbacks are updated to work with the new state format.
When starting the new to-do server, the cache process passes the list name. After these modifications, the to-do server knows its own name. Now, it’s trivial to persist the data.
Listing 7.9 Persisting the data (persistable_todo_cache/lib/todo/server.ex)
defmodule Todo.Server do
  ...

  def handle_cast({:add_entry, new_entry}, {name, todo_list}) do
    new_list = Todo.List.add_entry(todo_list, new_entry)
    Todo.Database.store(name, new_list)                    ❶
    {:noreply, {name, new_list}}
  end

  ...
end
You can immediately test whether this works. Run iex -S mix, and try the following:
iex(1)> {:ok, cache} = Todo.Cache.start()

iex(2)> bobs_list = Todo.Cache.server_process(cache, "bobs_list")

iex(3)> Todo.Server.add_entry(
          bobs_list,
          %{date: ~D[2023-12-19], title: "Dentist"}
        )
If all goes well, there should be a file named persist/bobs_list on the disk.
All that’s left to do is to read the data from the disk when the server is started. The first idea that comes to mind is to perform this in the init/1 callback:
def init(name) do
  todo_list = Todo.Database.get(name) || Todo.List.new()
  {:ok, {name, todo_list}}
end
Here, you try to fetch the data from the database, and you resort to the empty list if there’s nothing on disk.
While this approach would work, in general, you should be careful about possibly long-running init/1 callbacks. Recall that GenServer.start returns only after the process has been initialized. Consequently, a long-running init/1 function will cause the client (starter) process to block. In this case, a long initialization of a to-do server will block the cache process. And since the cache process is used by many clients, this can, in turn, block a larger part of the system.
Thankfully, GenServer comes with a solution to this problem, by allowing you to split the initialization into two phases: one that blocks the client process and another one that can be performed after the GenServer.start invocation in the client has finished.
To do this, init/1 must return the result in the shape of {:ok, initial_state, {:continue, some_arg}}. In this case, the following things happen:
-
The
GenServer.startinvocation in the caller process is unblocked. -
The
handle_continuecallback is invoked in the server process. The callback receives the provided argument (from the{:continue, some_arg}tuple) and the server state.
The handle_continue/2 function is the first callback invoked immediately after init/1. Therefore, it can be used as the second phase of the process initialization.
At the time handle_continue/2 is invoked, the GenServer.start invocation in the client process has already finished. Therefore, this phase of the initialization doesn’t block the client anymore, so it’s a fitting place for performing potentially longer- running initialization work, such as reading from the database. The idea can be seen in the following listing.
Listing 7.10 Two-phase initialization (persistable_todo_cache/lib/todo/server.ex)
defmodule Todo.Server do
  ...

  def init(name) do
    {:ok, {name, nil}, {:continue, :init}}                   ❶
  end

  def handle_continue(:init, {name, nil}) do
    todo_list = Todo.Database.get(name) || Todo.List.new()   ❷
    {:noreply, {name, todo_list}}
  end

  ...
end
❶ Schedules the post-init continuation
❷ Potentially long-running initialization
The execution of init/1 is kept as short as possible, and the to-do list is set to nil. There’s no point in setting it to anything else because it’s going to be overwritten in handle_continue/2, which is the first callback invoked immediately after init/2.
In any case, the to-do server now reads data from the database on creation. You can immediately test this. If you have the previous shell session open, close it, and start a new one. Then try the following:
iex(1)> {:ok, cache} = Todo.Cache.start()

iex(2)> bobs_list = Todo.Cache.server_process(cache, "bobs_list")

iex(3)> Todo.Server.entries(bobs_list, ~D[2023-12-19])
[%{date: ~D[2023-12-19], id: 1, title: "Dentist"}]
As you can see, your to-do list contains data proving that deserialization works.
7.3.3 Analyzing the system
Let’s analyze how the new version of the system works. The process interaction is presented in figure 7.2.
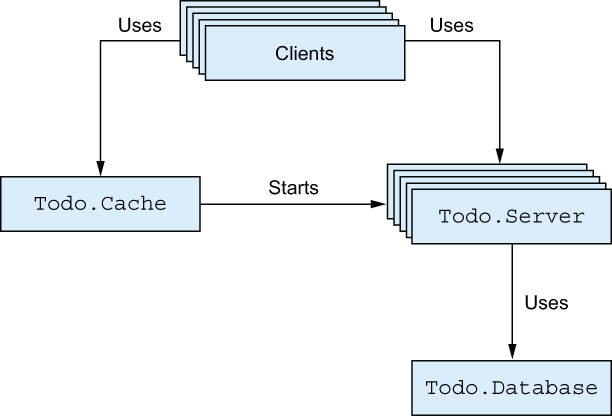
Figure 7.2 Process dependencies
You introduced just one process, but it can have a negative effect on the entire system. Recall that the database performs term encoding/decoding and, even worse, disk I/O operations.
Depending on the load and list sizes, this can negatively affect performance. Let’s recall all the places database requests are issued:
defmodule Todo.Server do
  ...

  def handle_continue(:init, {name, nil}) do
    todo_list = Todo.Database.get(name) || Todo.List.new()    ❶
    ...
  end

  ...

  def handle_cast({:add_entry, new_entry}, {name, todo_list}) do
    ...
    Todo.Database.store(name, todo_list)                      ❷
    ...
  end

  ...
end
The store request may not seem problematic from the client perspective because it’s an asynchronous cast. A client issues a store request and then goes about its business. But if requests to the database come in faster than they can be handled, the process mailbox will grow and increasingly consume memory. Ultimately, the entire system may experience significant problems, resulting in the possible termination of the BEAM OS process.
The get request can cause additional problems. It’s a synchronous call, so the to-do server waits while the database returns the response. While it’s waiting for the response, this to-do server can’t handle new messages.
It’s worth repeating that the synchronous call won’t block indefinitely. Recall that GenServer.call has a default timeout of 5 seconds, and you can configure it to be less for better responsiveness. Still, when a request times out, it isn’t removed from the receiver’s mailbox. A request is a message placed in the receiver’s mailbox. A timeout means you give up waiting on the response, but the message remains in the receiver’s mailbox and will be processed at some point.
7.3.4 Addressing the process bottleneck
There are many approaches to addressing the bottleneck introduced by the singleton database process. Here, we’ll discuss a few of them.
The simplest possible way to eliminate the process bottleneck is to bypass the process. You should ask yourself—does this need to be a process, or can it be a plain module?
There are various reasons for running a piece of code in a dedicated server process:
-
The code handles a kind of resource that can and should be reused between multiple invocations, such as a TCP connection, database connection, file handle, and so on.
-
A critical section of the code must be synchronized. Only one instance of this code may be running in any moment.
If none of these conditions are met, you probably don’t need a process and can run the code in client processes, which will completely eliminate the bottleneck and promote parallelism and scalability.
In the current code, you could, indeed, store to the file directly from the to-do server process. All operations on the same list are serialized in the same process, so there are no race conditions. But the problem with this approach is that concurrency is unbound. If you have 100,000 simultaneous clients, then you’ll issue that many concurrent I/O operations, which may negatively affect the entire system.
Handling requests concurrently
Another option is to keep the database process and make it handle database operations concurrently. This is useful when requests depend on a common state but can be handled independently. The idea is illustrated in figure 7.3.
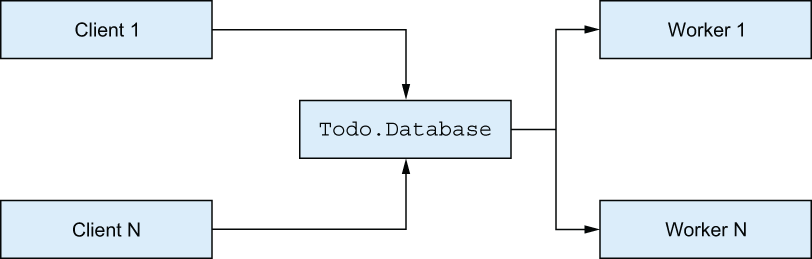
Figure 7.3 Handling requests concurrently
As you can see, each request is still serialized through the central server process, but this server process spawns one-off worker processes that perform the actual request handling. If you keep the code in the database process short and fast, you’ll get to keep a high degree of scalability with many workers running concurrently.
To implement this, you must run each database operation in a spawned, one-off process. For casts, this means transforming the body of the handler:
def handle_cast({:store, key, data}, state) do
  spawn(fn ->
    key                                           ❶
    |> file_name()                                ❶
    |> File.write!(:erlang.term_to_binary(data))  ❶
  end)

  {:noreply, state}
end
❶ Handled in a spawned process
The handler function spawns the new worker process and immediately returns. While the worker is running, the database process can accept new requests.
For synchronous calls, this approach is slightly more complicated because you must return the response from the spawned worker process:
def handle_call({:get, key}, caller, state) do
  spawn(fn ->                                   ❶
    data = case File.read(file_name(key)) do
      {:ok, contents} -> :erlang.binary_to_term(contents)
      _ -> nil
    end

    GenServer.reply(caller, data)               ❷
  end)

  {:noreply, state}                             ❸
end
❷ Responds from the spawned process
❸ No reply from the database process
The server process spawns another worker process and then returns {:noreply, state}, indicating to GenServer that you won’t reply at this point. In the meantime, the spawned process handles the request and reports back to the caller with GenServer.reply/2. This is one situation where you need to use the second argument of handle_call/3: the caller PID and the unique ID of the request. This information is used in the spawned process to send the response message to the caller.
This technique keeps the processing in the database process short, while still allowing concurrent execution of database operations. This approach has the same drawbacks as the previous idea. The concurrency is still unbound, so too many simultaneous clients might overload the disk I/O to the point where the entire system becomes unresponsive.
Limiting concurrency with pooling
A typical remedy for this problem is to introduce pooling. For example, your database process might create three worker processes and keep their PIDs in their internal state. When a request arrives, it’s delegated to one of the worker processes, perhaps in a round-robin fashion or with some other load-distribution strategy. The idea is presented in figure 7.4.
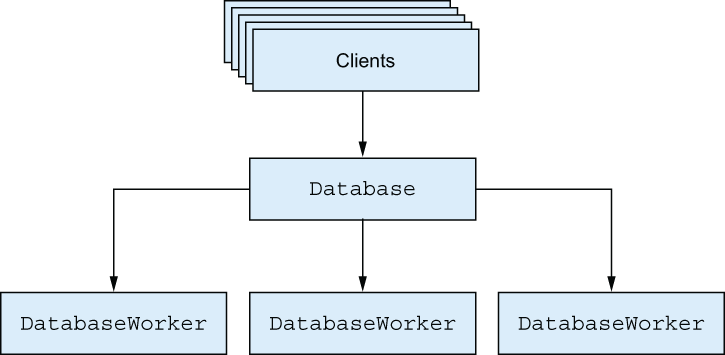
Figure 7.4 Pooling database operations
All requests still arrive at the database process first, but they’re quickly forwarded to one of the workers. Essentially, this technique keeps the concurrency level under control, and it works best when dealing with resources that can’t handle unbound concurrency.
This approach will work correctly in this example, so it’s the one you’ll use. In a different situation, some other approach might work better. The point of this analysis is to illustrate how you can think in terms of processes. Always keep in mind that multiple processes run concurrently, whereas a single process handles requests sequentially. If computations can safely run in parallel, you should consider running them in separate processes. In contrast, if an operation must be synchronized, you’ll want to run it in a single process.
7.3.5 Exercise: Pooling and synchronizing
Now, it’s time for you to practice a bit. This exercise introduces pooling and makes the database internally delegate to three workers that perform the actual database operations. Moreover, there should be per-key (to-do list name) synchronization on the database level. Data with the same key should always be treated by the same worker.
Here are some pointers for doing this:
-
Start with the existing solution, and migrate it gradually. Of the existing code, the only thing that needs to change is the
Todo.Databaseimplementation. You don’t have to touch any of the other modules. -
Introduce a
Todo.DatabaseWorkermodule. It will be almost a copy of the currentTodo.Database, but the process must not be registered under a name because you need to run multiple instances. -
Todo.DatabaseWorker.startshould receive the database folder as its argument and pass it as the second argument toGenServer.start/2. This argument is received in theinit/1callback, and it should be stored in the worker state. -
Todo.Databasewill receive a significant rewrite, but its interface must remain the same. This means it still implements a locally registered process that’s used via the functionsstart/0,get/1, andstore/2. -
During the
Todo.Databaseinitialization, start three workers and store their PIDs in a map, using zero-based indexes as keys. -
In
Todo.Database, implement a single request,choose_worker, that will return a worker’s PID for a given key. -
choose_workershould always return the same worker for the same key. The easiest way to do this is to compute the key’s numerical hash and normalize it to fall in the range [0, 2]. This can be done by calling:erlang.phash2(key, 3). -
The interface functions
getandstoreofTodo.Databaseinternally callchoose_workerto obtain the worker’s PID and then forward to interface functions ofDatabaseWorker, using the obtained PID as the first argument.
Always try to work in small steps, and test as often as possible. For example, once you implement Todo.DatabaseWorker, you can immediately start iex -S mix and try it in isolation.
The same goes for Todo.Database. First, you can initialize the state without implementing a request handler. Call IO.inspect from init/1 to verify that the state is correct. Then, implement choose_worker, and test that it works in the shell. Finally, add interface functions and test the entire system.
How can you be sure that requests for different keys are running in different processes? You can use IO.inspect and, from within the worker, print the PID and the key using something like IO.inspect "#{inspect(self())}: storing #{inspect(key)}". Use IO.inspect extensively. It’s your friend and can help you significantly during development.
If you get stuck, the complete solution is in the todo_cache_pooling folder. Make sure you understand the solution because you’ll continue extending this version in subsequent chapters.
7.4 Reasoning with processes
You’ve now seen various examples of server processes in action. The point of these examples has been to demonstrate how to reason about an involved concurrent system.
From within, a server process is a sequential program that accepts and handles requests, optionally managing internal state. From the outside, it’s a concurrent agent that exposes a well-defined communication interface.
Another way to look at server processes is to think of them as services. Each process is like a small service that’s responsible for a single task. In the to-do example, there’s a to-do server that handles a distinct to-do list. Different lists are handled by different to-do servers, which makes the system more efficient. But a single list is always handled by the same process, which eliminates race conditions and keeps consistency. The to-do cache is a service that maps to-do names to corresponding to-do servers. Finally, the database process is a service that handles database requests. Internally, it distributes the work over a limited pool of workers, making sure the same item is always handled by the same worker.
Those services (processes) are mostly independent, but in some cases, they need to cooperate. For this purpose, you can use calls and casts. Obviously, when a client needs a response, you should use calls. But even when a response isn’t needed, calls can sometimes be the better fit. The main problem with a cast is that it’s a fire-and-forget kind of request, so the caller doesn’t get any guarantees. You can’t be sure that the request has reached the target, and you most certainly don’t know about its outcome.
Essentially, both types have benefits and downsides. Casts promote system responsiveness (because a caller isn’t blocked) at the cost of reduced consistency (because a caller doesn’t know about the outcome of the request). On the other hand, calls promote consistency (i.e., a caller gets a response) but reduce system responsiveness (i.e., a caller is blocked while waiting for a response).
Finally, calls can also be used to apply back pressure to client processes. Because a call blocks a client, it prevents the client from generating too much work. The client becomes synchronized with the server and can never produce more work than the server can handle. In contrast, if you use casts, clients may overload the server, and requests may pile up in the message box and consume memory. Ultimately, you may run out of memory, and the entire system may be terminated.
Which approach is a better fit depends on the specific situation and circumstances. If you’re unsure, it’s probably better to start with a call because it’s more consistent. You can then consider switching to casts in places where you establish that calls hurt performance and system responsiveness.
Summary
-
When a system needs to perform various tasks, it’s often beneficial to run different tasks in separate processes. Doing so promotes the scalability and fault tolerance of the system.
-
A process is internally sequential and handles requests one by one. A single process can, thus, keep its state consistent, but it can also cause a performance bottleneck if it serves many clients.
-
Carefully consider calls versus casts. Calls are synchronous and, therefore, block the caller. If a response isn’t needed, casts may improve performance at the expense of reduced guarantees because a client process doesn’t know the outcome.
-
You can use Mix projects to manage projects that consist of multiple modules.