8 Fault tolerance basics
Fault tolerance is a first-class concept in BEAM. The ability to develop reliable systems that can operate even when faced with run-time errors is what brought us Erlang in the first place.
The aim of fault tolerance is to acknowledge the existence of failures, minimize their impact, and, ultimately, recover without human intervention. In a sufficiently complex system, many things can go wrong. Occasional bugs will happen, components you’re depending on may fail, and you may experience hardware failures. A system may also become overloaded and fail to cope with an increased incoming request rate. Finally, if a system is distributed, you can experience additional issues, such as a remote machine becoming unavailable, perhaps due to a crash or a broken network link.
It’s hard to predict everything that can go wrong, so it’s better to face the harsh reality that anything can fail. Regardless of which part of the system happens to fail, it shouldn’t take down the entire system; you want to be able to provide at least some service. For example, if the database server becomes unreachable, you can still serve data from the cache. You might even queue incoming store requests and try to resolve them later, when the connection to the database is reestablished.
You also must detect failures and try to recover from them. In the previous example, the system may try to reconnect to the database until it succeeds and then resume providing full service.
These are the properties of a resilient, self-healing system. Whatever goes wrong (and remember, anything can go wrong), the system should keep providing as much service as possible and fully recover as soon as possible.
Such thinking significantly changes the approach to error handling. Instead of obsessively trying to reduce the number of errors, your priority should be to minimize their effects and recover from them automatically. In a system that must run continuously, it’s better to experience many isolated errors than encounter a single error that takes down the entire system.
It’s somewhat surprising that the core tool for error handling is concurrency. In the BEAM world, two concurrent processes are completely separated; they share no memory, and a crash in one process can’t, by default, compromise the execution flow of another. Process isolation allows you to confine the negative effects of an error to a single process or a small group of related processes, which keeps most of the system functioning normally.
Of course, when a process crashes, you’ll usually want to detect this state and do something about it. In this chapter, you’ll learn the basic techniques of detecting and handling errors in a concurrent system. Then, in chapter 9, you’ll expand on this knowledge and implement fine-grained error isolation. Let’s start with a bit of theory about run-time errors.
8.1 Run-time errors
In previous chapters, I loosely mentioned that in various situations, an error is raised. One of the most common examples is a failed pattern match. If a match fails, an error is raised. Another example is a synchronous GenServer.call. If the response message doesn’t arrive in a given time interval (5 seconds by default), a run-time error happens. There are many other examples, such as invalid arithmetic operations (e.g., division by zero), invocation of a nonexistent function, and explicit error signaling.
When a run-time error happens, execution control is transferred up the call stack to the error-handling code. If you didn’t specify such code, the process where the error happened is terminated. All other processes run unaffected by default.
8.1.1 Error types
BEAM distinguishes three types of run-time errors: errors, exits, and throws. Here are some typical examples of errors:
iex(1)> 1/0                                         ❶
** (ArithmeticError) bad argument in arithmetic expression

iex(1)> Module.nonexistent_function()               ❷
** (UndefinedFunctionError) function Module.nonexistent_function/0 is
   undefined or private

iex(1)> List.first({1,2,3})                         ❸
** (FunctionClauseError) no function clause matching in List.first/2
❶ Invalid arithmetic expression
❷ Calls a nonexistent function
You can also raise your own error by using the raise/1 macro, passing an error string:
iex(1)> raise("Something went wrong")
** (RuntimeError) Something went wrong
If your function explicitly raises an error, you should append the ! character to its name. This is a convention used in Elixir standard libraries. For example, File.open! raises an error if a file can’t be opened:
iex(1)> File.open!("nonexistent_file")
** (File.Error) could not open non_existing_file: no such file or directory
In contrast, File.open (notice the lack of a !) just returns the information that the file couldn’t be opened:
iex(1)> File.open("nonexistent_file")
{:error, :enoent}
Notice that in this snippet, there’s no run-time error. File.open returns a result, which the caller can handle in some way.
Another type of a run-time error is the exit, which is used to deliberately terminate a process. To exit the current process, you can call exit/1, providing an exit reason:
iex(2)> spawn(fn ->
          exit("I'm done")                  ❶
          IO.puts("This doesn't happen")
        end)
The exit reason is an arbitrary term that describes why you’re terminating the process. As you’ll see later, it’s possible for some other process to detect a process crash and obtain this exit reason.
The final run-time error type is a throw. To issue a throw, you can call throw/1:
iex(3)> throw(:thrown_value)
** (throw) :thrown_value
The purpose of throws is to allow nonlocal returns. As you saw in chapters 3 and 4, Elixir programs are organized in many nested function calls. In particular, loops are implemented as recursions. The consequence is that there are no constructs such as break, continue, and return, which you’ve probably seen in other languages. When you’re deep in a loop, it’s not trivial to stop the loop and return a value; throws can help with this. You can throw a value and catch it up the call stack. But using throws for control flow is hacky and somewhat reminiscent of goto, and you should avoid this technique as much as possible.
8.1.2 Handling errors
It is, of course, possible to intercept any kind of run-time error (error, exit, or throw) and do something about it. The main tool for this is the try expression. Here’s how to run some code and catch errors:
try do
  ...
catch error_type, error_value ->
  ...
end
This works much like what you’ve probably seen in other languages. The code in the do block is executed, and if an error happens, execution is transferred to the catch block.
Notice that two things are specified in the catch. The error_type will contain an atom :error, :exit, or :throw, indicating the type of error that has occurred. The error_value will contain error-specific information, such as a value that was thrown or an error that was raised.
Let’s play with this a bit by writing a helper lambda to make it easier to experiment with errors:
iex(1)> try_helper = fn fun ->
          try do
            fun.()
            IO.puts("No error.")

          catch type, value ->
            IO.puts("""
              Error
                #{inspect(type)}
                #{inspect(value)}
              """)
          end
        end
This helper lambda takes a function as its argument, calls this function in a try, and reports the type of error and the corresponding value. Since the output spans multiple lines, the heredoc syntax (""") is used, which has briefly mentioned in chapter 2.
iex(2)> try_helper.(fn -> raise("Something went wrong") end)
Error
  :error                                            ❶
  %RuntimeError{message: "Something went wrong"}    ❷
Notice how the string message is wrapped in a RuntimeError struct. This is an Elixir-specific decoration done from within the raise/1 macro. If you want to raise a plain, undecorated error, you can use Erlang’s :erlang.error/1 and provide an arbitrary term. The resulting error value will be the term you’ve raised.
If you attempt to throw a value, you’ll get a different error type:
iex(3)> try_helper.(fn -> throw("Thrown value") end)
Error
  :throw
  "Thrown value"
Calling exit/1 produces a different type:
iex(4)> try_helper.(fn -> exit("I'm done") end)
Error
  :exit
  "I'm done"
Remember that in Elixir, everything is an expression that has a return value. With try, the return value is the result of the last executed expression—either from the do block or, if an error was raised, the catch block:
iex(5)> result =
          try do
            throw("Thrown value")
          catch type, value -> {type, value}
          end

iex(6)> result
{:throw, "Thrown value"}
It’s also worth noting that the type and value specified in the catch block are patterns. If you want to handle a specific type of error, you can do this by providing corresponding patterns.
For example, let’s say you want to immediately return a value from inside a deep nested loop. You could invoke the following:
throw({:result, some_result})
Then, somewhere up the call stack, you would handle this throw:
try do
  ...
catch
  :throw, {:result, x} -> x
end
In this example, you only match for a specific run-time error: a throw in the form {:result, x}. If anything else is raised, you won’t catch it, and an error will be propagated further up the call stack. If the error isn’t handled, the process terminates.
Because catch is a pattern match, multiple clauses can be specified, just as you’ve seen with case and receive expressions:
try do
  ...

catch
  type_pattern_1, error_value_1 ->
    ...

  type_pattern_2, error_value_2 ->
    ...

  ...
end
The block under the first pattern that matches a raised error is invoked, and the result of the last expression is returned.
If you want to catch anything, you can use the type, value pattern or _, _ if you’re not interested in values. These patterns will handle any error that can occur.
It’s also possible to specify code that should always be executed after the try block, regardless of whether an error was raised:
iex(7)> try do
          raise("Something went wrong")
        catch
          _,_ -> IO.puts("Error caught")
        after
          IO.puts("Cleanup code")    ❶
        end

Error caught
Cleanup code
Because it’s always executed, the after block is useful for cleaning up resources—for example, to close an open file.
It’s worth noting that the after clause doesn’t affect the result of the entire try expression. The result of try is the result of the last expression, either from the do block or from the corresponding catch block if something was caught.
There’s much more to signaling and handling run-time errors. Elixir provides some abstractions on top of this basic mechanism. You can define custom errors via a defexception macro (see https://hexdocs.pm/elixir/Kernel.xhtml#defexception/1) and handle them in a slightly more elegant fashion. The try special form also has a couple other features we haven’t discussed. You should definitely research the official try documentation (https://hexdocs.pm/elixir/Kernel.SpecialForms.xhtml#try/1) as well as the corresponding “Getting Started” section (https://elixir-lang.org/getting-started/try-catch-and-rescue.xhtml).
What I’ve presented here are the core concepts of run-time errors. All other extensions supported by Elixir eventually boil down to these concepts and have the same properties:
-
A run-time error has a type, which can be
:error,:exit, or:throw. -
A run-time error also has a value, which can be any arbitrary term.
-
If a run-time error isn’t handled, the corresponding process will terminate.
Compared to languages such as C++, C#, Java, and JavaScript, there’s much less need to catch run-time errors. A more common idiom is to let the process crash and then do something about it (usually, restart the process). This approach may seem hacky, but there’s reasoning behind it. In a complex system, most bugs are flushed out in the testing phase. The remaining bugs mostly fall into a so-called Heisenbug category—unpredictable errors that occur irregularly in special circumstances and are difficult to reproduce. The cause of such errors usually lies in corruptness of the state. Therefore, a reasonable remedy for such errors is to let the process crash and start another one.
This may help because you’re getting rid of the process state (which may be corrupt) and starting with a clean state. In many cases, doing so resolves the immediate problem. Of course, the error should be logged so that you can analyze it later and detect the root cause. But in the meantime, you can recover from an unexpected failure and continue providing service.
Don’t worry if this discussion seems vague. This approach to error handling, also known as letting it crash, will be explained in detail throughout this chapter and the next. In the following section, we’ll look at the basics of error handling in concurrent systems.
8.2 Errors in concurrent systems
Concurrency plays a central role in building fault-tolerant, BEAM-based systems. This is due to the total isolation and independence of individual processes. A crash in one process won’t affect the others (unless you explicitly want it to).
iex(1)> spawn(fn ->                       ❶
          spawn(fn ->                     ❷
            Process.sleep(1000)
            IO.puts("Process 2 finished")
          end)

          raise("Something went wrong")   ❸
        end)
❸ Raises an error from within process 1
Running this yields the following output:
17:36:20.546 [error] Process #PID<0.116.0> raised an exception    ❶
...
Process 2 finished                                                ❷
As you can see, the execution of process 2 goes on, despite the fact that process 1 crashes. Information about the crash of process 1 is printed to the screen, but the rest of the system—including process 2 and the iex shell prompt—runs normally.
Furthermore, because processes share no memory, a crash in one process won’t leave memory garbage that might corrupt another process. Therefore, by running independent actions in separate processes, you automatically ensure isolation and protection.
You already benefit from process isolation in this book’s example to-do system. Recall the current architecture, shown in figure 8.1.
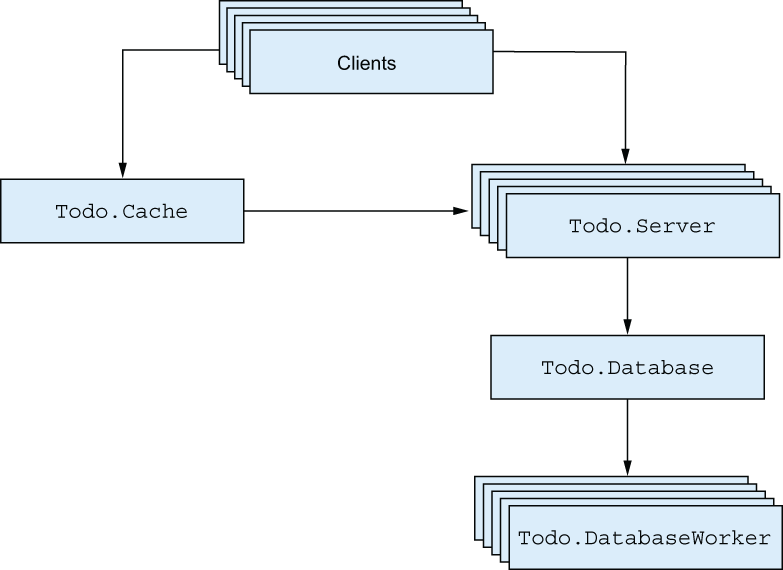
Figure 8.1 Isolating errors in the to-do system
All the boxes in the figure are BEAM processes. A crash in a single to-do server doesn’t affect operations on other to-do lists. A crash in Todo.Database doesn’t block cached reads that take place in to-do server processes.
Of course, this isolation isn’t enough by itself. As you can see in figure 8.1, processes often communicate with each other. If a process isn’t running, its clients can’t use its services. For example, if the database process goes down, the to-do servers can’t query it. What’s worse, modifications to the to-do list won’t be persisted. Obviously this isn’t desirable behavior, and you must have a way of detecting a process crash and somehow recovering from it.
8.2.1 Linking processes
A basic primitive for detecting a process crash is the concept of links. If two processes are linked, and one of them terminates, the other process receives an exit signal—a notification that a process has crashed.
An exit signal contains the PID of the crashed process and the exit reason—an arbitrary Elixir term that provides a description of why the process has terminated. In the case of a normal termination (when the spawned function has finished), the exit reason is the atom :normal. By default, when a process receives an exit signal from another process and that signal is anything other than :normal, the linked process terminates as well. In other words, when a process terminates abnormally, the linked process is also taken down.
One link connects exactly two processes and is always bidirectional. To create a link, you can use Process.link/1, which connects the current process with another process. More often, a link is created when you start a process. You can do this by using spawn_link/1, which spawns a process and links it to the current one.
Let’s verify this. In the following example, you again spawn two processes, this time linking them together. Then you take down one process:
iex(1)> spawn(fn ->
          spawn_link(fn ->       ❶
            Process.sleep(1000)
            IO.puts("Process 2 finished")
          end)

          raise("Something went wrong")
        end)
❶ Starts process 2 and links it to process 1
Unsurprisingly, this example gives the following output:
17:36:20.546 [error] Process #PID<0.116.0> raised an exception
Notice that you don’t see the output from process 2. This is because process 1 terminated abnormally, which caused an exit signal to be emitted to process 2. One process can be linked to an arbitrary number of other processes, and you can create as many links in the system as you want, as shown in figure 8.2.
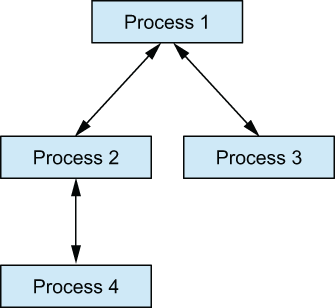
Figure 8.2 Example of links with multiple processes
This illustrates the transitive nature of process links. In this structure, the crash of a single process will emit exit signals to all of its linked processes. If the default behavior isn’t overridden, those processes will crash as well. Ultimately, the entire tree of linked processes will be taken down.
You may be puzzled by the consequences of links. Earlier, I explained how process isolation makes it possible to isolate the effect of a run-time error. Links break this isolation and propagate errors over process boundaries. You can think of a link as a communication channel for providing notifications about process terminations.
Usually, you don’t want a linked process to crash. Instead, you want to detect the process crash and do something about it. This can be done by trapping exits. When a process is trapping exits, it isn’t taken down when a linked process crashes. Instead, an exit signal is placed in the current process’s message queue, in the form of a standard message. A trapping process can receive this message and do something about the crash.
To set up an exit trap, you call Process.flag(:trap_exit, true), which makes the current process trap exit signals. Let’s look at how this works:
iex(1)> spawn(fn ->
          Process.flag(:trap_exit, true)                        ❶

          spawn_link(fn -> raise("Something went wrong") end)   ❷

          receive do                                            ❸
            msg -> IO.inspect(msg)                              ❸
          end                                                   ❸
        end)
❶ Traps exits in the current process
❸ Receives and prints the message
Here, you make the parent process trap exits and then spawn a linked process that will crash. Then you receive a message and print it to the screen. The shell session produces the following output:
{:EXIT, #PID<0.118.0>,
 {%RuntimeError{message: "Something went wrong"},
  [{:elixir_eval, :__FILE__, 1 [file: ~c”iex”, line: 4]}]}}
The general format of the exit signal message is {:EXIT, from_pid, exit_reason}, where from_pid is the pid of the crashed process, and exit_reason is an arbitrary term that describes the reason for process termination. If a process is terminated due to a throw or an error, the exit reason is a tuple in the form {reason, where}, with where containing the stack trace. Otherwise, if a process is terminated due to an exit, the reason is a term provided to exit/1.
8.2.2 Monitors
As mentioned earlier, links are always bidirectional. Most of the time, this is exactly what you need, but in some cases, unidirectional propagation of a process crash works better. Sometimes, you need to connect two processes, A and B, in such a way that process A is notified when B terminates but not the other way around. In such cases, you can use a monitor, which is something like a unidirectional link.
To monitor a process, you use Process.monitor:
monitor_ref = Process.monitor(target_pid)
This makes the current process monitor the target process. The result is a unique reference that identifies the monitor. A single process can create multiple monitors.
If the monitored process dies, your process receives a message in the {:DOWN, monitor_ref, :process, from_pid, exit_reason} format. If you want to, you can also stop the monitor by calling Process.demonitor(monitor_ref).
iex(1)> target_pid = spawn(fn ->                                ❶
          Process.sleep(1000)                                   ❶
        end)                                                    ❶

iex(2)> Process.monitor(target_pid)                             ❷

iex(3)> receive do                                              ❸
          msg -> IO.inspect(msg)                                ❸
        end                                                     ❸

{:DOWN, #Reference<0.1398266903.3291480065.256365>, :process,   ❹
  #PID<0.111.0>, :noproc}                                       ❹
❶ Spawns a process that terminates after one second
❷ Monitors the spawned process
There are two main differences between monitors and links. First, monitors are unidirectional—only the process that creates a monitor receives notifications. Additionally, unlike a link, the observer process won’t crash when the monitored process terminates. Instead, a message is sent, which you can handle or ignore.
Links, exit traps, and monitors make it possible to detect errors in a concurrent system. You can introduce a process with the responsibility of receiving links and monitoring notifications as well as doing something when other processes in the system crash. Such processes, called supervisors, are the primary tools of error recovery in concurrent systems.
8.3 Supervisors
A supervisor is a generic process that manages the life cycle of other processes in a system. A supervisor process can start other processes, which are then considered to be its children. Using links, monitors, and exit traps, a supervisor detects possible terminations of any child, and can restart it if needed.
Processes that aren’t supervisors are called workers. These are the processes that provide the actual services of the system. Your current version of the to-do system consists of only worker processes, such as the to-do cache and to-do server processes.
If any of the worker processes crashes, perhaps due to a bug, some part of your system will be gone forever. This is where supervisors can help. By running workers under a supervisor, you can ensure a failing process is restarted and the service of your system is restored.
To do that, you need at least one supervisor process in the system. In Elixir, this can be done using the Supervisor module (https://hexdocs.pm/elixir/Supervisor.xhtml). By invoking Supervisor.start_link/2, you can start the supervisor process, which then works as follows:
-
The supervisor process traps exits and then starts the child processes.
-
If, at any point in time, a child terminates, the supervisor process receives a corresponding exit message and performs corrective actions, such as restarting the crashed process.
-
If the supervisor process terminates, its children are also taken down.
There are two different ways of starting a supervisor. In a basic approach, you invoke the function Supervisor.start_link, passing it a list that describes each child to be started under the supervisor, together with some additional supervisor options. Alternatively, you can pass a module defining a callback function that returns this information. We’ll start with the basic approach and explain the second version a bit later.

Figure 8.3 Processes in the to-do system
Let’s introduce one supervisor to the to-do system. Figure 8.3 recaps these processes in the system:
-
Todo.Server—Allows multiple clients to work on a single to-do list -
Todo.Cache—Maintains a collection of to-do servers and is responsible for their creation and discovery -
Todo.DatabaseWorker—Performs read-write operations on the database -
Todo.Database—Manages a pool of database workers and forwards database requests to them
The to-do cache process is the system entry point. When you start the cache, all the needed processes are started, so the cache can be considered the root of the system. Now, we’ll introduce a new supervisor process that will supervise the to-do cache process.
8.3.1 Preparing the existing code
Before you start working with the supervisor, you’ll need to make a couple of changes to the cache. First, you’ll register the cache process. This will allow you to interact with the process without needing to know its PID.
You’ll also need to create a link while starting the to-do cache process. This is required if you want to run the process under a supervisor. Why is the supervisor using links rather than monitors? Because links work in both directions, so the termination of a supervisor means all its children will be automatically taken down. This, in turn, allows you to properly terminate any part of the system without leaving behind dangling processes. You’ll see how this works in this chapter and the next, when you work with finer-grained supervision.
Creating a link to the caller process is as simple as using GenServer.start_link in place of GenServer.start. While you’re at it, you can also rename the corresponding Todo.Cache interface function as start_link.
Finally, you’ll make the start_link function take one argument and ignore it. This seems confusing, but it makes starting a supervised process a bit easier. The reasons will be explained later, when we discuss child specifications. The changes are shown in the following listing.
Listing 8.1 Changes in the to-do cache (supervised_todo_cache/lib/todo/cache.ex)
defmodule Todo.Cache do
  use GenServer

  def start_link(_) do                                              ❶
    GenServer.start_link(__MODULE__, nil, name: __MODULE__)         ❷
  end

  def server_process(todo_list_name) do
    GenServer.call(__MODULE__, {:server_process, todo_list_name})   ❸
  end

  def init(_) do
    IO.puts("Starting to-do cache.")                                ❹
    ...
  end

  ...
end
❷ Registers under a name and links to the caller process
❸ Interface function that uses the registered name
Notice that you also call IO.puts/1 from the init/1 callback for debugging purposes. This debug expression is included in all other GenServer callback modules (Todo.Database, Todo.DatabaseWorker, and Todo.Server).
8.3.2 Starting the supervisor process
With these changes in place, you can immediately try to start the supervisor process with to-do cache as its only child. Change the current folder to supervised_todo_cache, and start the shell (iex -S mix). Now, you can start the supervisor:
iex(1)> Supervisor.start_link([Todo.Cache], strategy: :one_for_one)   ❶

Starting to-do cache.
Starting database server.
Starting database worker.
Starting database worker.
Starting database worker.
❶ Starts a supervisor and to-do cache as its child
As you can see from the console output, invoking Supervisor.start_link/2 caused the to-do cache to start. The cache process then started the database processes.
Let’s take a closer look at the invocation of Supervisor.start_link/2:
Supervisor.start_link(
  [Todo.Cache],             ❶
  strategy: :one_for_one    ❷
)
❶ List of child specifications
As the function name hints, Supervisor.start_link/2 starts a supervisor process and links it to the caller.
The first argument is the list of desired children. More precisely, each element of this list is a child specification that describes how the child should be started and managed. We’ll discuss child specifications in detail a bit later. In this simple form, the provided child specification is a module name. In this case, the child is described by some callback function in the Todo.Cache module.
When the supervisor process is started, it will go through this list and start each child according to the specification. In this example, the supervisor will invoke Todo.Cache.start_link/1. Once all the children are started, Supervisor.start_link/2 returns {:ok, supervisor_pid}.
The second argument to Supervisor.start_link/2 is the list of supervisor-specific options. The :strategy option, also known as the restart strategy, is mandatory. This option specifies how a supervisor should handle termination of its children. The one_ for_one strategy states that if a child terminates, another child should be started in its place. There are a couple of other strategies (e.g., “Restart all children if a single child crashes”), and we’ll discuss them in chapter 9.
Note The term restart is used casually here. Technically, a process can’t be restarted. It can only be terminated; then, another process, powered by the same module, can be started in its place. The new process has a different PID and doesn’t share any state with the old one.
In any case, after Supervisor.start_link/2 returns, all the required processes in the system are running, and you can interact with the system. For example, you can start one to-do server:
iex(2)> bobs_list = Todo.Cache.server_process("Bob's list")
Starting to-do server for Bob's list.
#PID<0.161.0>
The cache process is started as the child of the supervisor process, so we say that it’s supervised. This means that if the cache process crashes, its supervisor will restart it.
You can quickly verify this by provoking a crash of the cache process. First, you need to get the PID of the cache. As mentioned, the cache is now registered under a name (its own module name), so getting its PID is easily done with the help of Process.whereis/1:
iex(3)> cache_pid = Process.whereis(Todo.Cache)
#PID<0.155.0>
Now, you can kill the process using the Process.exit/2 function, which accepts a PID and the exit reason and then sends the corresponding exit signal to the given process. The exit reason can be an arbitrary term. Here, you’ll use the atom :kill, which is treated in a special way. The exit reason :kill ensures that the target process is unconditionally taken down, even if the process is trapping exits. Let’s see it in action:
iex(4)> Process.exit(cache_pid, :kill)
Starting to-do cache.
As you can see from the output, the process is immediately restarted. You can also prove that the to-do cache is now a process with a different PID:
iex(5)> Process.whereis(Todo.Cache)
#PID<0.164.0>
And you can use the new process, just as you did the old one:
iex(6)> bobs_list = Todo.Cache.server_process("Bob's list")
Starting to-do server for Bob's list.
#PID<0.167.0>
This brief experiment proves some basic fault-tolerance capabilities. After the crash, the system healed itself and resumed the full service.
8.3.3 Child specification
To manage a child process, a supervisor needs some information, such as answers to the following questions:
These pieces of information are collectively called the child specification. Recall that when invoking Supervisor.start_link/2, you sent a list of child specifications. In its basic shape, a specification is a map with a couple of fields configuring the properties of the child.
For example, here’s what the specification for the to-do cache could look like:
%{
  id: Todo.Cache,                            ❶
  start: {Todo.Cache, :start_link, [nil]},   ❷
}
The :id field is an arbitrary term that’s used to distinguish this child from any other child of the same supervisor.
The :start field is a triplet in the shape of {module, start_function, list_of_ arguments}. When starting the child, the generic supervisor code will use apply(module, start_function, list_of_arguments) to invoke the function described by this tuple. The invoked function must start and link the process.
There are some other fields you can omit from the specification—in which case, some sensible defaults are chosen. We’ll discuss some of them later, in chapter 9. You can also refer to the official documentation at https://hexdocs.pm/elixir/Supervisor.xhtml#module-child-specification for more details.
In any case, you can pass the specification map directly to Supervisor.start_link. Here’s an example:
Supervisor.start_link(
  [
    %{
      id: Todo.Cache,
      start: {Todo.Cache, :start_link, [nil]}
    }
  ],
  strategy: :one_for_one
)
This will instruct the supervisor to invoke Todo.Cache.start_link(nil) to start the child. Recall that you changed Todo.Cache.start_link to take one argument (which is ignored), so you need to pass some value (nil, in this example).
One problem with this approach is that it’s error prone. If something changes in the implementation of the cache, such as the signature of the start function, you need to remember to adapt the specification in the code starting the supervisor.
To address this issue, Supervisor allows you to pass a tuple {module_name, arg} in the child specification list. In this case, Supervisor will first invoke module_name .child_spec(arg) to get the actual specification. This function must return the specification map. The supervisor then proceeds to start the child according to the returned specification.
The Todo.Cache module already has child_spec/1 defined, even though you didn’t write it yourself. The default implementation is injected by use GenServer. Therefore, you can also start the supervisor in the following way:
Supervisor.start_link(
  [{Todo.Cache, nil}],
  strategy: :one_for_one
)
As a consequence, Supervisor will invoke Todo.Cache.child_spec(nil) and start the child according to the returned specification. It’s easy to verify what the injected implementation of child_spec/1 returns:
iex(1)> Todo.Cache.child_spec(nil)
%{id: Todo.Cache, start: {Todo.Cache, :start_link, [nil]}}
In other words, the generated child_spec/1 returns a specification that invokes the module’s start_link/1 function with the argument passed to child_spec/1. This is precisely why you made Todo.Cache.start_link take one argument, even though the argument is ignored:
defmodule Todo.Cache do
  use GenServer            ❶

  def start_link(_) do     ❷
    ...
  end

  ...
end
❶ Generates the default child_spec/1
❷ Conforms to the default child_spec/1
By doing this, you made Todo.Cache compatible with the generated child_spec/1, which means you can include Todo.Cache in the list of children without needing to do any extra work.
If you don’t like that approach, you can provide some options to use GenServer to tweak the output of the generated child_spec/1. Refer to the official documentation (https://hexdocs.pm/elixir/GenServer.xhtml#module-how-to-supervise) for more details. If you need even more control, you can simply define child_spec/1 yourself, which will override the default implementation.
Finally, if you don’t care about the argument passed to child_spec/1, you can include just the module name in the child specification list. In this case, Supervisor will pass the empty list [] to child_spec/1. Therefore, you can also start Todo.Cache like this:
Supervisor.start_link(
  [Todo.Cache],
  strategy: :one_for_one
)
Before going further, let’s recap how supervisor starting works. When you invoke Supervisor.start_link(child_specs, options), the following happens:
-
The new process is started, powered by the
Supervisormodule. -
The supervisor process goes through the list of child specifications and starts each child, one by one.
-
Each specification is resolved, if needed, by invoking
child_spec/1from the corresponding module. -
The supervisor starts the child process according to the
:startfield of the child specification.
8.3.4 Wrapping the supervisor
So far, you’ve played with the supervisor in the shell. But in real life, you’ll want to work with supervisor in the code. Just like with GenServer, it’s advised to wrap the Supervisor in a module.
The following listing implements the module for your first supervisor.
Listing 8.2 To-do system supervisor (supervised_todo_cache/lib/todo/system.ex)
defmodule Todo.System do
  def start_link do
    Supervisor.start_link(
      [Todo.Cache],
      strategy: :one_for_one
    )
  end
end
With this simple addition, starting the whole system becomes easy:
$ iex -S mix

iex(1)> Todo.System.start_link()

Starting to-do cache.
Starting database server.
Starting database worker.
Starting database worker.
Starting database worker.
The name Todo.System is chosen to describe the purpose of the module. By invoking Todo.System.start_link(), you start the entire to-do system with all the required services, such as the cache and database.
8.3.5 Using a callback module
Another way of starting a supervisor is by providing a callback module. This works similarly to GenServer. You develop the module that must implement the init/1 function. This function must return the list of child specifications and additional supervisor options, such as its strategy.
Here’s how you could rewrite Todo.System to use this approach:
defmodule Todo.System do
  use Supervisor                                           ❶

  def start_link do
    Supervisor.start_link(__MODULE__, nil)                 ❷
  end

  def init(_) do                                           ❸
    Supervisor.init([Todo.Cache], strategy: :one_for_one)  ❸
  end                                                      ❸
end
❶ Includes some common boilerplate
❷ Starts the supervisor with Todo.System as the callback module
❸ Implements the required callback function
As with GenServer, you start with use Supervisor to get some common boilerplate in your module.
The crucial part happens when you invoke Supervisor.start_link/2. Instead of the list of child specifications, you’re now passing the callback module. In this case, the supervisor process will invoke the init/1 function to provide the supervisor specification. The argument passed to init/1 is the second argument you pass to Supervisor .start_link/2. Finally, in init/1, you describe the supervisor with the help of the Supervisor .init/2 function, passing it the list of children and the supervisor options.
The preceding code is a more elaborate equivalent of Supervisor.start_ link([Todo.Cache], strategy: :one_for_one). Clearly, you need more lines of code to get the same effect. On the upside, this approach gives you more control. For example, if you need to perform some extra initialization before starting the children, you can do it in init/1. Moreover, the callback module is more flexible with respect to hot-code reloading, allowing you to modify the list of children without needing to restart the entire supervisor.
In most cases, the simple approach of passing the list of child specifications directly will be sufficient. Moreover, as you’ve seen in the preceding examples, if you wrap the use of Supervisor in a dedicated module, it’s easy to switch from one approach to the other. Therefore, in this book, you’ll exclusively use the simple approach without a callback module.
8.3.6 Linking all processes
At this point, you’re supervising the to-do cache process, so you get some basic fault tolerance. If the cache process crashes, a new process is started, and the system can resume providing the service.
However, there’s a problem in your current implementation. When the supervisor restarts the to-do cache, you’ll get a completely separate process hierarchy, and there will be a new set of to-do server processes that are in no way related to the previous ones. The previous to-do servers will be unused garbage that’s still running and consuming both memory and CPU resources.
Let’s demonstrate this issue. First, start the system and request one to-do server:
iex(1)> Todo.System.start_link()

iex(2)> Todo.Cache.server_process("Bob's list")
Starting to-do server for Bob's list.
#PID<0.159.0>
A cached to-do server isn’t started on subsequent requests:
iex(3)> Todo.Cache.server_process("Bob's list")
#PID<0.159.0>
Check the number of running processes:
iex(4)> length(Process.list())
71
Now, terminate the to-do cache:
iex(5)> Process.exit(Process.whereis(Todo.Cache), :kill)
Starting to-do cache.
Finally, request a to-do server for Bob’s list:
iex(6)> Todo.Cache.server_process("Bob's list")
Starting to-do server for Bob's list.
#PID<0.165.0>
As you can see, after you restart the to-do cache, retrieving a previously fetched server creates a new process. This isn’t surprising because you killed the previous cache process, which also destroyed the process state.
When a process terminates, its state is released, and the new process starts with the fresh state. If you want to preserve the state, you must handle it yourself; we’ll discuss this in chapter 9.
After the cache process is restarted, you have a completely new process that has no notion of what was previously cached. At the same time, your old cache structure (to-do servers) isn’t cleaned up. You can see this by rechecking the number of running processes:
iex(7)> length(Process.list())
72
You have one additional process, which is the previously started to-do server for Bob’s list. This obviously isn’t good. Terminating a to-do cache destroys its state, so you should also take down all existing to-do servers. This way, you ensure proper process termination.
To do this, you must establish links between processes. Each to-do server must be linked to the cache. Going further, you’ll also link the database server to the to-do cache and the database workers to the database server. This will effectively ensure the entire structure is linked, as illustrated in figure 8.4.
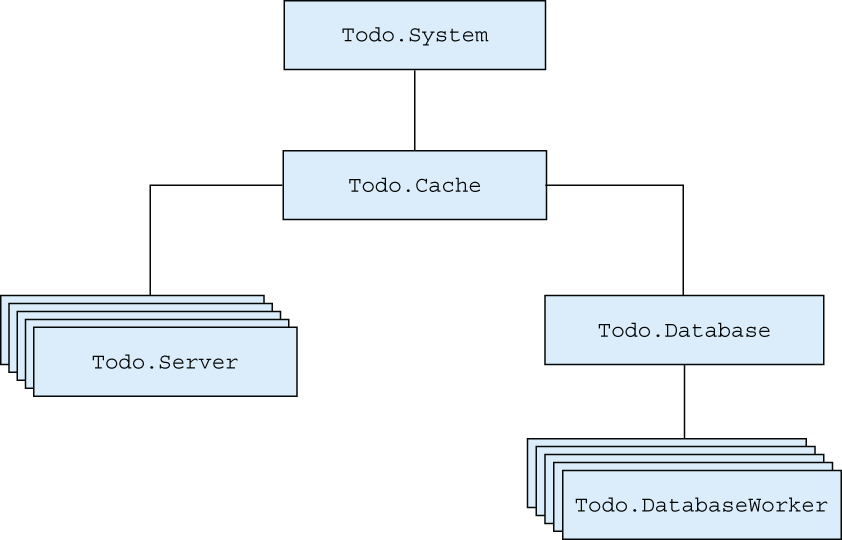
Figure 8.4 Linking all processes in the to-do system
By linking a group of interdependent processes, you can ensure that the crash of one process takes down its dependencies as well. Regardless of which process crashes, links ensure the entire structure is terminated. Because this will lead to the termination of the cache process, it will be noticed by the supervisor, which will start a new system.
With this approach, you can detect an error in any part of the system and recover from it without leaving dangling processes behind. On the downside, you’re allowing errors to have a wide impact. An error in a single database worker or to-do server will take down the entire structure. This is far from perfect, and you’ll make improvements in chapter 9.
For now, let’s stick with this simple approach and implement the required code. In your present system, you have a to-do supervisor that starts and supervises the cache. You must ensure that the cache is directly or indirectly linked to all other worker processes.
The change is simple. All you need to do is switch from start to start_link for all the processes in the project. In the corresponding modules, you currently have something like this:
def start(...) do
  GenServer.start(...)
end
This snippet must be transformed into the following:
def start_link(...) do
  GenServer.start_link(...)
end
And, of course, every module.start invocation must be replaced with module .start_link. These changes are mechanical, and the code isn’t presented here. The complete solution resides in the todo_links folder.
Let’s see how the new system works:
iex(1)> Todo.System.start_link()

iex(2)> Todo.Cache.server_process("Bob's list")
Starting to-do server for Bob's list.

iex(3)> length(Process.list())
71

iex(4)> Process.exit(Process.whereis(Todo.Cache), :kill)     ❶

iex(5)> bobs_list = Todo.Cache.server_process("Bob's list")
Starting to-do server for Bob's list.

iex(6)> length(Process.list())
71                                                           ❷
❶ Terminates the entire process structure
❷ The process count remains the same.
When you crash a process, the entire structure is terminated, and a new process starts in its place. Links ensure that dependent processes are terminated as well, which keeps the system consistent.
8.3.7 Restart frequency
It’s important to keep in mind that a supervisor won’t restart a child process forever. The supervisor relies on the maximum restart frequency, which defines how many restarts are allowed in a given time period. By default, the maximum restart frequency is three restarts in 5 seconds. You can change these parameters by passing :max_restarts and :max_seconds options to Supervisor.start_link/2. If this frequency is exceeded, the supervisor gives up and terminates itself together with all of its children.
Let’s verify this in the shell. First, start the supervisor:
iex(1)> Todo.System.start_link()
Starting the to-do cache.
Now, you need to perform frequent restarts of the to-do cache process:
iex(1)> for _ <- 1..4 do
          Process.exit(Process.whereis(Todo.Cache), :kill)
          Process.sleep(200)
        end
Here, you terminate the cache process and sleep for a short while, allowing the supervisor to restart the process. This is done four times, meaning that in the last iteration, you’ll exceed the default maximum restart frequency (three restarts in 5 seconds).
Starting the to-do cache.                 ❶
Starting database server.                 ❶
...                                       ❶

** (EXIT from #PID<0.149.0>) :shutdown    ❷
After the maximum restart frequency was exceeded, the supervisor gave up and terminated, taking down the child processes as well.
You may wonder about the reason for this mechanism. When a critical process in the system crashes, its supervisor tries to bring it back online by starting a new process. If this doesn’t help, there’s no point in infinite restarting. If too many restarts occur in a given time interval, it’s clear that the problem can’t be fixed. In this case, the only sensible thing a supervisor can do is give up and terminate itself, which also terminates all of its children.
This mechanism plays an important role in so-called supervision trees, where supervisors and workers are organized in a deeper hierarchy that allows you to control how the system recovers from errors. This will be thoroughly explained in the next chapter, where you’ll build a fine-grained supervision tree.
Summary
-
There are three types of run-time errors: throws, errors, and exits.
-
When a run-time error occurs, execution moves up the stack to the corresponding
tryblock. If an error isn’t handled, a process will crash. -
Process termination can be detected in another process. To do this, you can use links or monitors.
-
Links are bidirectional—a crash of either process is propagated to the other process.
-
By default, when a process terminates abnormally, all processes linked to it terminate as well. By trapping exits, you can react to the crash of a linked process and do something about it.
-
A supervisor is a process that manages the life cycle of other processes. It can start, supervise, and restart crashed processes.
-
The
Supervisormodule is used to start supervisors and work with them. -
A supervisor is defined by the list of child specifications and the supervision strategy. You can provide these as the arguments to
Supervisor.start_link/2, or you can implement a callback module.