10 Beyond GenServer
Chapters 8 and 9 introduced the distinction between worker and supervisor processes. Workers are the processes that provide some part of your service, whereas supervisors organize the worker processes into a tree. This allows you to start and stop processes in the desired order as well as to restart critical processes if they fail.
As was mentioned in section 9.1.6, all processes started directly from a supervisor should be OTP-compliant processes. Processes started with plain spawn and spawn_link are not OTP compliant, so you should refrain from running such processes in production. Modules such as Supervisor, GenServer, and Registry allow you to start OTP-compliant processes that can be placed into a supervision tree.
In this chapter, you’ll learn about two additional modules that also allow you to run OTP-compliant workers: Task and Agent. Tasks can be very useful when you need to run one-off jobs, whereas agents can be used to manage state and provide concurrent access to it. Finally, we’ll discuss a related feature called ETS tables, which, under some conditions, can serve as more efficient alternatives to GenServer and Agent. There’s a lot of new ground to cover, so let’s start by discussing tasks.
10.1 Tasks
The Task module can be used to concurrently run a job—a process that takes some input, performs some computation, and then stops. In this sense, task-powered processes have a different flow than server processes. Whereas a GenServer process acts as a long-running server, a Task-powered process starts its work immediately, doesn’t serve requests, and stops when the work is done.
The Task module can be used in two different ways, depending on whether the task process needs to send a result back to the process that started it or not. The former case is also called an awaited task because the starter process waits for the task to send the result back. Let’s discuss this option first.
10.1.1 Awaited tasks
An awaited task is a process that executes some function, sends the function result back to the starter process, and then terminates. Let’s look at a basic example.
Suppose you want to start a concurrent, possibly long-running, job and get its result back. You can simulate a long-running job with the following function:
iex(1)> long_job =
          fn ->
            Process.sleep(2000)
            :some_result
          end
This lambda, when invoked, sleeps for 2 seconds and then returns :some_result.
To run this lambda concurrently, you can use Task.async/1:
iex(2)> task = Task.async(long_job)
The Task.async/1 function takes a zero-arity lambda, spawns a separate process, and invokes the lambda in the spawned process. The return value of the lambda will be sent as a message back to the starter process.
Because the computation runs in a separate process, Task.async/1 returns immediately, even if the lambda itself takes a long time to finish. This means the starter process isn’t blocked and can perform some additional work concurrently with the task process.
The return value of Task.async/1 is a struct that describes the running tasks. This struct can be passed to Task.await/1 to await the result of the task:
iex(3)> Task.await(task)
:some_result
The function Task.await/1 waits for the response message from the task process. This message will contain the result of the lambda. When the message arrives, Task.await/1 returns the lambda’s result. If the message doesn’t arrive within 5 seconds, Task.await/1 will raise an exception. You can provide a different timeout as the second parameter to Task.await/2.
Awaited tasks can be very useful when you need to run a couple of mutually independent, one-off computations and wait for all the results. To illustrate this, we’ll reuse the example from section 5.2.2. In that example, you needed to execute multiple independent queries and collect all the results. Because queries are mutually independent, you can improve the total execution time by running each query in a separate process and sending the result as a message to the starter process. The starter process then needs to await all the results.
Back in chapter 5, you implemented this from scratch, using spawn, send, and receive. Here, you’ll rely on Task.async/1 and Task.await/1.
First, define a helper lambda that simulates a long-running query execution:
iex(1)> run_query =
          fn query_def ->
            Process.sleep(2000)
            "#{query_def} result"
          end
Now, you can start five queries, each in a separate task:
iex(2)> queries = 1..5

iex(3)> tasks =
          Enum.map(
            queries,
            &Task.async(fn -> run_query.("query #{&1}") end)
          )
Here, you create five queries, and then start each query execution in a separate task. The result in the tasks variable is a list of five %Task{} structs, each describing one task executing a query.
To wait for all the results, you pass each task from the tasks variable to the Task.await/1 function:
iex(4)> Enum.map(tasks, &Task.await/1)
["query 1 result", "query 2 result", "query 3 result", "query 4 result",
 "query 5 result"]
Using the pipe operator, you can write this code in a slightly shorter way:
iex(5)> 1..5
        |> Enum.map(&Task.async(fn -> run_query.("query #{&1}") end))
        |> Enum.map(&Task.await/1)

["query 1 result", "query 2 result", "query 3 result", "query 4 result",
 "query 5 result"]      ❶
The fact that all the results are collected in 2 seconds proves each task is running in a separate process.
This code waits for the tasks using the order in which the tasks were started. Therefore, the result ordering is deterministic. The first element of the result list is the result of query 1, the second element is the result of query 2, and so on.
It should be noted that Task.async/1 links the new task to the starter process. Therefore, if any task process crashes, the starter process will crash too (unless it’s trapping exits). The crash of the starter process will, in turn, cause all the other tasks started by the same process to crash. In other words, starting multiple tasks with Task.async/1 has all-or-nothing semantics. The crash of a single task takes down all other tasks as well as the starter process.
If you want to explicitly handle failures of individual tasks, you’ll need to trap exits and handle corresponding exit messages in the starter process. There are some functions available in the Task module that can help you here, most notably Task.async_stream/3. You can refer to the official documentation at https://hexdocs.pm/elixir/Task.xhtml for more details. In the meantime, let’s take a look at how you can work with tasks when the starter process doesn’t need to wait for their results.
10.1.2 Non-awaited tasks
If you don’t want to send a result message back to the starter process, you can use Task.start_link/1. This function can be thought of as an OTP-compliant wrapper around plain spawn_link. The function starts a separate process and links it to the caller. Then, the provided lambda is executed in the started process. Once the lambda finishes, the process terminates with the reason :normal. Unlike Task.async/1, Task.start_link/1 won’t send any message to the starter process. Here’s a basic example:
iex(1)> Task.start_link(fn ->
          Process.sleep(1000)
          IO.puts("Hello from task")
        end)

{:ok, #PID<0.89.0>}   ❶

Hello from task!      ❷
Let’s look at a more concrete example. Suppose you want to gather some metrics about your system and report them at regular intervals. This is an example of a non-responsive job. You don’t really need a GenServer here because you don’t need to serve requests from other client processes. Instead, you want a process that sleeps for a while and then gathers relevant metrics and reports them.
Let’s start implementing this in your to-do system. First, you’ll implement a sequential loop that periodically gathers metrics and prints them to the screen.
Listing 10.1 Reporting system metrics (todo_metrics/lib/todo/metrics.ex)
defmodule Todo.Metrics do
  ...

  defp loop() do
    Process.sleep(:timer.seconds(10))
    IO.inspect(collect_metrics())
    loop()
  end

  defp collect_metrics() do
    [
      memory_usage: :erlang.memory(:total),
      process_count: :erlang.system_info(:process_count)
    ]
  end
end
In real life, you’d likely want to collect much more data and send it to an external service, but this example keeps things simple.
You want to run this loop as a part of your system. To do this, you need to start a task.
Listing 10.2 Metrics reporter as task (todo_metrics/lib/todo/metrics.ex)
defmodule Todo.Metrics do
  use Task

  def start_link(_arg), do: Task.start_link(&loop/0)

  ...
end
First, you specify use Task, which will inject the child_spec/1 function into the Todo.Metrics module. As with GenServer, the injected specification will invoke start_link/1, so you need to define start_link/1, even if you don’t use the argument. The implementation of start_link/1 simply invokes Task.start_link/1 to start a task process where the loop is running.
With these two simple lines of code, the Todo.Metrics module is ready to be injected into the supervision tree.
Listing 10.3 Starting a supervised metrics task (todo_metrics/lib/todo/system.ex)
defmodule Todo.System do
  def start_link do
    Supervisor.start_link(
      [
        Todo.Metrics,
        ...
      ],
      strategy: :one_for_one
    )
  end
end
This is the main purpose of Task.start_link/1—it allows you to start an OTP-compliant process that you can safely run as a child of some supervisor.
$ iex -S mix

iex(1)> Todo.System.start_link()

[memory_usage: 48110864, process_count: 74]   ❶
[memory_usage: 48505592, process_count: 74]   ❷
This was a simple way of implementing a periodic job in your system, without needing to run multiple OS processes and use external schedulers such as cron.
In more complex scenarios, it’s worth separating scheduling from the job logic. The idea is to use one process for periodic scheduling and then start each job instance in a separate one-off process. Such an approach improves fault-tolerance because the crash of a job process won’t disturb the scheduling process. You can try to implement this approach as an exercise, but when it comes to production, it’s better to rely on battle-tested, third-party libraries, such as Quantum (https://github.com/quantum-elixir/quantum-core).
10.1.3 Supervising dynamic tasks
In many situations, you’ll want to start non-awaited tasks dynamically. A common example is when you need to communicate with a remote service, such as a payment gateway, while handling a web request.
A naive approach would be to perform this communication synchronously, while the request is being handled. However, this approach can lead to poor user experience. If there are some intermittent networking issues, communicating with a remote service might be slow, or it might completely fail.
A better approach is to perform this communication asynchronously, from a separate task process. You accept the incoming request, start a task that communicates with the remote service, and immediately respond that the request has been accepted. Once the task is done, you issue a notification about the outcome, perhaps via WebSocket or an email. This improves system responsiveness and enhances system resilience to various networking issues. You could retry the failed communication over a longer period of time, without needing to block the request handler—or even keep the user connected.
This is an example of a dynamically started independent task. The task is started on demand, and its life cycle must be decoupled from the life cycle of the process that started it (the process that handles the incoming request).
In such situations, it’s best to run the task under a dedicated supervisor. You could use DynamicSupervisor for this purpose, but Elixir includes a task-specific wrapper around it called Task.Supervisor (https://hexdocs.pm/elixir/Task.Supervisor.xhtml).
To run dynamically supervised tasks, start the task supervisor:
iex(1)> Task.Supervisor.start_link(name: MyTaskSupervisor)
Now, you can use Task.Supervisor.start_child/2 to start a task under that supervisor:
iex(2)> Task.Supervisor.start_child(
          MyTaskSupervisor,
          fn ->
            IO.puts("Task started")
            Process.sleep(2000)
            IO.puts("Task stopping")
          end
        )

{:ok, #PID<0.118.0>}   ❶

Task started           ❷
Task stopping          ❸
It’s important to understand the distinction between the logical and the actual starter process. The shell process is the process that initiated task creation. However, the task is actually started as a child of the task supervisor. As a result of this process structure, the life cycles of the logical starter (the iex shell process) and the task are separated. A crash of one process won’t affect the other.
This concludes our brief tour of tasks. We haven’t covered all the nuances, so I advise you to study the official module documentation in more detail at https://hexdocs.pm/elixir/Task.xhtml. Next, we’ll take a look at agents.
10.2 Agents
The Agent module provides an abstraction that’s similar to GenServer. Agents require a bit less ceremony and can, therefore, eliminate some boilerplate associated with GenServer. On the flip side, Agent doesn’t support all the scenarios that GenServer does. If a GenServer implements only init/1, handle_cast/2, and handle_call/3, it can be replaced with an Agent. But if you need to use handle_info/2 or terminate/1, Agent won’t suffice, and you’ll need to use GenServer. Let’s explore this further, starting with the basic use of agents.
10.2.1 Basic use
To start an agent, you can use Agent.start_link/1:
iex(1)> {:ok, pid} = Agent.start_link(fn -> %{name: "Bob", age: 30} end)
Agent.start_link/1 will start a new process and execute the provided lambda in that process. Unlike a task, an agent process doesn’t terminate when the lambda is finished. Instead, an agent uses the return value of the lambda as its state. Other processes can access and manipulate an agent’s state using various functions from the Agent module.
To fetch the agent’s state, or some part of it, you can use Agent.get/2:
iex(2)> Agent.get(pid, fn state -> state.name end)
"Bob"
Agent.get/2 takes the PID of the agent and a lambda. The lambda is invoked in the agent’s process, and it receives the agent’s state as the argument. The return value of the lambda is sent back to the caller process as a message. This message is received in Agent.get/2, which then returns the result to its caller.
To modify the agent’s state, you can use Agent.update/2:
iex(3)> Agent.update(pid, fn state -> %{state | age: state.age + 1} end)
:ok
This will cause the internal state of the agent process to change. You can verify the change with Agent.get/2:
iex(2)> Agent.get(pid, fn state -> state end)
%{age: 31, name: "Bob"}
It’s worth mentioning that Agent.update/2 is synchronous. The function only returns after the update has succeeded. An asynchronous update can be performed with Agent.cast/2.
There are some other functions available in the Agent module, so you’re advised to study the official documentation at https://hexdocs.pm/elixir/Agent.xhtml. In the meantime, let’s discuss how agents work in a concurrent setting.
10.2.2 Agents and concurrency
A single agent, being a process, can be used by multiple client processes. A change made by one process can be observed by other processes in subsequent agent operations. Let’s demonstrate this.
You’ll start an agent that’s used as a counter:
iex(1)> {:ok, counter} = Agent.start_link(fn -> 0 end)
The initial state of the agent is 0. Now, manipulate the agent’s state from another process:
iex(2)> spawn(fn -> Agent.update(counter, fn count -> count + 1 end) end)
Finally, let’s check the agent’s state from the shell process:
iex(3)> Agent.get(counter, fn count -> count end)
1
This example demonstrates that the state is associated with the agent process. When one client process changes the state of the agent, subsequent operations issued by other processes will see the new state.
An agent process works exactly like a GenServer. If multiple clients try to work with the same agent at the same time, the operations will be serialized and executed one by one. In fact, the Agent module is implemented in plain Elixir on top of GenServer. To demystify this, let’s sketch a naive implementation of an Agent-like module.
Here’s how you can implement the agent-like state initialization:
defmodule MyAgent do
  use GenServer                                   ❶

  def start_link(init_fun) do
    GenServer.start_link(__MODULE__, init_fun)    ❷
  end

  def init(init_fun) do
    {:ok, init_fun.()}                            ❸
  end

  ...
end
❶ Agent is implemented with GenServer.
❷ Passes the lambda as the argument to the server
❸ Invokes the lambda and uses its result as the server’s state
Recall from chapter 5 that any term can be sent as a message. This includes anonymous functions, and the agent implementation takes advantage of that fact. Agent interface functions take an anonymous function as an argument and pass the function to the server process, which, in turn, invokes the function and does something with its result.
The same approach is used to provide get and update operations:
defmodule MyAgent do
  ...

  def get(pid, fun) do
    GenServer.call(pid, {:get, fun})
  end

  def update(pid, fun) do
    GenServer.call(pid, {:update, fun})
  end

  def handle_call({:get, fun}, _from, state) do
    response = fun.(state)
   {:reply, response, state}
  end

  def handle_call({:update, fun}, _from, state) do
    new_state = fun.(state)
    {:reply, :ok, new_state}
  end

  ...
end
The real implementation of the Agent module is more sophisticated and feature rich, but the basic idea is the same as in the preceding example. The Agent module is a plain GenServer that can be controlled by sending lambdas to the process. Therefore, concurrent reasoning about agents is exactly the same as with GenServer.
10.2.3 Agent-powered to-do server
Because Agent can be used to manage concurrent state, it’s a perfect candidate to power your to-do list server. Converting a GenServer into an agent is a fairly straightforward job. You need to replace a pair of interface functions and the corresponding GenServer callback clause with a single function that uses the Agent API.
The full code of the Todo.Server as an agent is provided in the following listing.
Listing 10.4 Agent-powered to-do server (todo_agent/lib/todo/server.ex)
defmodule Todo.Server do
  use Agent, restart: :temporary

  def start_link(name) do
    Agent.start_link(
      fn ->
        IO.puts("Starting to-do server for #{name}")
        {name, Todo.Database.get(name) || Todo.List.new()}
      end,
      name: via_tuple(name)
    )
  end

  def add_entry(todo_server, new_entry) do
    Agent.cast(todo_server, fn {name, todo_list} ->
      new_list = Todo.List.add_entry(todo_list, new_entry)
      Todo.Database.store(name, new_list)
      {name, new_list}
    end)
  end

  def entries(todo_server, date) do
    Agent.get(
      todo_server,
      fn {_name, todo_list} -> Todo.List.entries(todo_list, date) end
    )
  end

  defp via_tuple(name) do
    Todo.ProcessRegistry.via_tuple({__MODULE__, name})
  end
 end
It’s worth noting that the interface of the module remains unchanged, so there’s no need to modify the code of any other module.
There are two things worth discussing in this code. The first is the expression use Agent at the start of the module. Just like with GenServer and Task, this expression will inject the default implementation of child_spec/1, allowing you to list the module in a child specification list.
In addition, the implementation of add_entry/2 uses Agent.cast/2. This function is the asynchronous version of Agent.update/2, which means the function returns immediately and the update is performed concurrently. Agent.cast/2 is used here to keep the same behavior as in the previous version, where GenServer.cast/2 was used.
The new version of Todo.Server requires only 29 lines of code, which is somewhat shorter than the previous 41 lines of code in the GenServer. An agent definitely seems like an appealing alternative to GenServer.
But agents can’t handle all the scenarios GenServer can, so they’re not always appropriate. In the next section, we’ll take a look at those limitations.
10.2.4 Limitations of agents
The Agent module can’t be used if you need to handle plain messages or if you want to run some logic on termination. In such cases, you need to use GenServer. Let’s look at an example.
In the current version of your system, you never expire items from the to-do cache. This means that when a user manipulates a single to-do list, the list will remain in memory until the system is terminated. This is clearly not good because as users work with different to-do lists, you’ll consume more and more memory until the whole system runs out of memory and blows up.
Let’s introduce a simple expiry of to-do servers. You’ll stop to-do servers that have been idle for a while.
One way to implement this is to create a single cleaning process that would terminate an idle to-do server. In this approach, each to-do server would need to notify the cleaning process every time it’s been used, and that would cause the cleaning process to become a possible bottleneck. You’d end up with one process that needs to handle the possibility of a high load of messages from many other processes, and it might not be able to keep up.
A better approach is to make each to-do server decide on its own when it wants to terminate. This will simplify the logic and avoid any performance bottlenecks. This is an example of something that can be done with GenServer but can’t be implemented with Agent.
An idle period in a GenServer can be detected in a few ways, and here you’ll use a simple approach. In values returned from GenServer callbacks, you can include one extra element at the end of the return tuple. This element, if it’s an integer, represents an idle time after which the timeout message is sent to the GenServer process.
For example, in init/1, instead of returning {:ok, initial_state}, you can return {:ok, initial_state, 1000}. The value of 1000 states that if no call, cast, or plain message arrives to the server process in 1,000 milliseconds, the handle_info/2 callback will be invoked, and the first argument will have the value of :timeout.
The same thing holds true for other callbacks such as handle_cast/2 and handle_ call/3, where you can return {:noreply, new_state, timeout} and {:reply, response, new_state, timeout}, respectively.
Therefore, to make the to-do server stop itself after a period of inactivity, you need to do the following:
-
Convert the implementation of the to-do server back to
GenServer. -
Include the idle timeout integer in all result tuples of all callback functions.
-
Add
handle_info/2and stop the server if the:timeoutmessage arrives.
Starting with the last GenServer-powered version of the Todo.Server, you’ll include the idle timeout integer in the callback functions’ results.
Listing 10.5 Specifying idle timeout (todo_cache_expiry/lib/todo/server.ex)
defmodule Todo.Server do
  ...

  @expiry_idle_timeout :timer.seconds(10)                     ❶

  def init(name) do
    IO.puts("Starting to-do server for #{name}.")
    {:ok, {name, nil}, {:continue, :init}}
  end

  def handle_continue(:init, {name, nil}) do
    todo_list = Todo.Database.get(name) || Todo.List.new()

    {
      :noreply,
      {name, todo_list},
      @expiry_idle_timeout                                    ❷
    }
  end

  def handle_cast({:add_entry, new_entry}, {name, todo_list}) do
    new_list = Todo.List.add_entry(todo_list, new_entry)
    Todo.Database.store(name, new_list)
    {:noreply, {name, new_list}, @expiry_idle_timeout}        ❷
  end

  def handle_call({:entries, date}, _, {name, todo_list}) do
    {
      :reply,
      Todo.List.entries(todo_list, date),
      {name, todo_list},
      @expiry_idle_timeout                                    ❷
    }
  end

  ...
end
❷ Includes the idle timeout in response
First, you declare a module attribute, @expiry_idle_timeout, which will contain the value of 10,000 (obtained by invoking :timer.seconds(10)). This attribute serves as a module-level constant, which you include as the last element of each return tuple of almost every callback function.
The only exception is init/1, where the continuation tuple ({:continue, ...}) is provided. As explained in chapter 7, this is used to perform a potentially long-running server initialization without blocking the caller. GenServer doesn’t support returning both the continue info and the timeout. Therefore, in init/1 you only include the continuation, while the timeout is provided in handle_continue. This is perfectly fine because handle_continue is unconditionally invoked immediately after init/1. These changes ensure that handle_info(:timeout, state) will be invoked when there’s no activity in the server process for 10 seconds.
Finally, you need to handle the :timeout message and stop the server.
Listing 10.6 Stopping an idle to-do server (todo_cache_expiry/lib/todo/server.ex)
defmodule Todo.Server do
  ...

  def handle_info(:timeout, {name, todo_list}) do
    IO.puts("Stopping to-do server for #{name}")
    {:stop, :normal, {name, todo_list}}           ❶
  end
end
Now, quickly verify if expiration works properly. Go to the todo_cache_expiry folder, start the system, and start one to-do server:
$ iex -S mix

iex(1)> Todo.System.start_link()
iex(2)> pid = Todo.Cache.server_process("bobs_list")
Now, wait for a while, and you should see the debug message:
Stopping to-do server for bobs_list
Finally, verify whether the process is still alive:
iex(3)> Process.alive?(pid)
false
This is an example of a scenario in which agents just won’t suffice and you need to use GenServer. But until you wanted to implement expiry, agents were just as appropriate a solution as GenServer. As long as you don’t need to handle plain messages or you don’t need to run some termination code in terminate/1, you can use Agent.
Personally, most often, I don’t use Agent and start immediately with GenServer. Because converting an Agent into a GenServer requires some work, I’d much rather start with GenServer immediately. As an added bonus, this keeps the code more uniform, because all the server processes are implemented using the same abstraction. If you feel confused and aren’t sure whether to use Agent or GenServer, my advice is to always go for GenServer because it covers more scenarios and is not much more complicated than Agent.
This concludes the story about agents. Next, we’ll take a look at a feature called ETS tables.
10.3 ETS tables
ETS (Erlang Term Storage) tables are a mechanism that allows you to share some state between multiple processes in a more efficient way. ETS tables can be thought of as an optimization tool. Whatever you can do with an ETS table can also be done with GenServer or Agent, but the ETS version can often perform much better. However, ETS tables can only handle limited scenarios, so, often, they can’t replace server processes.
Typical situations where ETS tables can be useful are shared key-value structures and counters. Although these scenarios can also be implemented with GenServer (or Agent), such solutions might lead to performance and scalability issues.
Let’s look at a simple demonstration of those issues by implementing a concurrent key-value store with GenServer. First, let’s look at the example use of such a store:
iex(1)> KeyValue.start_link()
{:ok, #PID<0.118.0>}

iex(2)> KeyValue.put(:some_key, :some_value)
:ok

iex(3)> KeyValue.get(:some_key)
:some_value
The full implementation of the KeyValue module is provided in the following listing.
Listing 10.7 GenServer-powered key-value store (key_value/lib/key_value.ex)
defmodule KeyValue do
  use GenServer

  def start_link do
    GenServer.start_link(__MODULE__, nil, name: __MODULE__)
  end

  def put(key, value) do
    GenServer.cast(__MODULE__, {:put, key, value})
  end

  def get(key) do
    GenServer.call(__MODULE__, {:get, key})
  end

  def init(_) do
    {:ok, %{}}
  end

  def handle_cast({:put, key, value}, store) do
    {:noreply, Map.put(store, key, value)}
  end

  def handle_call({:get, key}, _, store) do
    {:reply, Map.get(store, key), store}
  end
end
Nothing new happens here. The KeyValue module is a simple GenServer that holds a map in its state. The put and get requests boil down to invoking Map.put/3 and Map.get/2 in the server process.
Next, you’ll do some quick and inconclusive performance measurements of this key-value store. Go to the key_value folder, and run the following command:
mix run -e "Bench.run(KeyValue)"
The mix run command compiles the project, starts a BEAM instance, and then executes the expression provided via the -e argument, which means Bench.run/1 is invoked. Once the function is done, the BEAM instance stops.
The Bench module, available in key_value/lib/bench.ex, conducts a simple load test. It starts the KeyValue server and then performs operations on one million keys. For each key, the bench program executes 10 put operations. Each put is followed by a get, so, in total, the program performs 20,000,000 operations.
Once the test is done, the function prints the observed throughput:
mix run -e "Bench.run(KeyValue)"
953182 operations/sec
The throughput of about 950,000 operations/sec seems decent enough. But let’s see how the key-value server performs when it must serve multiple client processes. You can verify this by providing the :concurrency option to Bench.run:
mix run -e "Bench.run(KeyValue, concurrency: 10000)"
735369 operations/sec
Somewhat unexpectedly, with 10,000 client processes, you got worse throughput. What happened? The main problem is that despite having so many processes, there’s just one key-value server process, so all of the key-value operations are synchronized, as shown in figure 10.1.
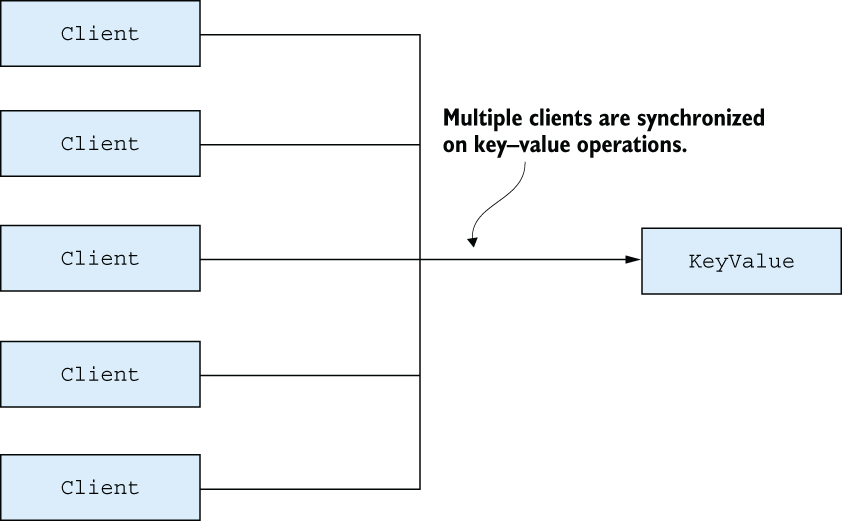
Figure 10.1 Single-process bottleneck
The key-value server, therefore, becomes a performance bottleneck and a scalability killer. The system can’t efficiently utilize all the hardware resources. Even though there are 10,000 client processes running, all the key-value operations are serialized.
Moreover, keep in mind that even in moderately concurrent systems, you usually run many more processes than there are CPU cores. In this case, you have 10,000 clients, which is many more than the number of CPU cores available. Consequently, not all processes can run at the same time—some must wait their turn.
As explained in chapter 5, the VM goes to great lengths to use CPUs as well as possible, but the fact remains that you have many processes competing for limited resources. As a result, the key-value server doesn’t get a single CPU core all to itself. The process must sometimes wait for its turn if BEAM schedulers run other processes in the system. Because the key-value server has fewer CPU resources for doing its job, it will take more time to compute the results.
This isn’t to say that processes are bad. In general, you should strive to run independent tasks concurrently to improve scalability and fault tolerance. Processes should also be your first choice for maintaining state that changes over time. The problem isn’t the many processes running in the system, but the single process on which many other processes depend. In this scenario, you can do much better with ETS tables, so let’s see what they are and how you can work with them.
10.3.1 Basic operations
ETS tables are special in-memory structures where you can store Erlang terms. This makes it possible to share some state between multiple processes without introducing a dedicated server process.
Compared to other data structures, ETS tables have some unusual characteristics:
-
There’s no specific ETS data type. A table is identified by its ID (a reference type) or a global name (an atom).
-
ETS tables are mutable. A write to a table will affect subsequent read operations.
-
Multiple processes can write to or read from a single ETS table. Writes and reads might be performed simultaneously.
-
Minimum concurrency safety is ensured. Multiple processes can safely write to the same row of the same table. The last write wins.
-
An ETS table resides in a separate memory space. Any data coming in or out is deep copied.
-
ETS doesn’t put pressure on the garbage collector. Overwritten or deleted data is immediately released.
-
An ETS table is deeply connected to its owner process (by default, the process that created the table). If the owner process terminates, the ETS table is reclaimed.
-
Other than on owner-process termination, there’s no automatic garbage collection of an ETS table. Even if you don’t hold a reference to the table, it still occupies memory.
These characteristics mean ETS tables somewhat resemble processes. In fact, it’s often said that ETS tables have process semantics. You could implement ETS tables with processes, but such an implementation would be much less efficient. In BEAM, ETS tables are powered by C code, which ensures better speed and efficiency.
The fifth point in the previous list is especially interesting. Because data is deep copied to and from an ETS table, there’s no classical mutability problem. Once you read data from an ETS table, you have a snapshot no one can change. Regardless of other processes possibly modifying the contents of those rows in the ETS table, the data you read remains unaffected.
Let’s look at some examples. All functions related to ETS tables are contained in the Erlang :ets module (https://erlang.org/doc/man/ets.xhtml). To create a table, you can call :ets.new/2:
iex(1)> table = :ets.new(:my_table, [])
#Reference<0.970221231.4117102596.53103>
The first argument is a table name, which is important only if you want to register the table (we’ll discuss this in a minute). Additionally, you can pass various options—some of which are discussed shortly. You should definitely spend some time researching the official documentation about :ets.new/2 to see which options are possible. The result of :ets.new/2 is a reference, a unique opaque term that represents the ETS table in the running system.
Because the structure is a table, you can store multiple rows into it. Each row is an arbitrarily sized tuple (with at least one element), and each tuple element can contain any Erlang term, including a deep hierarchy of nested lists, tuples, maps, or anything else you can store in a variable.
To store data, you can use :ets.insert/2:
iex(2)> :ets.insert(table, {:key_1, 1})      ❶
true

iex(3)> :ets.insert(table, {:key_2, 2})      ❶
true

iex(4)> :ets.insert(table, {:key_1, 3})      ❷
true
The first element of the tuple represents the key—something you can use for a fast lookup on the table. By default, ETS tables are of the set type, which means you can’t store multiple tuples with the same key. Consequently, your last write overwrites the row from the first write.
To verify this, you can use :ets.lookup/2, which returns a list of rows for a given key:
iex(5)> :ets.lookup(table, :key_1)
[key_1: 3]

iex(6)> :ets.lookup(table, :key_2)
[key_2: 2]
You may wonder why the list is returned if you can have only one row per distinct key. The reason is that ETS tables support other table types—some of which allow duplicate rows. In particular, the following table types are possible:
-
:set—This is the default. One row per distinct key is allowed. -
:ordered_set—This is just like:set, but rows are in term order (comparison via the<and>operators). -
:bag—Multiple rows with the same key are allowed, but two rows can’t be completely identical. -
:duplicate_bag—This is just like:bag, but it allows duplicate rows.
Another important option is the table’s access permissions. The following values are possible:
-
:protected—This is the default. The owner process can read from and write to the table. All other processes can read from the table.
To create a table of a different type or use a different access level, you can simply include the desired option in the list passed to :ets.new/2. For example, to create a public duplicate bag list, you can invoke this:
:ets.new(:some_table, [:public, :duplicate_bag])
Finally, it’s worth discussing the table name. This argument must be an atom, and by default, it serves no purpose (although, strangely enough, you must still provide it). You can create multiple tables with the same name, and they’re still different tables.
But if you provide a :named_table option, the table becomes accessible via its name:
iex(1)> :ets.new(:my_table, [:named_table])    ❶
:my_table

iex(2)> :ets.insert(:my_table, {:key_1, 3})    ❷

iex(3)> :ets.lookup(:my_table, :key_2)         ❷
[]
❷ Manipulates the table using the name
In this sense, a table name resembles a locally registered process name. It’s a symbolic name of a table, and it relieves you of having to pass around the ETS reference.
Trying to create a duplicate named table will result in an error:
iex(4)> :ets.new(:my_table, [:named_table])
** (ArgumentError) errors were found at the given arguments:
  * 2nd argument: invalid options
10.3.2 ETS-powered key-value store
Equipped with this new knowledge, you’ll implement key-value store with ETS tables. Since a table must be owned by some process, we’ll still keep a GenServer around. Its sole purpose is to create the table in init/1 and keep it alive. All interactions with the table (reads and writes) will be done directly from the caller process, without needing to issue a request to the server process.
The relevant code is contained in the same project as the initial attempt. First, you need to start and initialize the table owner process, as shown in the next listing.
Listing 10.8 Creating the ETS table (key_value/lib/ets_key_value.ex)
defmodule EtsKeyValue do
  use GenServer

  def start_link do
    GenServer.start_link(__MODULE__, nil, name: __MODULE__)   ❶
  end

  def init(_) do
    :ets.new(                                                 ❷
      __MODULE__,
      [:named_table, :public, write_concurrency: true]
    )

    {:ok, nil}
  end

  ...
end
❶ Starts the table owner process
In start_link, you start a GenServer. Then, in the init/1 callback, the new ETS table is created. The table is configured as named, so the client processes can access it by its name (the name of the module). The access is set to public, which allows client processes to write to the table. The table type isn’t provided, so it will default to set.
Notice the :write_concurrency option provided to :ets.new. This option allows you to issue concurrent writes to the table, which is exactly what you want in this case. There’s also a :read_concurrency option, which can improve read performance in some cases. This option isn’t set here because the Bench module performs a lot of interleaved reads and writes, and in such cases, :read_concurrency can lead to worse performance. Instead of randomly setting these options, it’s always good to measure and observe their effects.
At this point, you can implement the operations:
defmodule EtsKeyValue do
  ...

  def put(key, value) do
    :ets.insert(__MODULE__, {key, value})   ❶
  end

  def get(key) do
    case :ets.lookup(__MODULE__, key) do    ❷
      [{^key, value}] -> value              ❸
      [] -> nil                             ❹
    end
  end

  ...
end
The preceding code is a simple application of the presented :ets functions. To store an entry, you invoke :ets.insert/2. To perform a lookup, you invoke :ets.lookup/2. Because the ETS table is a set, the result list can contain at most one element: the key-value pair for the given key. If there’s no row for the given key, the result is an empty list.
The crucial thing to notice here is that get and put operations now don’t go through the server process. This means multiple clients can work with the key-value store simultaneously, without blocking each other, as shown in figure 10.2.

Figure 10.2 Concurrency in an ETS-powered key-value store
As you can see, operations working on different keys can be executed in parallel. Multiple operations working on the same key will be properly synchronized to prevent possible race conditions. When you have many keys, the chances for collisions are small, so you can expect better scheduler use, and therefore better scalability.
Now, verify that the new key-value store works correctly:
iex(1)> EtsKeyValue.start_link()
{:ok, #PID<0.109.0>}

iex(2)> EtsKeyValue.put(:some_key, :some_value)
true

iex(3)> EtsKeyValue.get(:some_key)
:some_value
The key-value store seems to be working. Now, let’s see how it performs. You’ll start with a sequential bench:
mix run -e "Bench.run(EtsKeyValue)"
5700062 operations/sec
On my machine, I obtained a projected throughput of about 5.7 million requests per second. Recalling that the pure GenServer version managed about 950,000 requests per second, this is an almost 6x increase in throughput!
There are a couple of reasons for this improvement. First, ETS operations are handled immediately in the client process. In contrast, a cross-process request involves putting a message in the mailbox of the receiver and then waiting for the receiver to be scheduled in and to handle the request. If the request is a synchronous call, the client process also must wait for the response message to arrive.
In addition, changes to ETS tables are destructive. If a value under some key is changed, the old value is immediately released. Therefore, data managed in ETS tables doesn’t put any pressure on a garbage collector. In contrast, transforming standard immutable data generates garbage. In a GenServer-based key-value store, frequent writes will generate a lot of garbage, which means the server process is occasionally blocked while it’s being garbage collected.
In this case, even in a plain sequential scenario, you get a significant improvement. But how does ETS hold up against multiple clients? Let’s see:
mix run -e "Bench.run(EtsKeyValue, concurrency: 10000, num_updates: 100)"
52009220 operations/sec
Notice the num_updates: 100 option. Because the ETS-based implementation is much faster, you’re passing this option to run a longer test. This test will perform 100 put (and, therefore, also 100 get) operations on each key.
Using 10,000 client processes yields a 9x greater throughput. Compared to the plain GenServer solution, the improvement is 70x (52,000,000 versus 735,000 requests per second). The single-process key-value server starts to slow down with an increase in the total number of running processes in the system. In contrast, the ETS-based cache scales better.
The main reason for this scaling lies in the fact that cache operations are executed in the client process, so you don’t need to perform GenServer-based serialization. The atomic operations provided by the :ets module are properly synchronized and can safely run simultaneously in multiple processes. Operations working on different keys can run in parallel. Even the reads of the same key can work in parallel. Only writes will block other operations on the same key.
On the flip side, the vocabulary of write operations is small. You can perform key-value writes with :ets.insert/2, delete a row with :ets.delete/2, modify a row with :ets.update_element/3, and atomically update an integer in a row with :ets.update_counter/4. For more complex scenarios, you’ll likely need to channel writes through a GenServer. Therefore, you can think of ETS tables as being an optimization tool. They’re extremely efficient in simple scenarios but not as powerful or flexible as server processes.
If you’re unsure whether you should use a GenServer or an ETS table, it’s best to start with a GenServer. This will be a simple solution, and in many cases, the performance will be sufficient. If you establish that a particular server is a bottleneck, you can see if an ETS table would be a good fit. In many cases, moving to an ETS table will only require changing the implementation. For example, if you compare the KeyValue module to EtsKeyValue, you’ll notice that they have the same public interface. That makes it possible to have a generic Bench module that can work with both.
You might wonder why GenServer is still used in the ETS-based key-value store. The sole purpose of this process is to keep the table alive. Remember that an ETS table is released from memory when the owner process terminates. Therefore, you need to have a distinct, long-running process that creates and owns the table.
10.3.3 Other ETS operations
So far, we’ve covered only basic insertions and key-based lookups. These are arguably the most important operations you’ll need, together with :ets.delete/2, which deletes all rows associated with a given key.
Key-based operations are extremely fast, and you should keep this in mind when structuring your tables. Your aim should be to maximize key-based operations, thus making ETS-related code as fast as possible.
Occasionally, you may need to perform non-key-based lookups or modifications, retrieving a list of rows based on value criteria. There are a couple of ways you can do this.
The simplest but least efficient approach is to convert the table to a list using :ets.tab2list/1. You can then iterate over the list and filter out your results, for example, by using functions from the Enum and Stream modules.
Another option is to use :ets.first/1 and :ets.next/2, which make it possible to traverse the table iteratively. Keep in mind that this traversal isn’t isolated. If you want to make sure no one modifies the table while you’re traversing it, you should serialize all writes and traversals in the same process. Alternatively, you can call :ets.safe_ fixtable/2, which provides some weak guarantees about traversal. If you’re iterating a fixed table, you can be certain there won’t be any errors, and each element will be visited only once. But an iteration through the fixed table may or may not pick up rows that are inserted during the iteration.
Traversals and :ets.tab2list/1 aren’t very performant. Given that data is always copied from the ETS memory space to the process, you end up copying the entire table. If you only need to fetch a couple of rows based on non-key criteria, this is overkill and a waste of resources. A better alternative is to rely on match patterns—features that allow you to describe the data you want to retrieve.
Match patterns are a simple way to match individual rows. For example, let’s say you’re managing a to-do list in an ETS table:
iex(1)> todo_list = :ets.new(:todo_list, [:bag])
iex(2)> :ets.insert(todo_list, {~D[2023-05-24], "Dentist"})
iex(3)> :ets.insert(todo_list, {~D[2023-05-24], "Shopping"})
iex(4)> :ets.insert(todo_list, {~D[2023-05-30], "Dentist"})
Here, you use a bag ETS table because it allows you to store multiple rows with the same key (date).
Most often, you’ll want to query a table by key, asking, “What appointments are on the given date?”
iex(5)> :ets.lookup(todo_list, ~D[2023-05-24])
[{~D[2023-05-24], "Dentist"}, {~D[2023-05-24], "Shopping"}]
Occasionally, you may be interested in obtaining all dates for an appointment type. Here’s an example of how to do this using match patterns:
iex(6)> :ets.match_object(todo_list, {:_, "Dentist"})
[{~D[2023-05-24], "Dentist"}, {~D[2023-05-30], "Dentist"}]
The function :ets.match_object/2 accepts a match pattern—a tuple that describes the shape of the row. The atom :_ indicates that you accept any value, so the pattern {:_, "Dentist"} essentially matches all rows where the second element is "Dentist".
Notice that this isn’t classical pattern matching. Instead, this tuple is passed to :ets.match_object/2, which iterates through all rows and returns the matching ones. Therefore, when you don’t care about a tuple element, you must pass an atom (:_) instead of a typical match-all anonymous variable (_). It’s also worth mentioning the :ets.match_delete/2 function, which can be used to delete multiple objects with a single statement.
In addition to being a bit shorter, match patterns have an important performance benefit over simple traversal. Recall that data is always copied from the ETS table to the selected process. If you used :ets.tab2list/1 or plain traversal, you’d have to copy every single row into your own process. In contrast, :ets.match_object/2 performs filtering in the ETS memory space, which is more efficient.
Going beyond match patterns, it’s possible to perform even richer queries, specifying more complex filters and even choosing individual fields you want to return. This is done by writing a full-blown match specification that consists of the following parts:
Such specifications can be passed to the :ets.select/2 function, which produces the corresponding result.
Match specifications can become complicated quickly, as you can see by looking at the documentation for :ets.select/2 (https://erlang.org/doc/man/ets.xhtml#select-2). To make that task simpler, take a look at the third-party library called ex2ms (https://github.com/ericmj/ex2ms).
Managing server-wide shared state is arguably the most common use case for ETS tables. In addition, ETS tables can be used to allow processes to persist their data. Remember from chapters 8 and 9 that processes lose their state on termination. If you want to preserve state across process restarts, the simplest way is to use a public ETS table as a means of providing in-memory state persistence. This should work reasonably quickly and allow you to recover from process crashes.
Be cautious when considering taking this road. As mentioned in chapters 8 and 9, it’s generally better to recover from a crash with clean state. You should also consider whether you can restore state based on data from other processes. Persisting state in the ETS table (or anywhere else, for that matter) should be used mostly for critical processes that are part of your error kernel.
It’s also possible to use ETS tables as a faster alternative to immutable data structures, such as maps. Because changes to ETS tables are destructive and data is immediately released, there won’t be any garbage-collection penalty involved, so you can expect more predictable latency, with fewer deviations.
There is a caveat, though. Remember that data is copied between an ETS table and a client process. Consequently, if your row data is complex and large, ETS tables may yield worse performance than pure, immutable data structures. Another important downside of ETS tables is that, unlike plain data, they can’t be sent over the network to another BEAM instance. That means that relying on ETS makes it harder to take advantage of distribution facilities (described in chapter 12).
In general, you should avoid using ETS and instead favor immutable structures as much as possible. Resort to ETS only in cases in which you can obtain significant performance gains.
Erlang ships with two facilities that are closely related to ETS and that provide a simple way of implementing an embedded database that runs in the BEAM OS process. I won’t discuss these features in detail in this book, but they deserve a brief mention so you can be aware that they exist and research them more deeply on your own.
The first feature, disk-based ETS (DETS, https://erlang.org/doc/man/dets.xhtml), is disk-based term storage. Just like ETS, DETS relies on the concept of tables, and each table is managed in a single file. The interface of the corresponding :dets module is somewhat similar to ETS, but more limited in features. DETS provides a simple way of persisting data to disk. Basic isolation is supported—concurrent writes are allowed, even when you’re storing to the same row.
Erlang also ships with a database called Mnesia (https://erlang.org/doc/apps/mnesia/users_guide.xhtml), built on top of ETS and DETS, that has many interesting features:
-
Mnesia is an embedded database—it runs in the same BEAM instance as the rest of your Elixir/Erlang code.
-
Tables can be in memory (powered by ETS) or disk based (powered by DETS).
-
Some typical database features are provided, such as complex transactions, dirty operations, and fast searches via secondary indexes.
These features make Mnesia a compelling option for storing data. You initialize the database from your startup Elixir or Erlang code, and you’re good to go. This has the huge benefit of allowing you to run the entire system in a single OS process.
On the downside, Mnesia is a somewhat esoteric database and isn’t used much outside the Elixir and Erlang community. This means there’s less community and tooling support compared to popular DBMS solutions. It also takes some trickery to make Mnesia work on a larger scale. For example, one problem is that disk-based tables can’t exceed 2 GB (this is a limitation of the underlying DETS storage), which means you must fragment larger tables.
10.3.4 Exercise: Process registry
Now is a good time to practice a bit. A textbook example of ETS in practice is a process registry. The Registry module uses a smart combination of GenServer and ETS to obtain maximum efficiency. In this exercise, you’ll implement a basic version of a :unique registry.
Here’s an example of using such a registry:
iex(1)> SimpleRegistry.start_link()
{:ok, #PID<0.89.0>}

iex(2)> SimpleRegistry.register(:some_name)         ❶
:ok                                                 ❶

iex(3)> SimpleRegistry.register(:some_name)         ❷
:error                                              ❷

iex(4)> SimpleRegistry.whereis(:some_name)          ❸
#PID<0.87.0>                                        ❸

iex(5)> SimpleRegistry.whereis(:unregistered_name)  ❹
nil
❷ Error on duplicate registration
The interface of SimpleRegistry is very basic. The server process is started and registered locally. Then, any process can register itself by invoking SimpleRegistry.register/1, passing an arbitrary term for the process key. The function returns :ok on successful registration or :error if the name is occupied. Lookup is done by invoking SimpleRegistry .whereis/1, which returns the pid for the given key or nil if no process is registered under a given name. In addition, the registry process can detect a termination of each registered process and remove all the registration entries for that process.
SimpleRegistry has no other fancy features of the Registry module, such as support for via tuples, duplicate registrations, or multiple registry instances. Here’s how you could build such a registry:
-
Implement the first version of
SimpleRegistryas aGenServer. Bothregisterandwhereiswill be implemented as calls. -
The state of the
GenServershould be a map, where keys are registered names and values are PIDs. -
While handling the
:registercall, the registry process should link to the caller, so it can detect the process termination and deregister it. Therefore, the registry server also must trap exits (by invokingProcess.flag(:trap_exit, true)ininit/1). Links are chosen over monitors to ensure that registered processes are informed if the registry process goes down. -
The registry process should handle
{:EXIT, pid, reason}in itshandle_infoand remove all entries for the given process from the map.
Once you have this registry in place, you can consider moving some parts out of the server process. In particular, by using ETS tables, it’s possible to perform both registration and lookup in client processes. Here’s how:
-
During
init/1, the registry process should create a named ETS table with public access. This table will map names to PIDs, so the registry process doesn’t need to maintain any state. -
Registration can be done via
:ets.insert_new/2(https://erlang.org/doc/man/ets.xhtml#insert_new-2). This function will only insert the new entry if there’s no entry under the given key. Therefore, you can safely call this function simultaneously from separate processes. The function returns a Boolean to indicate whether the entry has been inserted or not. -
Prior to invoking
:ets.insert_new/2, the caller process should link to the server process by invokingProcess.flag(:trap_exit, true). You can wrap this linking inSimpleRegistry.register/1. -
The implementation of
whereis/1boils down to invoking:ets.lookup/2and matching the result. -
Finally, the server process still needs to handle
:EXITmessages and remove the entries for the terminated processes. This can easily be done with the help of:ets.match_delete/2.
This exercise is a bit more involved than previous ones, but it’s a nice synthesis of some techniques you’ve seen in the past few chapters. If you get stuck, take a look at the solution in the process_registry folder. There, you’ll find both versions—the basic one implemented completely in a GenServer and a more performant one that uses an ETS table to store registrations.
Summary
-
Tasks can be used to run OTP-compliant concurrent job processes.
-
Agents can be used to simplify the implementation of processes that manage some state but don’t need to handle any plain messages.
-
ETS tables can be used to improve performance in some cases, such as shared key-value memory structures.