11 Working with components
It’s time to turn our attention toward producing releasable systems that can be deployed. To reach that goal, you need to learn about OTP applications, which let you organize your system into reusable components. Applications are a standard way of building Elixir or Erlang production systems and libraries. Relying on them brings various benefits, such as dependency management; simplified system starting; and the ability to build standalone, deployable releases.
In this chapter, you’ll learn how to create applications and work with dependencies. In the process, you’ll turn your to-do system into a proper OTP application and use some third-party libraries from the Erlang and Elixir ecosystem to expose an HTTP interface for your existing system. There’s a lot of work ahead, so let’s get started with OTP applications.
11.1 OTP applications
An OTP application is a component that consists of multiple modules and that can depend on other applications. This makes it possible to start the entire system with a single function call. As you’re about to see, it’s reasonably easy to turn code into an application. Your current version of the to-do system is already an OTP application, but there are some minor details you can improve. You’ll see this in action shortly; first, let’s look at what OTP applications consist of.
11.1.1 Creating applications with the mix tool
An application is an OTP-specific construct. The resource that defines an application is called an application resource file—a plain-text file written in Erlang terms that describes the application. (Don’t worry; you won’t need to write this directly. You’ll instead rely on the mix tool to do this for you). This file contains several pieces of information, such as the following:
Relying on the mix tool simplifies and automates some of the work of generating application resource files. For example, the application resource file must contain a list of all application modules. When you use mix, this list is generated for you automatically, based on the modules defined in the source code.
Some things, such as the application name, version, and description, must of course be provided by you. The mix tool can then use this data and your source code to generate the corresponding resource file while compiling the project.
Let’s see this in practice. Go to a temporary folder, and run mix new hello_world --sup. This command creates the hello_world folder with the minimum Mix project skeleton. The parameter --sup makes the mix tool generate the application callback module and start the empty (childless) supervisor from it.
You can now change to the hello_world folder and start the system with the familiar iex -S mix. On the surface, nothing spectacular happens. But mix automatically starts your application, which you can verify by calling Application.started_applications/0:
iex(1)> Application.started_applications()
[
  {:iex, ~c"iex", ~c"1.15.0"},
  {:hello_world, ~c"hello_world", ~c"0.1.0"},    ❶
  {:logger, ~c"logger", ~c"1.15.0"},
  {:mix, ~c"mix", ~c"1.15.0"},
  {:elixir, ~c"elixir", ~c"1.15.0"},
  {:compiler, ~c"ERTS  CXC 138 10", ~c"8.3"},
  {:stdlib, ~c"ERTS  CXC 138 10", ~c"5.0"},
  {:kernel, ~c"ERTS  CXC 138 10", ~c"9.0"}
]
As you can see, the hello_world application is running, together with some additional applications, such as Elixir’s mix, iex, and elixir, as well as Erlang’s stdlib and kernel.
You’ll see the benefits of this shortly, but first, let’s look at how the application is described. The main place you specify an application is in the mix.exs file. Here are the full contents of the generated file (comments are stripped out):
defmodule HelloWorld.MixProject do
  use Mix.Project

  def project do                              ❶
    [                                         ❶
      app: :hello_world,                      ❶
      version: "0.1.0",                       ❶
      elixir: "~> 1.15",                      ❶
      start_permanent: Mix.env() == :prod,    ❶
      deps: deps()                            ❶
    ]                                         ❶
  end                                         ❶

  def application do                          ❷
    [                                         ❷
      extra_applications: [:logger],          ❷
      mod: {HelloWorld.Application, []}       ❷
    ]                                         ❷
  end                                         ❷

  defp deps do                                ❸
    []                                        ❸
  end                                         ❸
end
The first interesting thing happens in the project/0 function, where you describe the Mix project. The app: :hello_world gives a name to your application. Only an atom is allowed as an application name, and you can use this atom to start and stop the application at run time.
The application is described in the application/0 function. Here, you specify some options that will eventually make it to the application resource file. In this case, the description includes the list of other Erlang and Elixir applications you depend on, together with the module that will be used to start the application. By default, Elixir’s :logger application is listed (https://hexdocs.pm/logger/Logger.xhtml).
Finally, the deps function returns the list of third-party dependencies—other libraries you want to use in your project. By default, this list is empty. You’ll see how dependencies are used a bit later in this chapter.
11.1.2 The application behavior
The critical part of the application description is mod: {HelloWorld.Application, []}, provided in mix.exs by application/0. This part specifies the module that will be used to start the application. When the application is started, the function HelloWorld.Application.start/2 is called.
Obviously, you need to implement the HelloWorld.Application module. This is done for you by the mix tool, so let’s see what it looks like:
defmodule HelloWorld.Application do
  use Application                                                  ❶

  def start(_type, _args) do                                       ❷
    children = []                                                  ❸
    opts = [strategy: :one_for_one, name: HelloWorld.Supervisor]   ❸
    Supervisor.start_link(children, opts)                          ❸
  end
end
❸ Starts the top-level supervisor
An application is an OTP behaviour, powered by the Application module (https://hexdocs.pm/elixir/Application.xhtml), which is a wrapper around Erlang’s :application module (https://www.erlang.org/doc/man/application.xhtml). To be able to work with Application, you must implement your own callback module and define some callback functions.
At a minimum, your callback module must contain the start/2 function. The arguments passed are the application start type (which you’ll usually ignore) and an arbitrary argument (a term specified in mix.exs under the mod key). See the official documentation (https://hexdocs.pm/elixir/Application.xhtml#c:start/2) for details.
The task of the start/2 callback is to start the top-level process of your system, which should usually be a supervisor. The function returns its result in the form of {:ok, pid} or {:error, reason} if something went wrong.
11.1.3 Starting the application
To start the application in the running BEAM instance, you can call Application .start/1. This function first looks for the application resource file (which is generated by mix) and interprets its contents. Then, it verifies whether all the applications you’re depending on are started. Finally, the application is started by calling the callback module’s start/2 function. The Application.ensure_all_started/2 function is also available, which recursively starts all dependencies that aren’t yet started.
Usually, you won’t need to invoke these functions because mix automatically starts the application implemented by the project. Calling iex -S mix automatically starts the application together with its dependencies.
It should be noted that you can’t start multiple instances of a single application. Trying to start an already running application will return an error:
$ iex -S mix

iex(1)> Application.start(:hello_world)
{:error, {:already_started, :hello_world}}
You can stop the application using Application.stop/1:
iex(2)> Application.stop(:hello_world)
[info] Application hello_world exited: :stopped
Stopping the application terminates its top-level process. If that process is a supervisor, it will stop its own children before it stops itself. This is why it’s important to organize the processes in the supervision tree, as described in chapter 9. Doing so ensures the application is stopped in a controlled manner, leaving no dangling processes behind.
Application.stop/1 stops only the specified application, leaving dependencies (other applications) running. To stop the entire system in a controlled way, you can invoke System.stop/0. This function will take down all the OTP applications and then the BEAM instance itself. Both Application.stop/1 and System.stop/0 work in a polite way. Every process in the supervision tree can perform some final cleanup in its terminate/2 callback, as explained in section 9.1.6.
11.1.4 Library applications
You don’t need to provide the mod: ... option from the application/0 function in mix.exs:
defmodule HelloWorld.Application do
  ...

  def application do
    []
  end

  ...
end
In this case, there’s no application callback module, which, in turn, means there’s no top-level process to be started. This is still a proper OTP application. You can even start it and stop it.
What’s the purpose of such applications? This technique is used for library applications—components that don’t need to create their own supervision tree. As the name indicates, these are usually libraries, such as a JSON or a CSV parser. Erlang’s own STDLIB application (https://erlang.org/doc/apps/stdlib/index.xhtml) is a pure library application because it exposes various utility modules but doesn’t need to manage its own supervision tree.
Library applications are useful because you can list them as runtime dependencies. This plays an important role when you start to assemble the deployable release, as you’ll see in chapter 13.
11.1.5 Implementing the application callback
Equipped with this knowledge, you can turn your to-do system into a proper application. As mentioned earlier, it’s already an OTP application, albeit a library one that doesn’t implement a callback module for the application behavior. In fact, there is usually a 1:1 relationship between a Mix project and an OTP application. A Mix project implements exactly one OTP application. An exception is a so-called umbrella project, which can contain multiple OTP applications.
Given that the to-do system runs a set of its own processes under a supervision tree, it makes sense to implement the application callback module. Once you do that, the system can be automatically started as soon as you run iex -S mix.
The first thing you need to do is edit the mix.exs file. Recall that you created your initial project back in chapter 7, using the mix tool. Therefore, you already have this file in place and only need to add some information. The complete code for mix.exs is provided in the following listing.
Listing 11.1 Specifying application parameters (todo_app/mix.exs)
defmodule Todo.MixProject do
  use Mix.Project

  def project do
    [
      app: :todo,
      version: "0.1.0",
      elixir: "~> 1.15",
      start_permanent: Mix.env() == :prod,
      deps: deps()
    ]
  end

  def application do
    [
      extra_applications: [:logger],
      mod: {Todo.Application, []}      ❶
    ]
  end

  defp deps do
    []
  end
end
❶ Specifying the application callback module
The only change to mix.exs is in the application/0 function, where the callback module is specified.
Next, you need to implement the callback module. The code is shown next.
Listing 11.2 Implementing the application module (todo_app/lib/todo/application.ex)
defmodule Todo.Application do
  use Application

  def start(_, _) do
    Todo.System.start_link()
  end
end
As already mentioned, starting the application is as simple as starting the top-level supervisor. Given that you’ve already structured your system to reside under the Todo.System supervisor, this is all it takes to turn your system into a full-blown OTP application.
$ iex -S mix

Starting database server            ❶
Starting database worker            ❶
Starting database worker            ❶
Starting database worker            ❶
Starting to-do cache                ❶
❶ The system is started automatically.
By implementing the OTP application callback, you’ve made it possible to start the system automatically.
It’s worth noting that you get the same benefit when running tests. When you invoke mix test, all of the essential processes in your system are started. Back in chapter 7, when you added a couple of tests, you had to manually start the cache process:
defmodule Todo.CacheTest do
  use ExUnit.Case

  test "server_process" do
    {:ok, cache} = Todo.Cache.start()                   ❶
    bob_pid = Todo.Cache.server_process(cache, "bob")

    assert bob_pid != Todo.Cache.server_process("alice")
    assert bob_pid == Todo.Cache.server_process("bob")
  end

  ...
end
The code has since seen a bunch of transformations, but in every incarnation, there was some version of the preceding pattern. Inside Todo.CacheTest, you needed to manually start the supporting processes, such as cache. With the system turned into a proper OTP application, this is not the case anymore, as you can see in the following listing.
Listing 11.3 Testing server_process (todo_app/test/todo_cache_test.exs)
defmodule Todo.CacheTest do
  use ExUnit.Case

  test "server_process" do
    bob_pid = Todo.Cache.server_process("bob")      ❶

    assert bob_pid != Todo.Cache.server_process("alice")
    assert bob_pid == Todo.Cache.server_process("bob")
  end

  ...
end
❶ Works without manually starting the cache
11.1.6 The application folder structure
Let’s briefly discuss your compiled application’s folder structure. Owing to the mix tool, you usually won’t need to worry about this, but it can sometimes be useful to understand the folder structure of a compiled system.
Before you look at the application structure, you should know a bit about Mix environments. A Mix environment is a compile-time option that can be used to affect the shape of the compiled code.
Mix projects use three environments: dev, test, and prod. These three environments produce slight variations in the compiled code. For example, in a version compiled for development (the dev environment), you’ll likely want to run some extra debug logging, whereas in a version compiled for production (the prod environment), you don’t want to include such logging. In a version compiled for tests (the test environment), you want to further reduce the amount of logging and use a different database to prevent the tests from polluting your development database.
You can introduce your own Mix environment if you want to, but this is rarely needed, if ever. The three environments mentioned here should be sufficient to cover all possible scenarios.
For most mix tasks, the default environment is dev, indicating that you’re dealing with development. One exception to that rule is the test task. When you invoke mix test, the Mix environment is automatically set to test.
You can specify a Mix environment by setting the MIX_ENV OS environment variable. By convention, when building for production, you should use the prod environment. To compile the code for prod, you can invoke MIX_ENV=prod mix compile. To compile and start a prod version, you can invoke MIX_ENV=prod iex -S mix.
The prod environment is a frequent source of confusion. Many teams conflate prod with the production machine. A prod version indeed runs on the production machine, but it will also run on other machines, such as staging. Most importantly, it should be possible and simple to start a version compiled for prod on a local developer machine. You won’t need to do this frequently, but it’s occasionally useful to analyze the behavior of the system which is as close to the deployed production version as possible. This is exactly what the prod-compiled version is. Therefore, you’re advised to support running a prod-compiled version locally. Commit to this goal from the start of the project because doing this later, after the codebase grows significantly, is typically much more difficult.
Once you compile your project, compiled binaries reside in the _build/project_env folder, where project_env is the Mix environment that was in effect during compilation.
Because dev is the default environment, if you run mix compile or iex -S mix, you get binaries in the _build/dev folder. The OTP itself recommends the following folder convention:
lib/
  App1/
    ebin/
    priv/

  App2/
    ebin/
    priv/
  ...
Here, App1 and App2 represent application names (such as todo). The ebin folder contains compiled binaries (.beam files and application resource files), whereas the priv folder contains application-specific private files (images, compiled C binaries, and so on). This isn’t a mandatory structure, but it’s a convention used in most Elixir and Erlang projects. Some tools may rely on this structure, so it’s best to follow this convention.
Luckily, you don’t need to maintain this structure yourself because mix does so automatically. The final folder structure of a compiled Mix project has the following shape:
YourProjectFolder
_build
  dev
    lib
      App1
        ebin
        priv

      App2
      ...
In addition to your application, the lib folder also contains the application dependencies, except for the standard applications included in Elixir and Erlang, which reside in the folder where Elixir and Erlang are installed and which are accessible via the load path.
As mentioned, the application resource file resides in lib/YourApp/ebin and is named YourApp.app. For the to-do system, the file resides in _build/dev/lib/todo/ ebin/ (relative to the root project folder). When you attempt to start the application, the generic application behavior looks for the resource file in the load paths (the same paths that are searched for compiled binaries).
This concludes our discussion of application basics. Now that you have a grasp of some theory, let’s look at how to work with dependencies.
11.2 Working with dependencies
Depending on third-party libraries is an important feature. As soon as you start developing more complicated projects, you’ll probably want to use various libraries, such as web frameworks, the JSON parser, and database drivers, to name a few examples. Such libraries can simplify various side concerns, prevent you from going down too many rabbit holes, and allow you to focus on the core challenges of your system.
For example, in the current implementation of the to-do system, you maintain a small pool of database workers, which allows you to have controlled parallelism of database operations. You implemented this pool completely from scratch back in chapter 7. But as it happens, managing a pool of processes is a frequent pattern in Elixir and Erlang, so a couple of third-party libraries offer a solution to this challenge. In this chapter, you’ll replace your naive implementation of the process pool with a proven and battle-tested process pool library.
11.2.1 Adding a dependency
In this section, you’ll add a dependency to the Poolboy library (https://github.com/devinus/poolboy). This library provides a mature implementation of a process pool.
The dependency to an external library must be specified in the mix.exs file, as illustrated in the next listing.
Listing 11.4 Adding an external dependency (todo_poolboy/mix.exs)
defmodule Todo.MixProject do
  ...

  defp deps do
    [
      {:poolboy, "~> 1.5"}   ❶
    ]
  end
end
❶ Specifies an external dependency
An external dependency is specified as a tuple. The first element is always an atom, which should correspond to the application name of the dependency. The second element in the tuple, "~> 1.5", is the version requirement. Here, you indicate that you want version 1.5 or any later 1.x version. For more information about the version syntax, take a look at the official documentation at https://hexdocs.pm/elixir/Version.xhtml#module-requirements.
At this point, you’ve specified that your project depends on an external library, so you need to fetch your dependencies. This can be done by running mix deps.get from the command line. Dependencies are fetched from Elixir’s external package manager, which is called Hex (https://hex.pm). Other possible dependency sources include the GitHub repository, a Git repository, or a local folder. For more information, take a look at the official documentation at https://hexdocs.pm/mix/Mix.Tasks.Deps.xhtml.
Running mix deps.get fetches all dependencies (recursively) and stores the reference to the exact version of each dependency in the mix.lock file, unless mix.lock already exists on the disk—in which case, this file is consulted to fetch the proper versions of dependencies. This ensures reproducible builds across different machines, so make sure you include mix.lock in the source control where your project resides.
Now that you’ve fetched all of your dependencies, you can build the entire system by running mix compile, which will compile all the dependencies and the project. It’s worth mentioning that Poolboy is an Erlang library, but mix will still know how to compile it.
11.2.2 Adapting the pool
With these preparations in place, you can start adapting the pool implementation. Using Poolboy requires starting a process called the pool manager that manages a pool of workers. While starting the pool manager, you pass the desired pool size (the number of worker processes) and the module that powers each worker. During its startup, the pool manager starts the worker processes as its children.
Other processes can ask the pool manager to give them the PID of one worker. This operation is called checkout. Once a process gets the worker’s PID, it can issue requests to that worker. When the client process doesn’t need the worker process anymore, it notifies the pool manager. This operation is called checkin.
This workflow is a bit more sophisticated than your own simple pool. The checkout and checkin operations allow the pool manager to keep track of which worker processes are being used. If some workers are available, a client can immediately get a worker. Otherwise, if all the workers are checked out, the client will have to wait. As soon as the first worker is returned to the pool, a waiting client will check out that worker.
Poolboy also relies on monitors and links to detect the termination of a client. If a client checks out a worker and then crashes, the pool manager process will detect it and return the worker to the pool. Likewise, if a worker process crashes, a new one will be started.
Equipped with this knowledge, you’re going to adapt the pool. First, you need to start the pool manager somewhere in your supervision tree. You could do that by invoking :poolboy.start_link, but there’s a slightly more elegant way. You can invoke :poolboy.child_spec/3, which describes how Poolboy is supposed to be started. Therefore, to switch the database to the Poolboy-powered pool, you only need to change the implementation of Todo.Database.child_spec/1.
Listing 11.5 Starting a Poolboy-powered pool (todo_poolboy/lib/todo/database.ex)
defmodule Todo.Database do
  @db_folder "./persist"

  def child_spec(_) do
    File.mkdir_p!(@db_folder)

    :poolboy.child_spec(
      __MODULE__,                             ❶
      [                                       ❷
        name: {:local, __MODULE__},           ❷
        worker_module: Todo.DatabaseWorker,   ❷
        size: 3                               ❷
      ],                                      ❷

      [@db_folder]                            ❸
    )
  end

  ...
end
The first argument passed to :poolboy.child_spec/3 is the ID of the child. This information is needed by the parent supervisor. Here, you use the module name (Todo.Database) as the ID.
The second argument is the pool options. The :name option states that the pool manager process should be locally registered, so you can interact with it without needing to know its PID. The :worker_module option specifies the module that will power each worker process, whereas :size specifies the pool size.
The final argument to :poolboy.child_spec/3 is a list of arguments passed to the start_link of each worker when they’re being started.
These arguments state that you want three worker processes, with each worker powered by the Todo.DatabaseWorker module. The pool manager will start each worker by invoking Todo.DatabaseWorker.start_link(@db_folder).
It’s worth noting that with this change, you don’t need Todo.Database.start_link anymore because the new specification states that the database should be started by invoking :poolboy.start_link.
Next, you need to adapt the store and get functions of the Todo.Database. Previously, these functions selected a worker ID and then forwarded this ID to the corresponding function in the Todo.DatabaseWorker module. Now, these functions need to check out the worker from the pool, make a request to the worker, and return the worker to the pool. All of this can be easily done with the function :poolboy .transaction/2.
Listing 11.6 Adapted operation functions (todo_poolboy/lib/todo/database.ex)
defmodule Todo.Database do
  ...

  def store(key, data) do
    :poolboy.transaction(     ❶
      __MODULE__,
      fn worker_pid ->        ❷
        Todo.DatabaseWorker.store(worker_pid, key, data)
      end
    )
  end

  def get(key) do
    :poolboy.transaction(
      __MODULE__,
      fn worker_pid ->
        Todo.DatabaseWorker.get(worker_pid, key)
      end
    )
  end
end
❶ Asks the pool for a single worker
❷ Performs an operation on the worker
Here, you invoke :poolboy.transaction/2, passing the registered name of the pool manager. This will issue a checkout request to fetch a single worker. Once a worker is available, the provided lambda is invoked. When the lambda is finished, :poolboy .transaction/2 will return the worker to the pool.
In the provided lambda, you get the PID of the checked-out worker and issue a Todo.DatabaseWorker request. This means you need to slightly change the implementation of Todo.DatabaseWorker. Previously, the functions from this module accepted a worker ID and then did a registry lookup to find the worker process. In this version, the discovery of the PID is performed by the pool, so you don’t need to register the workers anymore or perform any lookup to discover the process.
Listing 11.7 Adapted worker interface
defmodule Todo.DatabaseWorker do
  use GenServer

  def start_link(db_folder) do
    GenServer.start_link(__MODULE__, db_folder)
  end

  def store(pid, key, data) do
    GenServer.cast(pid, {:store, key, data})
  end

  def get(pid, key) do
    GenServer.call(pid, {:get, key})
  end

  ...
end
That’s all it took to change the pool implementation. The code in the client modules, Todo.System and Todo.Server, as well as the testing code remain exactly the same. This is thanks to the fact that you hid the implementation details behind the interface functions.
11.2.3 Visualizing the system
Once you have a full-blown OTP application, you can visualize it with the help of a tool called observer, which is part of the standard Erlang/OTP distribution.
Let’s see this in action. First, start the system, and then create two to-do servers:
$ iex -S mix

iex(1)> Todo.Cache.server_process("Alice")
iex(2)> Todo.Cache.server_process("Bob")
Now, you can start the observer tool:
iex(3)> :observer.start()
A GUI window should appear, which presents some basic information about the system. If you click the Applications tab, you can see the supervision tree of your application, as illustrated in figure 11.1.
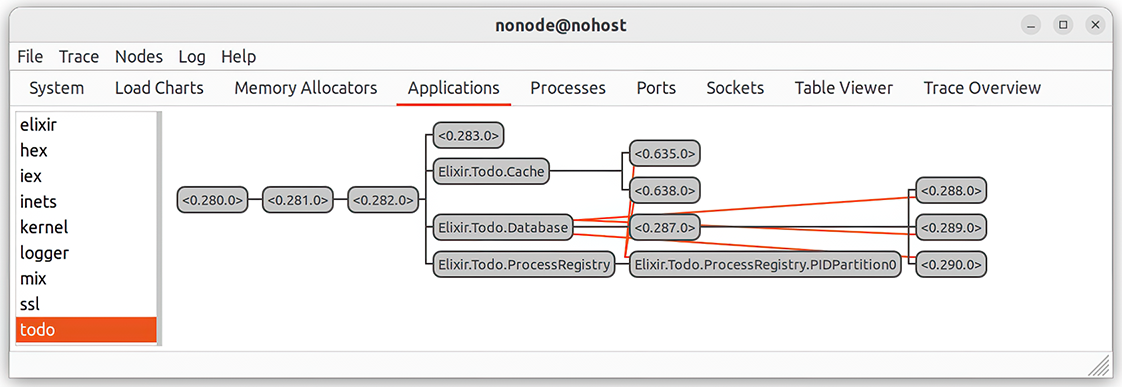
Figure 11.1 Observing the application
The two top processes, with the PIDs <0.280.0> and <0.281.0>, are the processes used by OTP to manage the application. The third process, with the PID <0.282.0>, is the top-level Todo.System supervisor. Then, you can see the four children: the process with the PID <0.283.0>, Todo.Cache, Todo.Database, and Todo.ProcessRegistry.
If available, the observer uses the registered name of a process. Otherwise, the process PID is used to display the process. In this example, the first process with the PID <0.283.0> is the metrics reporter powered by the Todo.Metrics module.
Under the cache, you can see two children, which are to-do servers that you just started from the shell. You can easily verify this by double-clicking on the process box and clicking the State button in the new window. In the last row, you’ll see the process state, which will contain the name of the to-do list.
The observer tool can be useful for visualizing the behavior of the running system. For example, in the Processes tab you can see a list of all processes running in the system and easily figure out which processes are very busy or use a lot of memory. This tab is frequently used to find bottlenecks in the system. You can even use the observer to visualize the system running in production. This will be explained in chapter 13.
11.3 Building a web server
The time has finally come to introduce an HTTP interface into your to-do system. You’ll implement a rudimentary server, wrapping only entries and add_entry requests.
Our focus won’t be so much on the details and finesse of web servers. Instead, the aim is to demonstrate how you can work with OTP applications and show you how everything connects in a simple simulation of a real-world system.
11.3.1 Choosing dependencies
You could, of course, implement the entire server from scratch, but that would be too much work. Instead, you’ll reach for a couple of existing libraries to make your life easier. Note that it’s not the purpose of this section to provide detailed descriptions of those libraries; they’re just a simple means to an end (a basic, working, HTTP server). You’re encouraged to research those libraries in more detail on your own.
Several web server frameworks and libraries are available for both Elixir and Erlang. If you plan on doing any serious production development, you should definitely take a look at the Phoenix Framework (https://phoenixframework.org/). Phoenix is versatile and highly modular, so it’s a great choice for powering all kinds of web servers. At first glance, Phoenix might seem a bit daunting, so we’ll keep things simple here and reach for two lower-level libraries.
The first one is an Erlang library called Cowboy (https://github.com/extend/cowboy). It’s a fairly lightweight and efficient HTTP server library that’s a popular choice for HTTP servers in Erlang and Elixir ecosystems.
But you won’t use Cowboy directly. Instead, you’ll interface with it via the Plug library (https://github.com/elixir-lang/plug), which provides a unified API that hides the details of the actual HTTP server implementation.
You can add both libraries to your project with a single dependency.
Listing 11.8 External dependencies for the web server (todo_web/mix.exs)
defmodule Todo.Mixfile do
  ...

  defp deps do
    [
      {:poolboy, "~> 1.5"},
      {:plug_cowboy, "~> 2.6"}    ❶
    ]
  end
end
We’re adding a new dependency called plug_cowboy. This library provides the glue code between Plug and Cowboy. Internally, this library depends on the Plug and Cowboy libraries, which are therefore transitive dependencies of our project. We don’t need to explicitly list them. The mix tool can resolve this automatically.
11.3.2 Starting the server
With the dependencies configured, you can now run mix deps.get and start implementing the HTTP interface. As mentioned, your primary interface for working with Cowboy is Plug. Plug is a reasonably complex library, and I won’t provide an in-depth treatment here. Our focus is on getting a basic version running and understanding how all the pieces work together.
To start a server powered by Plug and Cowboy, you can reach for Plug.Cowboy .child_spec/1. This function returns a child specification describing how to start the processes responsible for the HTTP server part of the system. As usual, it’s best to wrap this in a dedicated module.
Listing 11.9 HTTP server specification (todo_web/lib/todo/web.ex)
defmodule Todo.Web do
  ...

  def child_spec(_arg) do
    Plug.Cowboy.child_spec(
      scheme: :http,
      options: [port: 5454],
      plug: __MODULE__
    )
  end

  ...
end
The argument passed to Plug.Cowboy.child_spec/1 provides the server options. Here, you specify that you want to serve HTTP traffic on port 5454. The final option, :plug, indicates that some function from this module will be invoked to handle the request.
When you include Todo.Web in a supervisor, several new processes will be started. There will be at least one process that listens on a given port and accepts requests. Then, each distinct TCP connection will be handled in a separate process, and your callbacks (which you must implement) will be invoked in those request-specific processes. But you don’t need to worry about any of these details. Owing to child_spec/1, the Plug library keeps these internals to itself.
Note Remember that applications are singletons—you can start only one instance of a distinct application in a running BEAM instance. But this doesn’t mean you can run only one HTTP server in your system. The Plug and Cowboy applications can be considered factories of HTTP servers. When you start these applications, no HTTP server is started yet. You use child_spec/1 to inject an HTTP server somewhere in your supervision tree. You can, of course, run multiple HTTP servers in your system. For example, you could add another HTTP server for administration purposes.
With child_spec/1 in place, you can inject the HTTP server into the supervision tree. This is done in the Todo.System supervisor.
Listing 11.10 Starting the HTTP server (todo_web/lib/todo/system.ex)
defmodule Todo.System do
  def start_link do
    Supervisor.start_link(
      [
        Todo.Metrics,
        Todo.ProcessRegistry,
        Todo.Database,
        Todo.Cache,
        Todo.Web            ❶
      ],
      strategy: :one_for_one
    )
  end
end
Thanks to wrapping and proper naming, the Todo.System module clearly describes what the system is made of: metrics, a process registry, a database, a cache, and a web server.
11.3.3 Handling requests
Now, you can start handling some requests. Let’s introduce support for add_entry. This will be a POST request. To keep the implementation simple, you’ll transfer all parameters via URL. The example request looks like this:
http://localhost:5454/add_entry?list=bob&date=2023-12-19&title=Dentist
Begin by setting up a route for this request. The skeleton is provided next.
Listing 11.11 Setting up a route for add_entry (todo_web/lib/todo/web.ex)
defmodule Todo.Web do
  use Plug.Router          ❶

  plug :match              ❷
  plug :dispatch           ❷

  ...

  post "/add_entry" do     ❸
    ...
  end

  ...
end
There are some strange constructs here, which are part of how Plug is used. I’ll provide a simple explanation, but you don’t need to understand all this because it isn’t the aim of this exercise.
Calling use Plug.Router adds some functions to your module. This is similar to how you used the Elixir behavior helper (by calling use GenServer). For the most part, the imported functions will be used internally by Plug.
Expressions such as plug :match and plug :dispatch deserve special mention. These calls will perform some additional compile-time work that will allow you to match different HTTP requests. These expressions are examples of Elixir macro invocations, and they’ll be resolved at compilation time. As a result, you’ll get some additional functions in your module (which are again used only by Plug).
Finally, you call a post macro to define request-handling code. The post macro works similarly to the test macro you saw in chapter 7. Under the hood, this macro will generate a function that’s used by all the other generated boilerplate you got by calling the plug macro and use Plug.Router. The generated function will look roughly like the following:
defp do_match(conn, "POST", ["add_entry"], _) do
  ...
end
The code of the generated do_match function will contain the code passed to the plug macro. The generated do_match function is invoked by some other generated code that exists in your module courtesy of the use Plug.Router and plug :match expressions.
If you issue multiple calls to the post macro, you’ll have multiple clauses for this do_match function, each clause corresponding to the single route you’re handling. You’ll end up with something like this:
defp do_match(conn, "POST", ["add_entry"], _), do: ...
defp do_match(conn, "POST", ["delete_entry"], _), do: ...
...
defp do_match(conn, _, _, _), do: ...   ❶
You can check this yourself with the help of a tool called decompile (https://github.com/michalmuskala/decompile). Install the tool according to the README instructions, change to the to-do project root folder, compile the project, and then run mix decompile Todo.Web --to expanded. This will generate the file Elixir.Todo.Web.ex, which will contain the Elixir code after all the macros have been expanded.
Long story short, the code you provide to post "/add_entry" is invoked when an HTTP POST request with an /add_entry path arrives at your server.
Let’s now look at the implementation of the request handler.
Listing 11.12 Implementing the add_entry request (todo_web/lib/todo/web.ex)
defmodule Todo.Web do
  ...

  post "/add_entry" do
    conn = Plug.Conn.fetch_query_params(conn)                      ❶
    list_name = Map.fetch!(conn.params, "list")                    ❶
    title = Map.fetch!(conn.params, "title")                       ❶
    date = Date.from_iso8601!(Map.fetch!(conn.params, "date"))     ❶

    list_name                                                      ❷
    |> Todo.Cache.server_process()                                 ❷
    |> Todo.Server.add_entry(%{title: title, date: date})          ❷

    conn                                                           ❸
    |> Plug.Conn.put_resp_content_type("text/plain")               ❸
    |> Plug.Conn.send_resp(200, "OK")                              ❸
  end

  ...
end
Notice that in the request handler, you use the conn variable, which doesn’t exist anywhere. This variable is brought to you by the post macro, which generates this variable and binds it to the proper value.
As the name implies, the conn variable holds your connection. This is an instance of a Plug.Conn struct that holds a TCP socket together with information about the state of the request you’re processing. From your handler code, you must return the modified connection, which will hold response information, such as its status and body.
The implementation of the request handler consists of three parts. You first decode the input parameters. Then, you invoke the code that performs some action in your system—in this case, adding the new entry. Finally, you respond to the client.
To decode input parameters, you need to invoke Plug.Conn.fetch_query_params/1. This function returns a new version of the connection structure with the params field containing request parameters (in the form of a map). This is essentially a caching technique. Plug caches the result of fetch_query_params in the connection struct, so repeated calls to fetch_query_params won’t result in excessive parsing.
Once you have the parameters ready, you can add the entry. Finally, you set the response content type, status, and body.
The same approach is used to handle the entries request.
Listing 11.13 Implementing the entries request (todo_web/lib/todo/web.ex)
defmodule Todo.Web do
  ...

  get "/entries" do
    conn = Plug.Conn.fetch_query_params(conn)
    list_name = Map.fetch!(conn.params, "list")
    date = Date.from_iso8601!(Map.fetch!(conn.params, "date"))

    entries =
      list_name
      |> Todo.Cache.server_process()
      |> Todo.Server.entries(date)

    formatted_entries =
      entries
      |> Enum.map(&"#{&1.date} #{&1.title}")
      |> Enum.join("\n")

    conn
    |> Plug.Conn.put_resp_content_type("text/plain")
    |> Plug.Conn.send_resp(200, formatted_entries)
  end

  ...
end
This code follows the same approach as in add_entry. Because entries is a GET request, you use the get macro instead of post.
In this implementation, you decode the parameters and then fetch the desired entries. You then produce the textual representation sent to the client and return the response.
Note The presented code organization treats the HTTP server as merely an interface to the core of the system. Notice how in both requests, you convert the input into domain-specific types and then invoke HTTP-agnostic code, such as Todo.Server.add_entry, to perform the operation. The core of the system, which we implemented in the previous chapters, doesn’t know or care that it’s running in the context of an HTTP request. Such separation of concerns makes the code easier to work with, test, and expand.
At this point, you can start the system with iex -S mix and issue requests. For example, this is what you get using the command-line curl tool:
$ curl -d "" \
  "http://localhost:5454/add_entry?list=bob&date=2023-12-19&title=Dentist"
OK

$ curl "http://localhost:5454/entries?list=bob&date=2023-12-19"
2023-12-19 Dentist
This proves that your system is working, but let’s see how everything combines.
11.3.4 Reasoning about the system
First, let’s look at how the HTTP server works. The simplified idea is illustrated in figure 11.2.
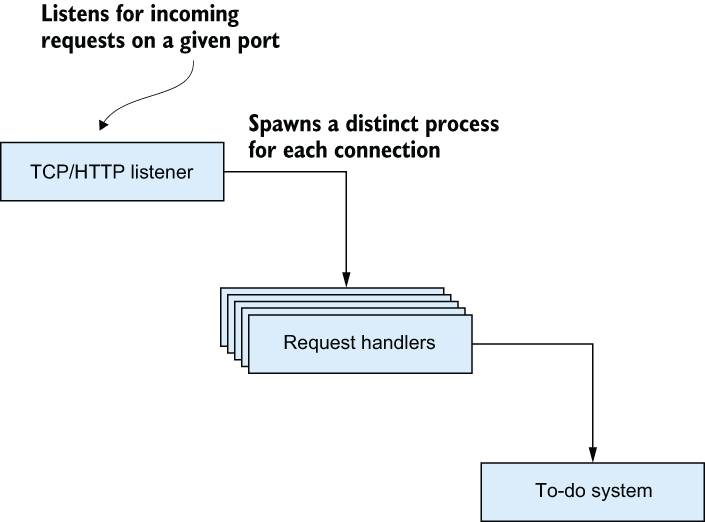
Figure 11.2 Requests are handled in separate processes.
The most important thing to notice is that each connection is managed in a distinct process. In practice, this means different requests are handled in different processes. There’s no special magic here—this is how the underlying Cowboy web server is implemented. It uses one process to listen on a port, and then it spawns a separate process for each incoming request.
This architecture has all sorts of benefits due to the way BEAM treats processes. Because processes are concurrent, CPU resources are maximally used and the system is scalable. Because processes are lightweight, you can easily manage many simultaneous connections. Moreover, thanks to the BEAM scheduler being preemptive, you can be certain that occasional long-running, CPU-intensive requests won’t paralyze the entire system. Finally, due to process isolation, a crash in a single request won’t affect the rest of the system.
Processes also make it easy to reason about the system. For example, you can be certain that independent requests won’t block each other, whereas multiple requests on the same to-do list are synchronized, as illustrated in figure 11.3.

Figure 11.3 Independent simultaneous requests are handled concurrently, whereas requests on the same to-do list are synchronized.
This is due to the way the to-do cache works. Whenever you want to manipulate Bob’s list, you first ask the to-do cache to return the PID of the process in charge. All requests for Bob’s list go through that same process and are, therefore, handled one by one.
After so much development, it’s worth measuring the performance of the system. I quickly tested the system using a tool called wrk (https://github.com/wg/wrk). A brief 30-second load test on my machine gives a throughput of about 40,000 requests per second, with an average latency of 1 ms, and a 99 percentile latency of 7 ms. While the test was running, all the CPU cores were completely busy, which proves there are no bottlenecks in the system. The system is highly concurrent and able to use all of the cores at its disposal.
The observed results are quite decent, especially given that we made some naive decisions in the implementation. Here are a couple of possible issues in the implementation:
-
Date-based lookups in the to-do list abstraction iterate through the entire list.
-
Every to-do server lookup goes through a to-do cache dynamic supervisor.
There’s definitely some room for improvement here, but it’s comforting to know that the system performs well out of the box, even though you didn’t do any fine tuning.
Let’s discuss some effects that calls and casts may have on your system. To refresh your memory, casts are fire-and-forget requests. A caller sends a message to the server and then immediately moves on to do something else. In contrast, a call is a blocking request, where a caller waits for the server to respond.
Remember that you’ve opted to use casts for all operations, except where you need to return a response. This was a somewhat arbitrary decision, made mostly for didactic purposes. In reality, casts have a drawback: you don’t know what happened with your request. This, in turn, means you may be giving false responses to end users, as illustrated in figure 11.4.
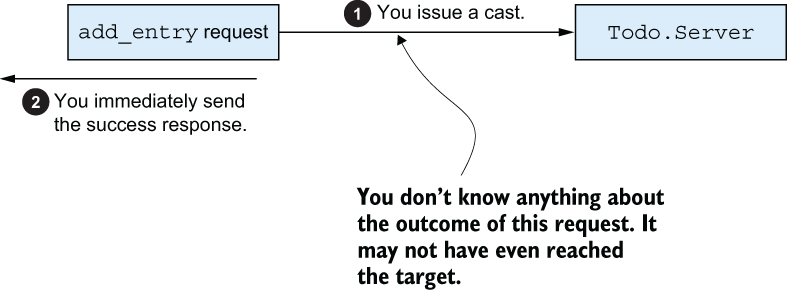
Figure 11.4 Using casts reduces the certainty of your responses.
Because you use a cast to add a to-do entry in your system, you have no way of knowing what happened with your request. When you’re telling the end user that you succeeded, this is a guess, rather than a truthful statement.
Obviously, the simple way to resolve this is to use calls, which are synchronous, meaning the client must wait until the response arrives, as illustrated in figure 11.5.
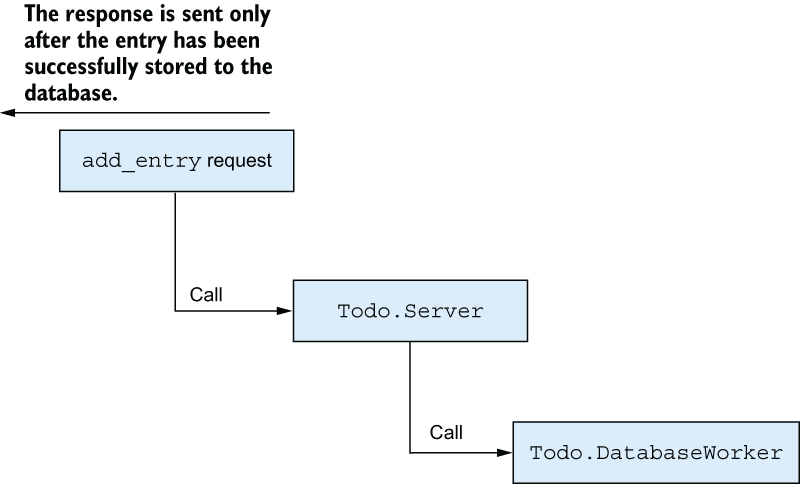
Figure 11.5 Using calls promotes consistency but reduces the responsiveness of the system.
This approach is more consistent: you return success only when you’re certain that the entry has been stored. But the downside is that the entire system now depends on the throughput of database workers, and as you may recall, you’re running only three workers, and you’re using a relatively inefficient database.
This can be resolved by introducing an intermediate process. The idea is to provide an immediate response stating that the request has been queued. Then, you do your best to process the request, and you send a subsequent notification about the request’s status (see figure 11.6).
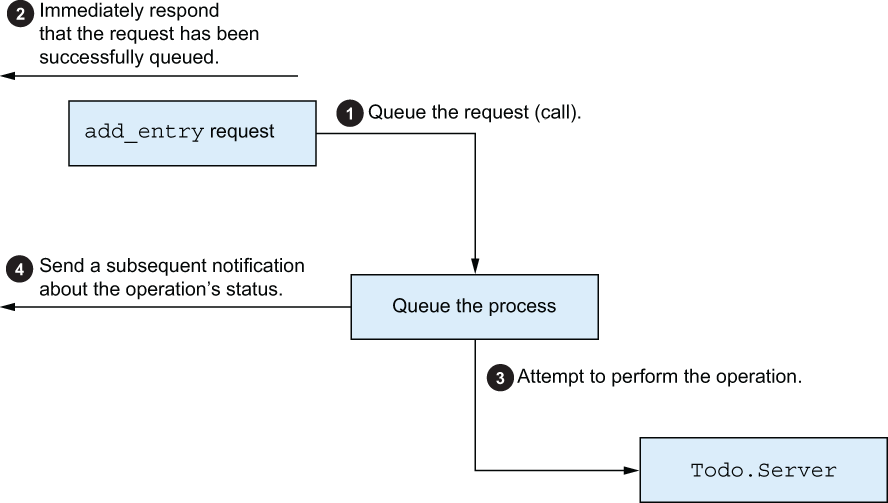
Figure 11.6 Queuing the request and sending a notification about the status
This scheme is more elaborate and involved, so it’s not appropriate for simpler cases in which using plain calls is enough. But in cases when the load is very high and end-to-end operations can take longer, introducing an intermediate process may be beneficial. This process can increase the responsiveness of the system while retaining consistency. Moreover, this process can serve as a proactive agent in dealing with congestion and increased load. If the system becomes overloaded and the queue starts piling up, you can refuse to take more requests into the queue process until you regain some breathing space.
As always, no single approach works for all cases. Using calls can be a reasonable first attempt because it promotes consistency. Later, you can easily switch to casts or introduce an intermediate process, depending on the specific situation.
If you need to perform more complex load management, you can introduce an intermediate process. Instead of rolling your own solution, you can consider using the GenStage library (https://github.com/elixir-lang/gen_stage), which allows you to build various pipelines of producers and consumers.
At this point, you’re finished implementing a basic HTTP server. Next, we’ll talk about application configuration.
11.4 Configuring applications
An OTP application can be configured using a feature called an application environment—a key-value, in-memory store, where keys are atoms and values are Elixir terms. You can provide application environment values through config script files—Elixir scripts that reside in the config folder.
The mix tool makes sure the configuration is loaded into the application environment before the application is started. Finally, you can retrieve an environment value using functions from the Application module.
11.4.1 Application environment
Let’s look at a simple example. The to-do HTTP server currently listens on a hard-coded port: 5454. In this example, you’ll make the HTTP port configurable via an OS environment variable.
The most typical way of setting an application environment is to use the config/ runtime.exs file. This is a script evaluated at run time, just before the application is started. In here, you can set the environment configuration of your application as well as any of its dependencies.
To make the HTTP port configurable, you can read the configuration from the OS environment variable and store it into the application environment.
Listing 11.14 Configuring the HTTP port (todo_env/config/runtime.exs)
import Config                                           ❶

http_port = System.get_env("TODO_HTTP_PORT", "5454")    ❷
config :todo, http_port: String.to_integer(http_port)   ❸
❶ Imports configuration helpers
❷ Reads the OS environment variable
❸ Sets the application’s environment value
Here, you use System.get_env/2 to read the OS environment variable TODO_HTTP_PORT, using the default value of 5454 if the variable is not set. Then, you use the imported Config.config/2 function to configure the :http_port setting of the :todo application.
As soon as you start the system, this setting is available in the application environment, and you can retrieve it—for example, with the Application.fetch_env!/2 function:
$ iex -S mix

iex(1)> Application.fetch_env!(:todo, :http_port)
5454
Setting the OS environment variable before the system is started affects the application environment:
$ TODO_HTTP_PORT=1337 iex -S mix

iex(1)> Application.fetch_env!(:todo, :http_port)
1337
Now, you can adapt the code of Todo.Web to read the port from the application environment.
Listing 11.15 Fetching the http_port setting (todo_env/lib/todo/web.ex)
defmodule Todo.Web do
  ...

  def child_spec(_arg) do
    Plug.Cowboy.child_spec(
      scheme: :http,
      options: [port: Application.fetch_env!(:todo, :http_port)],   ❶
      plug: __MODULE__
    )
  end

  ...
end
❶ Retrieves the HTTP port from the :todo application environment
In this case, you use Application.fetch_env!/2, which will raise an error if the HTTP port isn’t configured. To provide a default value if none is set, you can use Application .get_env/3 (https://hexdocs.pm/elixir/Application.xhtml#get_env/3).
11.4.2 Varying configuration
In some cases, you might want to use different settings in different Mix environments. For example, you currently always use the same HTTP port for development and for tests. As a consequence, you can’t run tests if the to-do system is started in development. The solution for this problem is to use a different HTTP port in the test Mix environment.
Note It’s worth noting that the term environment is overloaded. An application environment is a key-value store that holds various settings for your OTP application. A Mix environment determines the compilation target, such as development, test, or production. Finally, the OS environment consists of the OS-level variables present at the current shell session.
To vary the settings in different Mix environments, you need to make some changes to config/runtime.exs.
Listing 11.16 Mix environment-specific settings (todo_env/config/runtime.exs)
import Config

http_port =
  if config_env() != :test,                              ❶
    do: System.get_env("TODO_HTTP_PORT", "5454"),        ❶
    else: System.get_env("TODO_TEST_HTTP_PORT", "5455")  ❶

config :todo, http_port: String.to_integer(http_port)
❶ Making the decision based on the Mix environment
Here, you rely on the imported Config.config_env/0 to determine the Mix environment used to build the project. Then, in the test environment, you’ll use a different OS environment variable and a different default HTTP port. The app environment name is always the same (:http_port), so the rest of the code doesn’t need to be changed.
Let’s quickly verify if this works. Start the application in the default dev environment:
$ iex -S mix

iex(1)> Application.fetch_env!(:todo, :http_port)
5454
Now, try the same in the test environment:
$ MIX_ENV=test iex -S mix

iex(1)> Application.fetch_env!(:todo, :http_port)
5455
At this point, you can run tests, even if the system is started in another OS process.
There is one additional inconvenience. The database folder is currently always the same, regardless of the Mix environment. As a result, running the tests will pollute your current dev data.
To avoid this, you can make the database folder configurable, using a different OS environment variable and a different default value in the test environment, just like you did with the HTTP port. For the sake of brevity, the code is not presented here, but you’re advised to try it on your own or check the implementation in the todo_env folder.
11.4.3 Config script considerations
It’s worth mentioning that Elixir also supports build-time config scripts. If you create the config/config.exs file, this script will be evaluated before the project is compiled. As a result, any setting you read from external sources, such as OS environment, is done on the build machine.
If you’re building the system on a different machine than the one where you’re running it (which is good practice), the system might end up being improperly configured. Because of this subtle confusion, and due to its special semantics (it’s evaluated at compile time), try to use config.exs as little as possible. In most cases, runtime.exs should serve all your needs.
If you’re developing a library, try to avoid taking your parameters through the application environment. If a library is accepting its parameters via application environment, its users are forced to provide the values through config scripts. A much more flexible approach is to design the API of your library to accept all the parameters as function arguments. With such an approach, library users have complete freedom in deciding how to provide the parameters. They can hardcode the parameters, configure them through the application environment, or fetch the parameters from external sources at run time. For more details, refer to the “Library Guidelines” page in the official documentation (https://hexdocs.pm/elixir/library-guidelines.xhtml#avoid-application-configuration).
Summary
-
An OTP application is a reusable component. The application can run the entire supervision tree or just provide utility modules (as in a library application).
-
A non-library application is a callback module that must start the supervision tree.
-
Applications allow you to specify runtime dependencies to other applications. This isn’t the same as compile-time dependencies that allow you to fetch external code and compile it from your project.
-
Application environments allow you to provide application settings. This can be useful if you want to expose some configuration to the system operators.