12 Building a distributed system
Now that you have a to-do HTTP server in place, it’s time to make it more reliable. To have a truly reliable system, you need to run it on multiple machines. A single machine represents a single point of failure because a machine crash leads to a system crash. In contrast, with a cluster of multiple machines, a system can continue providing service even when individual machines are taken down.
Moreover, by clustering multiple machines, you have a chance of scaling horizontally. When demand for the system increases, you can add more machines to the cluster to accommodate the extra load. This idea is illustrated in figure 12.1.
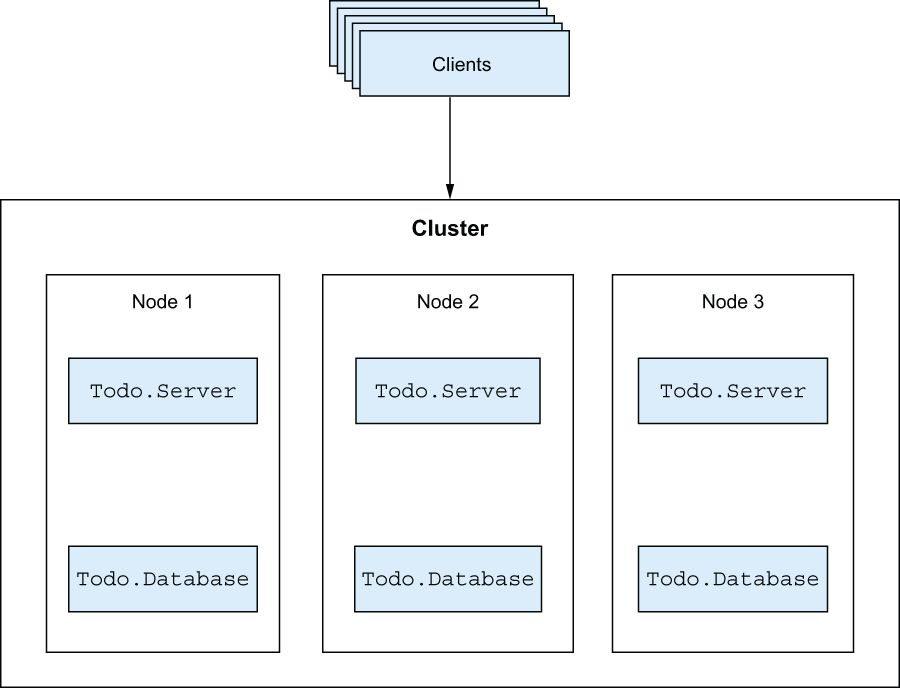
Figure 12.1 The to-do system as a cluster
Here, you have multiple nodes sharing the load. If a node crashes, the remaining load will be spread across survivors, and you can continue to provide service. If the load increases, you can add more nodes to the cluster to take the extra load. Clients access a well-defined endpoint and are unaware of internal cluster details.
Distributed systems obviously offer significant benefits, and Elixir and Erlang give you some simple and yet powerful distribution primitives. The central tools for distributed Erlang-based systems are processes and messages. You can send a message to another process, regardless of whether it’s running in the same BEAM instance or on another instance on a remote machine.
Don’t confuse this with a traditional RPC approach, wherein a remote call is wrapped to look like a local call. Erlang and, by extension, Elixir take the opposite route, and their distributed nature appears early in the game. If you think about it, a typical concurrent system that runs a multitude of processes can already be considered distributed.
Much like remote services, processes live their own lives and run in total isolation from each other. Issuing a request to another local process can be considered a remote call, and message passing has much in common with remote network communication. In the basic version, you send a message and don’t know anything about its outcome. You can’t even be sure whether the message will reach the target. If you want stronger guarantees, you can design the protocol to make the target send you a response (e.g., by using a synchronous call). Moreover, you must consider the cost of passing a message (the contents are copied), and this property sometimes affects the design of the communication protocol among multiple processes.
All these properties are common to the Erlang concurrency model and distributed systems, and you need to take them into consideration. The good news is that a properly designed concurrent system is, in many ways, ready to be distributed across multiple machines.
This transformation is by no means free. Distributed systems introduce an additional set of nontrivial challenges that need to be tackled. But thanks to the simple distribution building blocks that are available—many of which you’re already familiar with—you can focus on the core challenges of distributed systems.
As you’ll see in this chapter, it doesn’t take much to turn your to-do system into a basic fault-tolerant cluster. To do this, you need to become familiar with basic distribution primitives.
12.1 Distribution primitives
Distributed BEAM systems are built by connecting multiple nodes in a cluster. A node is a BEAM instance that has a name associated with it.
You can start multiple nodes on the same host machine or on different machines, and you can connect those nodes. Once the nodes are connected, you can communicate between different processes on different nodes by relying on the familiar message-passing mechanism.
12.1.1 Starting a cluster
To set up a cluster, you need to start a couple of nodes. Starting a node can be as simple as using the --sname parameter while starting the shell:
$ iex --sname node1@localhost    ❶
iex(node1@localhost)1>           ❷
❷ The shell reports the node name.
Using --sname turns your BEAM instance into a node with the name node1@localhost. The part before the @ character is a prefix that uniquely identifies a node on a single machine. The second part (localhost) identifies the host machine. If you omit the host part, the host machine’s name is automatically used.
The --sname parameter sets a short name, in which the host machine is identified only by its name. It’s also possible to provide a long name, in which the host machine is identified by a fully qualified symbolic name or an IP address. This will be discussed in more detail in the final section of this chapter.
Once you’ve started a node, you can obtain its name by calling the Kernel.node/0 function:
iex(node1@localhost)1> node()
:node1@localhost                 ❶
As you can see from the output, a node name is represented internally as an atom.
Using a node usually makes sense when you want to connect it to another node. Let’s try this. Keep node1 running, and start another OS shell session. Now, start node2 and connect it to node1:
$ iex --sname node2@localhost

iex(node2@localhost)1> Node.connect(:node1@localhost)    ❶
true
The argument to Node.connect/1 is an atom that represents the target node name. When Node.connect/1 is invoked, BEAM tries to establish a TCP connection with the target BEAM instance. Once the connection is established, nodes are considered to be connected, and all communication between them takes place via this connection.
You can prove that nodes are connected by calling Node.list/0, which returns a list of all nodes connected to the current one (the current node isn’t listed). Trying this on node1 and node2 gives the expected results:
iex(node1@localhost)2> Node.list()
[:node2@localhost]                   ❶

iex(node2@localhost)2> Node.list()
[:node1@localhost]                   ❷
It’s possible to connect multiple nodes. In fact, by default, BEAM tries to establish a fully connected cluster. If you start a third node, node3, and connect it to node2, a connection is established to all other nodes that node2 is connected to:
$ iex --sname node3@localhost

iex(node3@localhost)1> Node.connect(:node2@localhost)

iex(node3@localhost)2> Node.list()
[:node2@localhost, :node1@localhost]   ❶
❶ node3 is connected to all nodes.
This is useful in scenarios in which you want to set up a fully connected cluster of multiple nodes. Adding a new node to such a cluster amounts to establishing a connection to a single node from the cluster. The new node will then automatically connect to all nodes in the cluster.
To get a list of all nodes in a cluster, including the current one, you can use Node.list/1:
iex(node1@localhost)3> Node.list([:this, :visible])
[:node1@localhost, :node2@localhost, :node3@localhost]
The :this option states that you want the current node to appear in the list. The :visible option indicates that you also want to get the list of all visible nodes. It’s possible to start a node as hidden, as I’ll explain in the last section of this chapter.
12.1.2 Communicating between nodes
Once you have some nodes started and connected, you can make them cooperate. A simple way to try this is to use Node.spawn/2, which receives a node name (an atom) and a lambda. The function then spawns a new process on the target node and runs the lambda in that process.
For example, from node1 you can spawn a process on node2.
Listing 12.1 Spawning a process on another node
iex(node1@localhost)4> Node.spawn(
                         :node2@localhost,                          ❶
                         fn -> IO.puts("Hello from #{node()}") end  ❷
                       )

Hello from node2@localhost
The output proves that the lambda has been executed on another node.
Another important primitive is the ability to send messages to processes, regardless of their location. This property is also known as location transparency. The send operation always works the same way, regardless of the node on which the target process is running.
Let’s look at a simple example. From node1, you’ll start a computation that runs on node2 and then sends the result back to node1:
iex(node1@localhost)5> caller = self()

iex(node1@localhost)6> Node.spawn(
                         :node2@localhost,
                         fn -> send(caller, {:response, 1+2}) end   ❶
                       )

iex(node1@localhost)7> flush()
{:response, 3}                                                      ❷
❶ Sends the response back to the caller
❷ The response is received on the caller.
This example clearly resembles standard use of processes. You spawn a process on a remote node and then, from the spawned process, send the message back to the caller. Notice how the caller variable is used. Even though the lambda runs on another node, the closure mechanism still works.
Finally, you use the iex shell’s flush helper, which takes all messages from the current process mailbox and prints them to the console. This proves that the messages have been received on the caller node.
There are no limits to what can be sent as a message. Whatever works in one BEAM instance will work across different instances (with a small caveat, described in the sidebar on lambdas). When the destination process is on another node, the message is encoded using :erlang.term_to_binary/1 and decoded on the target node with :erlang.binary_to_term/1.
In a multinode environment, the term “local registration” finally starts to make sense. When you register a process locally, the scope of registration is only the current node. This means you can use the same registered name on different nodes (but only once on each node). For example, register shell processes for both node1 and node2:
iex(node1@localhost)8> Process.register(self(), :shell)
true

iex(node2@localhost)3> Process.register(self(), :shell)
true
Calling send(:shell, some_message) will send the message to either node1 or node2, depending on the node where you invoke send.
It’s possible to reference a locally registered process on another node by using {some_alias, some_node}. For example, to send a message from the node1 to node2 shell, you can do this:
iex(node1@localhost)9> send(
                         {:shell, :node2@localhost},    ❶
                         "Hello from node1!"
                       )
❶ Identifies a process registered on another node
Then, on node2, you can verify that a message is received:
iex(node2@localhost)4> flush()
"Hello from node1!"
You can also use the {some_alias, some_node} form when making GenServer requests (casts and calls). Finally, there are two special functions, GenServer.abcast/3 and GenServer.multi_call/4, that let you issue a request to all locally registered processes on given nodes.
12.1.3 Process discovery
Process discovery is a very important operation in a cluster, but this same operation is used in clusterless mode as well. In fact, distributed system or not, the typical pattern of process communication is always the same:
In step 1, you discover a process. You used a form of discovery with the Registry module in chapter 9.
Even in a single-node system, you must somehow find the target process’s PID. This doesn’t change in a distributed setting, but you must use another means of discovery because Registry isn’t cluster aware and works only in the scope of a local node.
The simplest way to do cluster-wide discovery is to use the :global module (https://www.erlang.org/doc/man/global.xhtml), which provides a global name registration facility. For example, if you run the to-do system as a multinode cluster, you may want to run exactly one process per to-do list (unless you aim for redundancy, of course). Global name registration allows you to achieve this.
As an example, you can register the node1 shell process to act as the process responsible for handling Bob’s to-do list:
iex(node1@localhost)10> :global.register_name({:todo_list, "bob"}, self())
:yes
The result (:yes) means global registration is successful. The global (cluster-wide) alias of the current process is now {:todo_list, "bob"}.
At this point, all processes on all nodes in the cluster can find the process registered under this alias. Attempting to globally register the node2 shell process under the same alias will fail:
iex(node2@localhost)5> :global.register_name({:todo_list, "bob"}, self())
:no
You can use :global.whereis_name/1 to find the process:
iex(node2@localhost)6> :global.whereis_name({:todo_list, "bob"})
#PID<7954.90.0>
Note that lookups are local. When a registration is being performed, all nodes are contacted, and they cache the registration information in their local ETS tables. Each subsequent lookup on any node is performed on that node, without any additional chatter. This means a lookup can be performed quickly, whereas registration requires chatting between nodes.
Take a look at the shape of this PID: #PID<7954.90.0>. The first number in the PID string representation isn’t 0, which indicates you’re dealing with a process from some other node.
Global registration allows you to forward all requests that need to manipulate the same resource (in this case, a to-do list) to a single synchronization point (a process) in your cluster. This is exactly the same pattern you use in a single-node setting, now applied to a cluster of nodes. You’ll see this in action a bit later when you start making the to-do system distributed.
Global registration can also be used with GenServer, as illustrated in the following snippet:
GenServer.start_link(
  __MODULE__,
  arg,
  name: {:global, some_global_alias}                 ❶
)

GenServer.call({:global, some_global_alias}, ...)    ❷
❶ Registers the process under a global alias
❷ A global alias can be used to make a request.
Finally, if a registered process crashes or the owner node disconnects, the alias is automatically unregistered on all other machines.
Another frequent discovery pattern occurs when you want to register several processes under the same alias. This may sound strange, but it’s useful in situations in which you want to categorize processes in a cluster and broadcast messages to all processes in a category.
For example, in redundant clusters, you want to keep multiple copies of the same data. Having multiple copies allows you to survive node crashes. If one node terminates, a copy should exist somewhere else in the cluster.
For this problem, you can use the :pg (process groups) module (https://www.erlang.org/doc/man/pg.xhtml). This module allows you to create arbitrarily named cluster-wide groups and add multiple processes to those groups. This addition is propagated across all nodes, and, later, you can query the group and get the list of all processes belonging to it.
Let’s try this. You’ll set up both shell processes of node1 and node2 to handle Bob’s to-do list. To do this, you’ll need to add both processes to this group.
Start the first node, and ensure :pg is running by invoking :pg.start_link/0:
iex(node1@localhost)1> :pg.start_link()
Start the second node, connect it to the first node, and start :pg:
iex(node2@localhost)1> Node.connect(:node1@localhost)

iex(node2@localhost)2> :pg.start_link()
You can add both shell processes to a group with the function :pg.join/2:
iex(node1@localhost)2> :pg.join({:todo_list, "bob"}, self())
:ok

iex(node2@localhost)3> :pg.join({:todo_list, "bob"}, self())
:ok
The first argument is an arbitrary term that uniquely identifies the group. The second argument is the PID of the process, which is added to the group.
At this point, both processes are in the process group, and both nodes can see this:
iex(node1@localhost)3> :pg.get_members({:todo_list, "bob"})
[#PID<8531.90.0>, #PID<0.90.0>]

iex(node2@localhost)4> :pg.get_members({:todo_list, "bob"})
[#PID<0.90.0>, #PID<7954.90.0>]
How can you use this technique? When you want to make an update to Bob’s to-do list, you can query the corresponding process group and get a list of all processes responsible for Bob’s list. Then, you can issue your request to all processes (e.g., by using GenServer.multi_call/4). This ensures all replicas in the cluster are updated.
But when you need to issue a query (e.g., to retrieve to-do list entries), you can do this on a single process from the group (no need to perform multiple queries on all replicas, unless you want better confidence). Therefore, you can choose a single PID from the process group.
Just like the :global module, :pg is implemented in pure Erlang and is also an elaborate version of a process registry. Group creations and joins are propagated across the cluster, but lookups are performed on a locally cached ETS table. Process crashes and node disconnects are automatically detected, and nonexistent processes are removed from the group.
12.1.4 Links and monitors
Links and monitors work even if processes reside on different nodes. A process receives an exit signal or a :DOWN notification message (in the case of a monitor) if any of the following events occur:
Let’s quickly prove this. You’ll start two nodes, connect them, and set up a monitor from the node1 shell to the shell of node2:
$ iex --sname node1@localhost
$ iex --sname node2@localhost

iex(node2@localhost)1> Node.connect(:node1@localhost)
iex(node2@localhost)2> :global.register_name({:todo_list, "bob"}, self())

iex(node1@localhost)1> Process.monitor(       ❶
  :global.whereis_name({:todo_list, "bob"})
)
❶ Monitors a process on another node
Now, you can terminate node2 and flush messages in node1:
iex(node1@localhost)2> flush()
{:DOWN, #Reference<0.0.0.99>, :process, #PID<7954.90.0>, :noconnection}
As you can see, you have a notification that the monitored process isn’t running anymore. This allows you to detect errors in distributed systems and recover from them. In fact, the error-detection mechanism works the same way as in concurrent systems, which isn’t surprising, given that concurrency is also a distribution primitive.
12.1.5 Other distribution services
Other interesting services are provided as part of the Erlang standard library. I’ll mention them briefly here, but once you start writing distributed systems, you should definitely spend time researching them.
I already mentioned that many basic primitives can be found in the Node module (https://hexdocs.pm/elixir/Node.xhtml). On top of that, you may find some useful services in the :net_kernel (https://www.erlang.org/doc/man/net_kernel.xhtml) and :net_adm (https://www.erlang.org/doc/man/net_adm.xhtml) modules.
Occasionally, you’ll need to issue function calls on other nodes. As you’ve seen, this can be done with Node.spawn, but this is a low-level approach and often isn’t suitable. The problem with Node.spawn is that it’s a fire-and-forget kind of operation, so you don’t know anything about its outcome.
More often, you’ll want to obtain the result of a remote function call or invoke a function on multiple nodes and collect all the results. In such cases, you can refer to the :rpc Erlang module (https://erlang.org/doc/man/rpc.xhtml), which provides various useful helpers.
For example, to call a function on another node and get its result, you can use :rpc.call/4, which accepts a node and an MFA identifying the function to be called remotely. Here’s an example that performs a remote call of Kernel.abs(-1) on node2:
iex(node1@localhost)1> :rpc.call(:node2@localhost, Kernel, :abs, [-1])
1
Other useful helpers included in the :rpc module allow you to issue a remote function call on multiple nodes in the cluster. You’ll see this in action a bit later when you add replication features to your database.
I also want to mention cluster-wide locks. These are implemented in the :global module, and they allow you to grab an arbitrarily named lock. Once you have a particular lock, no other process in the cluster can acquire it until you release it.
Let’s see this in action. Start node1 and node2 and connect them. Then, on node1, try to acquire the lock using :global.set_lock/1:
iex(node1@localhost)1> :global.set_lock({:some_resource, self()})
true
The tuple you provide consists of the resource ID and the requester ID. The resource ID is an arbitrary term, whereas the requester ID identifies a unique requester. Two different requesters can’t acquire the same lock in the cluster. Usually, you’ll want to use the process ID as the requester ID, which means that at any point, at most one process can acquire the lock.
Acquiring the lock involves chatting with other nodes in the cluster. Once :set_lock returns, you know that you have the lock, and no one else in the cluster can acquire it. Attempt to acquire a lock on node2:
iex(node2@localhost)1> :global.set_lock({:some_resource, self()}) ❶
❶ Blocks until the lock is released
The shell process on node2 will wait indefinitely (this can be configured via an additional parameter) until the lock becomes available. As soon as you release the lock on node1, it’s obtained on node2:
iex(node1@localhost)2> :global.del_lock({:some_resource, self()})
iex(node2@localhost)2>                                             ❶
❶ The lock is now held by the shell process on node2.
There’s also a simple helper for the acquire-release pattern available in the form of :global.trans/2 (https://erlang.org/doc/man/global.xhtml#trans-2), which takes the lock; runs the provided lambda; and, finally, releases the lock.
Locking is something you should usually avoid because it causes the same kinds of problems as classical synchronization approaches. Excessively relying on locks increases the possibility of deadlocks, livelocks, or starvation. Generally, you should synchronize through processes because it’s easier to reason about the system this way.
But used judiciously, locks can sometimes improve performance. Remember that message passing has an associated cost; this is especially true in distributed systems, where a message must be serialized and transmitted over the network. If a message is very large, this can introduce significant delays and hurt system performance.
Locks can help here because they let you synchronize multiple processes on different nodes without needing to send large messages to another process. Here’s a sketch of this idea. Let’s say you need to ensure that the processing of a large amount of data is serialized in the entire cluster (at any point in time, at most one process may run in the entire cluster). Normally, this is done by passing the data to a process that acts as a synchronization point. But passing a large chunk of data may introduce a performance penalty because data must be copied and transmitted over the network. To avoid this, you can synchronize different processes with locks and then process the data in the caller context:
def process(large_data) do
  :global.trans(                     ❶
    {:some_resource, self},
    fn ->
      do_something_with(large_data)  ❷
    end
  )
end
❶ Acquires the cluster-wide lock
Calling :global.trans/2 ensures cluster-wide isolation. At most, one process in the cluster can be running do_something_with/1 on :some_resource at any point in time. Because do_something_with/1 is running in the caller process, you avoid sending a huge message to another synchronization process. Invoking :global.trans/2 introduces additional chatter between nodes, but messages used to acquire the lock are much smaller than passing the contents of large_data to another process on another node, so you save bandwidth.
This concludes our discussion of the basics of distribution. I didn’t mention some important aspects that arise once you start using a network as a communication channel for message passing. We’ll revisit this topic in the last section of this chapter. For now, let’s focus on making the to-do system more distributed.
12.2 Building a fault-tolerant cluster
With some distribution primitives in your arsenal, you can begin building a cluster of to-do web servers. The aim is to make the system more resilient to all sorts of outages, including crashes of entire nodes. The solution presented here will be simplistic. Making a proper distributed system requires much more attention to various details, and the topic could easily fill an entire book.
On the plus side, making a basic BEAM-powered distributed system isn’t complicated. In this section, you’ll get a feel for how distribution primitives fit nicely into the existing BEAM concurrency model.
Most of your work here will be based on the GenServer abstraction. This shouldn’t come as a surprise, given that message passing is the main distribution tool in BEAM. Before continuing, make sure you remember how GenServer works; if needed, revisit the explanation in chapter 6.
12.2.1 Cluster design
The goals of this cluster are deceptively simple:
-
The cluster will consist of multiple nodes, all of which are powered by the same code and provide the same service (a web interface for managing multiple to-do lists).
-
Changes should be propagated across the cluster. A modification made on a single to-do list on one node should be visible on all other nodes. From the outside, clients shouldn’t care which node they access.
-
The crash of a single node shouldn’t disturb the cluster. Service should be provided continuously, and data from the crashed node shouldn’t be lost.
These goals describe a fault-tolerant system. You always provide service, and individual crashes don’t cause a disturbance. Thus, the system becomes more resilient and highly available.
Let’s begin work on making the system distributed. First, we’ll look at the to-do cache.
12.2.2 The distributed to-do cache
In a sense, the to-do cache is the centerpiece of the system. This is the primary element that maintains the consistency of the data, so let’s recall how it works. The main idea is illustrated in figure 12.2.
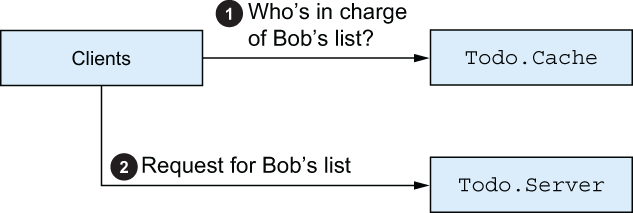
Figure 12.2 Using a to-do cache
When you want to modify a to-do list, you ask the to-do cache to provide the corresponding to-do server process for you. This to-do server then acts as a synchronization point for a single to-do list. All requests for Bob’s list go through that process, which ensures consistency and prevents race conditions.
When clustering your system, you’ll aim to keep this property. The difference is that your cache must somehow be made to work across all nodes in the cluster. No matter where in the cluster you ask the question “Who’s in charge of Bob’s list?” the answer will always point to the same process in the cluster (until that process crashes, of course). This is the single thing you need to change to make your to-do cache distributed. As you’ll see, the changes are reasonably straightforward.
There are various ways to complete cluster-wide discovery. Probably the simplest (although not necessarily the most efficient) relies on services from the :global module that allow you to register a process under a global alias—an arbitrary term that identifies a process in the cluster. Here’s what you need to do:
Let’s start implementing this. The first thing you need to do is modify the Todo.Server module to rely on global registration. So far, you’ve been using Registry, which is suitable only for single-node registrations. For distributed process registration and discovery, you can use the :global module.
Replacing Registry with :global requires a single change in the Todo.Server module. The current version of the relevant code, introduced in chapter 9, looks like this:
defmodule Todo.Server do
  def start_link(name) do
    GenServer.start_link(Todo.Server, name, name: via_tuple(name))
  end

  defp via_tuple(name) do
    Todo.ProcessRegistry.via_tuple({__MODULE__, name})
  end

  ...
end
To make the registration use the :global module, you need to return {:global, registered_name} from via_tuple/1. While you’re at it, you can also rename the function.
Listing 12.2 Global registration of to-do servers (todo_distributed/lib/todo/server.ex)
defmodule Todo.Server do
  ...

  def start_link(name) do
    GenServer.start_link(Todo.Server, name, name: global_name(name))
  end

  defp global_name(name) do
    {:global, {__MODULE__, name}}     ❶
  end

  ...
end
With this single simple change, you’ve switched to distributed registration and discovery. There’s no need to change anything else; the system will work properly.
But there’s one possible performance issue with the current implementation. When you register a process under a global alias, the :global module performs a synchronized chat across the entire cluster. This means a global registration is much more expensive than a local one, which is particularly problematic with the current implementation of the cache, introduced in chapter 9. Let’s recall the relevant parts:
defmodule Todo.Cache do
  ...

  def server_process(todo_list_name) do
    case start_child(todo_list_name) do      ❶
      {:ok, pid} -> pid
      {:error, {:already_started, pid}} -> pid
    end
  end

  defp start_child(todo_list_name) do
    DynamicSupervisor.start_child(
      __MODULE__,
      {Todo.Server, todo_list_name}
    )
  end

  ...
end
❶ A new process is always started.
Way back in section 9.2.3, you opted for this simplistic approach. Whenever a child lookup is done, you start the new process and attempt to register it. If the registration fails, DynamicSupervisor.start_child/2 will return {:error, {:already_started, pid}}. This was a simple solution that served you well. But now, with the system being distributed, this unconditional registration attempt can become a serious bottleneck. Every time you want to work with a to-do list, even if the server process is already running, you attempt a :global registration, which will in turn grab a cluster-wide lock and will then chat with all other nodes in the system.
This can be improved by performing an explicit lookup first. You’ll check whether the to-do server is registered and attempt to start the server only if the lookup returns nothing. To do this, you need to first expand the Todo.Server module with the whereis/1 function, which takes a name and returns a PID of the registered process or nil if no process is registered under the given name.
Listing 12.3 Discovering to-do servers (todo_distributed/lib/todo/server.ex)
defmodule Todo.Server do
  ...

  def whereis(name) do
    case :global.whereis_name({__MODULE__, name}) do
      :undefined -> nil
      pid -> pid
    end
  end

  ...
end
It’s worth repeating that :global.whereis_name/1 doesn’t lead to any cross-node chatting. This function only makes a single lookup to a local ETS table. Therefore, you can expect pretty good and stable performance from the Todo.Server.whereis/1 function.
Now, you can adapt the code in Todo.Cache..
Listing 12.4 Optimized process discovery (todo_distributed/lib/todo/cache.ex)
defmodule Todo.Cache do
  ...

  def server_process(todo_list_name) do
    existing_process(todo_list_name) || new_process(todo_list_name)
  end

  defp existing_process(todo_list_name) do
    Todo.Server.whereis(todo_list_name)
  end

  defp new_process(todo_list_name) do
    case DynamicSupervisor.start_child(
      __MODULE__,
      {Todo.Server, todo_list_name}
    ) do
      {:ok, pid} -> pid
      {:error, {:already_started, pid}} -> pid
    end

  end
end
Relying on a bit of wrapping and the || operator, the server_process/1 function highlights the approach of finding the to-do server. You either return the PID of the existing process, or you attempt to start the new process. As explained in section 9.2.3, the code in new_process/1 properly handles the situation in which two different client processes attempt to start the server for the same to-do list at the same time. The code will also work properly in a distributed setting, and it will handle race conditions between two clients on two different nodes.
With these changes in place, the Todo.ProcessRegistry module isn’t used anymore, and it can, therefore, be removed from the project. The process registry entry can also be removed from the child specification list in the Todo.System module.
Keep in mind that global registration is chatty and serialized (only one process at a time may perform global registration). This means the preceding approach isn’t very scalable with respect to the number of different to-do lists or the number of nodes in the cluster. The solution will also perform poorly if the network is slow.
There are alternatives. The main challenge here is to reliably discover the process responsible for a to-do list while reducing network communication. This can be done by introducing a rule that always maps the same to-do list name to the same node in the network. Here’s a simple sketch of the idea:
def node_for_list(todo_list_name) do
  all_sorted_nodes = Enum.sort(Node.list([:this, :visible]))

  node_index = :erlang.phash2(
    todo_list_name,
    length(all_sorted_nodes)
  )

  Enum.at(all_sorted_nodes, node_index)
end
You get the list of all nodes and sort it to ensure that it’s always in the same order. Then, you hash the input name, making sure the result falls in the range 0..length(all_sorted_nodes). Finally, you return the node at the given position. This ensures that as long as the cluster is stable (the list of nodes doesn’t change), the same to-do list will always be mapped to the same node.
Now, you can make a discovery in a single hop to the target node. Assuming the previous version of Todo.Cache (not the one you just implemented), retrieving the target process can be as simple as this:
:rpc.call(
  node_for_list(todo_list_name),
  Todo.Cache,
  :server_process,
  [todo_list_name]
)
You forward to the target node and retrieve the desired process there. You don’t need to use global registration, and Todo.Cache can continue working as it was before this chapter. The result of the preceding invocation is a PID, which you can then use to make your call. The benefit is that you can discover the PID with less chatting.
The main downside of this approach is that it doesn’t work properly when the cluster configuration changes. If you add another node or a node disconnects, the mapping rules will change. Dealing with this situation is complex. You need to detect the change in the cluster (which is possible, as will be explained a bit later) and migrate all data to different nodes according to new mapping rules. While this data is being migrated, you’ll probably want to keep the service running, which will introduce another layer of complexity. The amount of data that needs to be migrated can be greatly reduced if you use some form of consistent hashing—a smarter mapping of keys to nodes that’s more resilient to changes in the cluster.
It’s obvious that the implementation can quickly become more involved, which is why you started simple and chose the global registration approach. Although it’s not particularly scalable, it’s a simple solution that works. But if you need better performance and scalability, you’ll have to resort to a more complex approach. Instead of reinventing the wheel, consider looking at third-party solutions, such as Syn (https://github.com/ostinelli/syn) or Swarm (https://github.com/bitwalker/swarm).
12.2.3 Implementing a replicated database
After the changes you just made, you’ll have the following behavior:
-
When the first request for Bob’s list arrives, a to-do list is created on the node that handles that request.
-
All subsequent requests on Bob’s to-do list are forwarded to the process created in step 1.
-
If the node (or the process) created in step 1 crashes, a new request for Bob’s list will cause the new to-do server to be registered.
Everything seems fine at first glance, and the system looks properly distributed. You won’t test it now because there’s one important issue we haven’t addressed yet: the database doesn’t survive crashes. Let’s say you performed several updates to Bob’s list on node A. If this node crashes, some other node, such as node B, will take over the work for Bob’s list. But previously stored data won’t be on that node, and you’ll lose all your changes.
Obviously, the database needs to be replicated so that data can survive node crashes. The simplest (although not the most efficient) way of preserving data is to replicate it in the entire cluster. This idea is illustrated in figure 12.3.
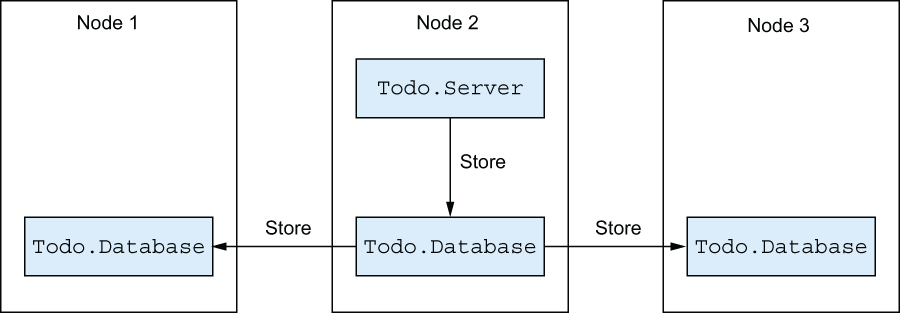
Figure 12.3 Replicating the database
This is pretty straightforward. When you store data to the database, you’ll propagate the change to all nodes in the cluster. The corresponding implementation can be simple if you rely on services from the :rpc module. I mentioned that :rpc, among other things, allows you to issue a function call on all nodes in the cluster. You’ll rely on this feature and make some changes to the Database module:
-
Rename the existing
Database.storefunction toDatabase.store_local. The code remains the same. -
Provide the new implementation to
Database.store. This new implementation will callDatabase.store_localon all nodes in the cluster.
Another change you’ll make (the code isn’t presented here) will turn Todo.DatabaseWorker.store/2 into a call. This request should have been implemented as a call in the first place. Back in chapter 7, I opted for a cast somewhat arbitrarily, mostly for didactic purposes. In reality, if you’re asking another process to store data, you should request a confirmation message, so you know whether the data has been stored or something went wrong. This becomes increasingly important as you move to a less reliable communication medium (a network) in which all sorts of things can go wrong. When you expect a request to be used across nodes, you should usually implement it as a call.
No other changes are required. In particular, Todo.Database.get/1 remains unchanged. When you want to read the data, you can do so from the local node, optimistically assuming all nodes have the same copy of the data. The changes are straightforward, as shown in the following listing.
Listing 12.5 Storing data on all nodes (todo_distributed/lib/todo/database.ex)
defmodule Todo.Database do
  ...

  def store(key, data) do
    {_results, bad_nodes} =
      :rpc.multicall(                                               ❶
        __MODULE__,                                                 ❶
        :store_local,                                               ❶
        [key, data],                                                ❶
        :timer.seconds(5)                                           ❶
      )                                                             ❶

    Enum.each(bad_nodes, &IO.puts("Store failed on node #{&1}"))    ❷
    :ok
  end

  ...
end
❶ Calls store_local on all nodes
Here, you rely on :rpc.multicall/4 to make a function call on all nodes in the cluster. multicall accepts MFA and a timeout. The target function is then invoked on all nodes in the cluster, all results are collected, and you get a tuple in the form {results, bad_nodes}: a list of results and a list of nodes that didn’t respond in the given time.
Finally, you print all nodes on which the request timed out. Note that, in practice, this isn’t sufficient. You should also verify that each received response returns :ok. Moreover, you should do something meaningful in the case of a partial success. Otherwise, you’ll end up with an inconsistent cluster, with different nodes containing different data. For the sake of brevity, I’ve refrained from doing this here, but in a real project, this is an issue that needs to be considered and addressed.
I made another small change in the database workers, which isn’t presented here. Up to now, you’ve used the persist folder to store your data. This is changed to accommodate the node name. If your node is called node1@localhost, you’ll store data in the persist/node1 folder. This is done mostly to simplify testing and allow you to start multiple nodes locally from the same root folder.
In any case, this simple change makes it possible to replicate your data across the cluster. With this, our basic take on a clustered to-do system is finished, and you can try it out.
12.2.4 Testing the system
Finally, it’s time to test the system. You need to start a few nodes, connect them, and see how the cluster works. But recall that, in chapter 11, you made the web server listen on port 5454. You can’t have two nodes listening on the same port, so you need to change this. Luckily, in section 11.4, you made the web port configurable via the application environment, so it’s possible to change the default port from the command line.
Start two instances, node1 and node2, that listen on ports 5454 and 5555, respectively:
$ TODO_SERVER_EXPIRY=600 iex --sname node1@localhost -S mix    ❶

$ TODO_SERVER_EXPIRY=600 TODO_HTTP_PORT=5555 \
    iex --sname node2@localhost -S mix                         ❷
❶ Starts node1, which listens on the default port
❷ Starts node2, and sets the alternative port
Here, we’re changing the system configuration via the OS environment variables. The to-do server auto-expiry timeout is increased to 600 seconds, so it doesn’t interfere with our local experiments. The second node is also configured to use the nondefault port.
Next, you need to connect the two nodes:
iex(node1@localhost)1> Node.connect(:node2@localhost)
Now, the cluster is established, and you can use your servers. Add an entry for Bob on the first node:
$ curl -d "" \
    "http://localhost:5454/add_entry?list=bob&date=2023-12-19&title=Dentist"
OK
Then, verify that this entry is visible on another node:
$ curl "http://localhost:5555/entries?list=bob&date=2023-12-19"
2023-12-19 Dentist
This proves that your data is propagated across the cluster. Furthermore, looking at individual iex shells, you’ll see the “Starting to-do server for bob” message in the node1 shell but not in node2. This is clear proof that even when you try to access Bob’s list on another node, you’re forwarded to the corresponding process on node1.
You can, thus, safely modify Bob’s list on node2 without compromising the data:
$ curl -d "" \
    "http://localhost:5555/add_entry?list=bob&date=2023-12-19&title=Movies"

$ curl "http://localhost:5454/entries?list=bob&date=2023-12-19"
2023-12-19 Dentist
2023-12-19 Movies
Finally, crashing a single node won’t disturb the system. Stop node1, where Bob’s to-do server is running, and try to query node2:
$ curl "http://localhost:5555/entries?list=bob&date=2023-12-19"
2023-12-19 Dentist
2023-12-19 Movies
Sure enough, the cluster is still providing its service, and data is preserved. The new to-do server has been created on node2, and it restored the state from the replicated database.
At this point, your basic cluster is complete. There are some remaining issues, which I won’t address here but will mention:
-
You should set up a load balancer to serve as a single access point for all clients.
-
You need a scheme for introducing new nodes to the running cluster. When a new node is introduced, it should first synchronize the database with one of the already connected nodes; then, it can begin serving requests.
-
Database replication is fragile. You need some kind of two-phase commit strategy.
Some of these challenges aren’t easy to tackle, but they’re inherent to distributed systems, and you’ll have to deal with them regardless of the underlying technology. It’s important to understand that Erlang isn’t a “magic wand” for distributed problems. In a distributed system, many things can go wrong, and it’s up to you to decide how you want to recover from various failures. There’s no one-size-fits-all solution: your job is to combine basic distribution primitives in a way that suits the problem at hand.
Of course, offloading the work to proven third-party components can often help. For example, by using the built-in Mnesia database, you could achieve better write guarantees and be able to easily migrate new nodes to the cluster. But even then, it’s important to understand how a third-party library works in a distributed setting. In this example, Mnesia doesn’t deal explicitly with network partitions and split-brain scenarios and, instead, leaves it to the developer to resolve this situation. Some other component might exhibit different drawbacks, so you need to understand how it works in a distributed setting.
Erlang distribution primitives can take you a long way. Only a few changes were needed to make your system distributed, even if you didn’t prepare for the distributed system up front.
12.2.5 Detecting partitions
The work so far has been easy, but we’ve conveniently ignored the issue of network partitions. This is one of the biggest challenges when building a distributed system. Fully discussing this topic could easily turn into a substantial-sized book, so I’ll just explain the basic mechanisms of detecting partitions.
When you decide to go distributed, partitions are a problem you’ll have to deal with, one way or another. Network partitions shouldn’t be ignored in a distributed system, so even if you reach for a third-party product (e.g., an external database) to handle clustering and replication, you should understand how that product behaves when partitions occur. It’s best to be aware of the challenges you’ll face so that you can make conscious and informed decisions about how to proceed.
A network partition, or netsplit, is a situation in which two nodes can no longer communicate with each other. There can be all sorts of underlying causes, and it’s impossible to tell them apart:
From the standpoint of one node, all those situations look the same. The remote node doesn’t respond, and you don’t know why. It’s, therefore, virtually impossible to guarantee that a netsplit will never take place. Even on an ultra-fast and reliable network, a bug or overload may cause one host to become so busy that it can’t respond to another in a timely manner. The other node has no choice but to interpret this situation as a netsplit and conclude that the connection is lost. This means that when you’re implementing a distributed system, you need to consider network partitions and devise a strategy to deal with such situations.
When a partition occurs, you may end up with multiple independent clusters that are mutually disconnected. The problem is that although those clusters can’t talk to each other, a cluster’s clients may be able to reach all nodes. This situation is also known as split-brain. If different clusters continue to serve users independently, you may end up with undesired behavior. A request issued on one cluster won’t be visible on another, and users may face lost updates, or phantom entries may appear. Ultimately, once you reconnect those clusters, you may end up with conflicting data.
To deal with partitions, you need to be able to detect them. Remember that a partition always manifests as a loss of connection to the remote node, and it’s possible to detect this situation. As mentioned earlier, a node periodically pings its peers via tick messages, and if a peer fails to respond to these messages, it will be considered disconnected. Each process can subscribe to notifications about changes in connected nodes via :net_kernel .monitor_nodes/1 (https://erlang.org/doc/man/net_kernel.xhtml#monitor_nodes-1).
The argument you provide is a Boolean that indicates whether you’re adding a new subscription (true) or installing a single subscriber that overwrites all previous ones on this node (false). Either way, a process that calls monitor_nodes will receive notifications whenever a remote node connects or disconnects.
Let’s try this. First, start node1 and subscribe to notifications:
$ iex --sname node1@localhost
iex(node1@localhost)1> :net_kernel.monitor_nodes(true)
This makes the caller process (in this case, the shell) receive notifications.
Now, start two additional nodes and connect them to node1:
$ iex --sname node2@localhost
iex(node2@localhost)1> Node.connect(:node1@localhost)

$ iex --sname node3@localhost
iex(node3@localhost)1> Node.connect(:node1@localhost)
In the node1 shell, you can see the corresponding messages:
iex(node1@localhost)2> flush()
{:nodeup, :node2@localhost}
{:nodeup, :node3@localhost}
The same thing happens on disconnect. You can stop node2 and node3 and check the messages in node1:
iex(node1@localhost)3> flush()
{:nodedown, :node3@localhost}
{:nodedown, :node2@localhost}
Alternatively, you can also use Node.monitor/2 if you want to monitor a particular node (https://hexdocs.pm/elixir/Node.xhtml#monitor/2).
Finally, as I already mentioned, you can set up a monitor or a link to a remote process. This works just as it does with local processes. If a remote process crashes (or the node disconnects), you’ll receive a message (when using monitors) or an exit signal (when using links).
12.2.6 Highly available systems
Way back in chapter 1, I described some properties of a highly available system. It may not be obvious, but you’ve gradually reached this goal in the to-do system, which now has some nice properties:
-
Responsiveness—Because you have a highly concurrent system, you can use your hardware more efficiently and serve multiple requests concurrently. Owing to how BEAM processes work, you won’t experience unexpected pauses, such as system-wide garbage collection (because processes are garbage collected individually and concurrently). Occasional long-running tasks won’t block the entire system due to frequent preemption of processes. Ultimately, you should have a predictable running system with fairly constant latency that degrades gracefully if your system becomes overloaded.
-
Scalability—Your system is both concurrent and distributed, so you can address increased popularity and load by using a more powerful machine or by adding more nodes to the system. The system can automatically take advantage of the new hardware.
-
Fault tolerance—Due to process isolation, you can limit the effect of individual errors. Due to process links, you can propagate such errors across the system and deal with them. Supervisors can help the system self-heal and recover from errors. At the same time, the main code will follow the happy path, focusing on the work that needs to be done, liberated from error-detection constructs. Finally, due to distribution, you can survive crashes of entire machines in the system.
At this point, it should be clear that the main tool for high availability is the BEAM concurrency model. Relying on processes provided many nice properties and made it possible to come close to having a highly available system.
Of course, this system is extremely simplified: you haven’t provided proper implementations for aspects such as the database, and you haven’t dealt with netsplits, which makes these claims overconfident. Regardless, when you set out to implement a highly available system that must serve a multitude of users continuously, these are the properties you’ll need to achieve, and processes are the main tool that can take you there.
At this point, you’re finished making the system distributed. Before departing, though, there are some important network-related considerations to discuss.
12.3 Network considerations
So far, you’ve been running nodes locally. This is fine for making local experiments and doing development-time testing. But in production, you’ll usually want to run different nodes on different machines. When running a cross-host cluster, you need to consider some additional details. Let’s start with node names.
12.3.1 Node names
The names you’ve been using so far are short names that consist of an arbitrary name prefix (node1 and node2, in this case) and the host name (localhost, in these examples). You can also provide a fully qualified node name, also known as a long name, which consists of a name prefix and a fully qualified host name. A long name can be provided with the --name command-line option:
$ iex --name node1@127.0.0.1
iex(node1@127.0.0.1)1>        ❶
It’s also possible to use symbolic names:
$ iex --name node1@some_host.some_domain
iex(node1@some_host.some_domain)1>
A node name plays an important role when establishing a connection. Recall that a name uses the form arbitrary_prefix@host (short name) or arbitrary_prefix@host .domain (long name). This name obviously identifies a BEAM instance on a machine. The second part of the name (host or host.domain) must be resolvable to the IP address of the machine where the instance is running. When you attempt to connect to node2@some_host.some_domain from node1, the node1 host must be able to resolve some_host.some_domain to the IP address of the host machine.
It’s also worth noting that a node can connect only to a node that has the same type of name. In other words, a connection between a long-named node and a short-named node isn’t possible.
12.3.2 Cookies
To connect two nodes, they must agree on a magical cookie—a kind of passphrase that’s verified while the nodes are connecting. The first time you start a BEAM instance, a random cookie is generated for you and persisted in your home folder in the .erlang.cookie file. By default, all nodes you start on that machine will have this cookie.
To see your cookie, you can use Node.get_cookie/0:
iex(node1@localhost)1> Node.get_cookie()
:JHSKSHDYEJHDKEDKDIEN
Notice that the cookie is internally represented as an atom. A node running on another machine will have a different cookie, so connecting two nodes on different machines won’t work by default; you need to, somehow, make all nodes use the same cookie. This can be as simple as calling Node.set_cookie/1 on all nodes you want to connect:
iex(node1@localhost)1> Node.set_cookie(:some_cookie)

iex(node1@localhost)2> Node.get_cookie()
:some_cookie
Another approach is to provide the --cookie option when you start the system:
$ iex --sname node1@localhost --cookie another_cookie

iex(node1@localhost)1> Node.get_cookie()
:another_cookie
Cookies provide a bare minimum of security and also help prevent a fully connected cluster in which all nodes can directly talk to each other. For example, let’s say you want to connect node A to B and B to C, but you don’t want to connect A and C. This can be done by assigning different cookies to all the nodes and then, in A and C, using the Node.set_cookie/2 function, which allows you to explicitly set different cookies that need to be used when connecting to different nodes.
12.3.3 Hidden nodes
It should be clear by now that most node operations revolve around the cluster. Most often, you’ll treat all connected nodes as part of your cluster. But in some cases, this isn’t what you need. For example, various tools let you connect to a remote running node and interact with it. A simple example is starting a local node that acts as a remote shell to another node. Another example is an instrumentation tool—a node that connects to another node, collects all sorts of metrics from it, and presents the results in a GUI.
Such nodes are helpers that shouldn’t be part of the cluster, and you usually don’t want them to be seen as such. For this purpose, you can make a hidden connection. When you start your BEAM instance with the --hidden argument, the node isn’t seen in other nodes’ connected lists (and vice versa).
Keep in mind, though, that a hidden node is still maintained in the node’s connection list, albeit under a different hidden tag. You can explicitly retrieve hidden nodes by calling Node.list([:hidden]). Calling Node.list([:connected]) returns all connected nodes, both hidden and visible, whereas calling Node.list([:visible]) returns only visible nodes. When you want to perform a cluster-wide operation, you should generally use the :visible option.
Services provided by :global, :rpc, and :pg ignore hidden nodes. Registering a global alias on one node won’t affect any hidden peer, and vice versa.
12.3.4 Firewalls
Given that nodes communicate via TCP connection, it’s obvious that you need to have some ports that are open to other machines. When one node wants to connect to another node on a different machine, it needs to communicate with two different components, as illustrated in figure 12.4.
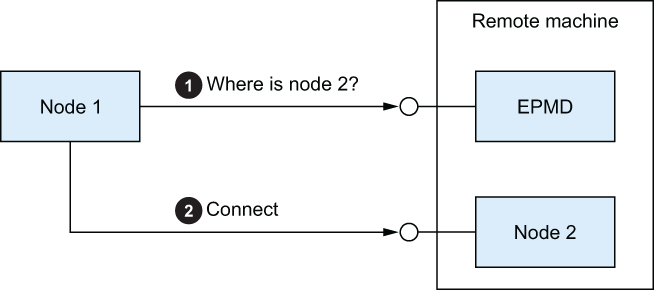
Figure 12.4 Connecting to a remote node
The first component, the Erlang Port Mapper Daemon (EPMD), is an OS process that’s started automatically when you start the first Erlang node on the host machine. This component acts as a node name resolver on the host machine. EPMD knows the names of all currently running BEAM nodes on the machine. When a node wants to connect to a node on this machine, it first queries EPMD to determine which port the target node is listening on, and then it contacts the target node. EPMD listens on port 4369, and this port must be accessible from remote machines.
In addition, each node listens on a random port that needs to be accessible as well because it’s used to establish the connection between two nodes. Obviously, it’s not particularly helpful that the node’s listening port is random because it’s not possible to define firewall rules.
Luckily, you can provide a fixed range of ports on which a node will listen. This can be done by setting the inet_dist_listen_min and inet_dist_listen_max environment variables of the kernel app at the command line:
$ iex \
    --erl '-kernel inet_dist_listen_min 10000' \   ❶
    --erl '-kernel inet_dist_listen_max 10100' \   ❶
    --sname node1@localhost
The node will listen on the first port available in the given range. If you’re sure there won’t be a port clash, you can use the same value for both parameters, thus effectively designating a single port to be used.
You can manually inspect the ports of all nodes on the host machine via :net_adm.names/0:
iex(node1@localhost)1> :net_adm.names()
{:ok, [{~c"node1", 10000}]}
Alternatively, you can also invoke epmd -names from the OS command line.
To summarize, if you’re behind a firewall, you need to open port 4369 (EPMD) and the range of ports on which your node will listen.
Summary
-
Distributed systems can improve fault tolerance, eliminating the risk of a single point of failure.
-
Clustering lets you scale out and spread the total load over multiple machines.
-
BEAM-powered clusters are composed of nodes, which are named BEAM instances that can be connected and can communicate.
-
Two nodes communicate via a single TCP connection. If this connection is broken, the nodes are considered disconnected.
-
The main distribution primitive is a process. Sending a message works the same way, regardless of the process location. A remotely registered process can be accessed via
{alias, node_name}. -
Many useful higher-level services built on top of those primitives are available in the
:global,:rpc, andGenServermodules. -
When communicating between nodes, use calls rather than casts.