Chapter 3. On the Catwalk
When you are alone / You are the cat, you are the phone / You are an animal
They Might Be Giants, “Don’t Let’s Start” (1986)
In this chapter, the challenge is to write a clone of cat, which is so named because it can concatenate many files into one file.
That is, given files a, b, and c, you could execute cat a b c > all to stream all the lines from these three files and redirect them into a file called all.
The program will accept a couple of different options to prefix each line with the line number.
You’ll learn how to do the following:
-
Organize your code into a library and a binary crate
-
Use testing-first development
-
Define public and private variables and functions
-
Test for the existence of a file
-
Create a random string for a file that does not exist
-
Read regular files or
STDIN(pronounced standard in) -
Use
eprintln!to print toSTDERRandformat!to format a string -
Write a test that provides input on
STDIN -
Create a struct
-
Define mutually exclusive arguments
-
Use the
enumeratemethod of an iterator
How cat Works
I’ll start by showing how cat works so that you know what is expected of the challenge.
The BSD version of cat does not print the usage for the -h|--help flags, so I must use man cat to read the manual page.
For such a limited program, it has a surprising number of options, but the challenge program will implement only a subset of these:
CAT(1)                    BSD General Commands Manual                   CAT(1)

NAME
     cat -- concatenate and print files

SYNOPSIS
     cat [-benstuv] [file ...]

DESCRIPTION
     The cat utility reads files sequentially, writing them to the standard
     output.  The file operands are processed in command-line order.  If file
     is a single dash ('-') or absent, cat reads from the standard input.  If
     file is a UNIX domain socket, cat connects to it and then reads it until
     EOF.  This complements the UNIX domain binding capability available in
     inetd(8).

     The options are as follows:

     -b      Number the non-blank output lines, starting at 1.

     -e      Display non-printing characters (see the -v option), and display
             a dollar sign ('$') at the end of each line.

     -n      Number the output lines, starting at 1.

     -s      Squeeze multiple adjacent empty lines, causing the output to be
             single spaced.

     -t      Display non-printing characters (see the -v option), and display
             tab characters as '^I'.

     -u      Disable output buffering.

     -v      Display non-printing characters so they are visible.  Control
             characters print as '^X' for control-X; the delete character
             (octal 0177) prints as '^?'.  Non-ASCII characters (with the high
             bit set) are printed as 'M-' (for meta) followed by the character
             for the low 7 bits.

EXIT STATUS
     The cat utility exits 0 on success, and >0 if an error occurs.
Throughout the book I will also show the GNU versions of programs so that you can consider how the programs can vary and to provide inspiration for how you might expand beyond the solutions I present.
Note that the GNU version does respond to --help, as will the solution you will write:
$ cat --help
Usage: cat [OPTION]... [FILE]...
Concatenate FILE(s), or standard input, to standard output.

  -A, --show-all           equivalent to -vET
  -b, --number-nonblank    number nonempty output lines, overrides -n
  -e                       equivalent to -vE
  -E, --show-ends          display $ at end of each line
  -n, --number             number all output lines
  -s, --squeeze-blank      suppress repeated empty output lines
  -t                       equivalent to -vT
  -T, --show-tabs          display TAB characters as ^I
  -u                       (ignored)
  -v, --show-nonprinting   use ^ and M- notation, except for LFD and TAB
      --help     display this help and exit
      --version  output version information and exit

With no FILE, or when FILE is -, read standard input.

Examples:
  cat f - g  Output f's contents, then standard input, then g's contents.
  cat        Copy standard input to standard output.

GNU coreutils online help: <http://www.gnu.org/software/coreutils/>
For complete documentation, run: info coreutils 'cat invocation'
Note
The BSD version predates the GNU version, so the latter implements all the same short flags to be compatible. As is typical of GNU programs, it also offers long flag aliases like --number for -n and --number-nonblank for -b. I will show you how to offer both options, like the GNU version.
For the challenge program, you will implement only the options -b|--number-nonblank and -n|--number.
I will also show you how to read regular files and
STDIN when given a filename argument of a dash (-).
To demonstrate cat, I’ll use some files that I have included in the 03_catr directory of the repository.
Change into that
directory:
$ cd 03_catr
The tests/inputs directory contains four files for testing:
-
empty.txt: an empty file
-
fox.txt: a single line of text
-
spiders.txt: a haiku by Kobayashi Issa with three lines of text
-
the-bustle.txt: a lovely poem by Emily Dickinson that has nine lines of text, including one blank
Empty files are common, if useless. The following command produces no output, so we’ll expect our program to do the same:
$ cat tests/inputs/empty.txt
Next, I’ll run cat on a file with one line of text:
$ cat tests/inputs/fox.txt
The quick brown fox jumps over the lazy dog.
Note
I have already used cat several times in this book to print the contents of a single file, as in the preceding command. This is another common usage of the program outside of its original intent of concatenating files.
The -n|--number and -b|--number-nonblank flags will both number the lines. The line number is right-justified in a field six characters wide followed by a tab character and then the line of text.
To distinguish the tab character, I can use the -t option to display nonprinting characters so that the tab shows as ^I, but note that the challenge program is not expected to do this.
In the following command, I use the Unix pipe (|) to connect STDOUT from the first command to STDIN in the second command:
$ cat -n tests/inputs/fox.txt | cat -t
     1^IThe quick brown fox jumps over the lazy dog.
The spiders.txt file has three lines of text that should be numbered with the -n option:
$ cat -n tests/inputs/spiders.txt
     1	Don't worry, spiders,
     2	I keep house
     3	casually.
The difference between -n (on the left) and -b (on the right) is apparent only with the-bustle.txt, as the latter will number only nonblank lines:
$ cat -n tests/inputs/the-bustle.txt    $ cat -b tests/inputs/the-bustle.txt
     1	The bustle in a house                1	The bustle in a house
     2	The morning after death              2	The morning after death
     3	Is solemnest of industries           3	Is solemnest of industries
     4	Enacted upon earth,—                 4	Enacted upon earth,—
     5
     6	The sweeping up the heart,           5	The sweeping up the heart,
     7	And putting love away                6	And putting love away
     8	We shall not want to use again       7	We shall not want to use again
     9	Until eternity.                      8	Until eternity.
Note
Oddly, you can use -b and -n together, and the -b option takes precedence. The challenge program will allow only one or the other.
In the following example, I’m using blargh to represent a nonexistent file.
I create the file cant-touch-this using the touch command and use the chmod command to set permissions that make it unreadable.
(You’ll learn more about what the 000 means in Chapter 14 when you write a Rust version of ls.)
When cat encounters any file that does not exist or cannot be opened, it will print a message to STDERR and move to the next file:
$ touch cant-touch-this && chmod 000 cant-touch-this $ cat tests/inputs/fox.txt blargh tests/inputs/spiders.txt cant-touch-this The quick brown fox jumps over the lazy dog.cat: blargh: No such file or directory
Don't worry, spiders,
I keep house casually. cat: cant-touch-this: Permission denied
This is the output from the first file.
This is the error for a nonexistent file.
This is the output from the third file.

This is the error for an unreadable file.
Finally, I’ll run cat with all the files. Notice that it starts renumbering the lines for each file:
$ cd tests/inputs
Change into the tests/inputs directory.
Run
catwith all the files and the-noption to number the lines.
If you look at the mk-outs.sh script used to generate the test cases, you’ll see I execute cat with all these files, individually and together, as regular files and through STDIN, using no flags and with the -n and -b flags.
I capture all the outputs to various files in the tests/expected directory to use in testing.
Getting Started
The challenge program you write should be called catr (pronounced cat-er) for a Rust version of cat.
I suggest you begin with cargo new catr to start a new application.
You’ll use all the same external crates as in Chapter 2, plus the rand crate to create random values for testing.
Update your Cargo.toml to add the following dependencies:
[dependencies]clap="2.33"[dev-dependencies]assert_cmd="2"predicates="2"rand="0.8"
You’re going to write the whole challenge program yourself later, but first I’m going to coach you through the things you need to know.
Starting with Tests
So far in this book, I’ve shown you how to write tests after writing the programs to get you used to the idea of testing and to practice the basics of the Rust language. Starting with this chapter, I want you to think about the tests before you start writing the program. Tests force you to consider the program’s requirements and how you will verify that the program works as expected. Ultimately, I want to draw your attention to test-driven development (TDD) as described in a book by that title written by Kent Beck (Addison-Wesley). TDD advises we write the tests before writing the code, as shown in Figure 3-1. Technically, TDD involves writing tests as you add each feature, and I will demonstrate this technique in later chapters. Because I’ve written all the tests for the program, you might consider this more like test-first development. Regardless of how and when the tests are written, the point is to emphasize testing at the beginning of the process. Once your program passes the tests, you can use the tests to improve and refactor your code, perhaps by reducing the lines of code or by finding a faster implementation.
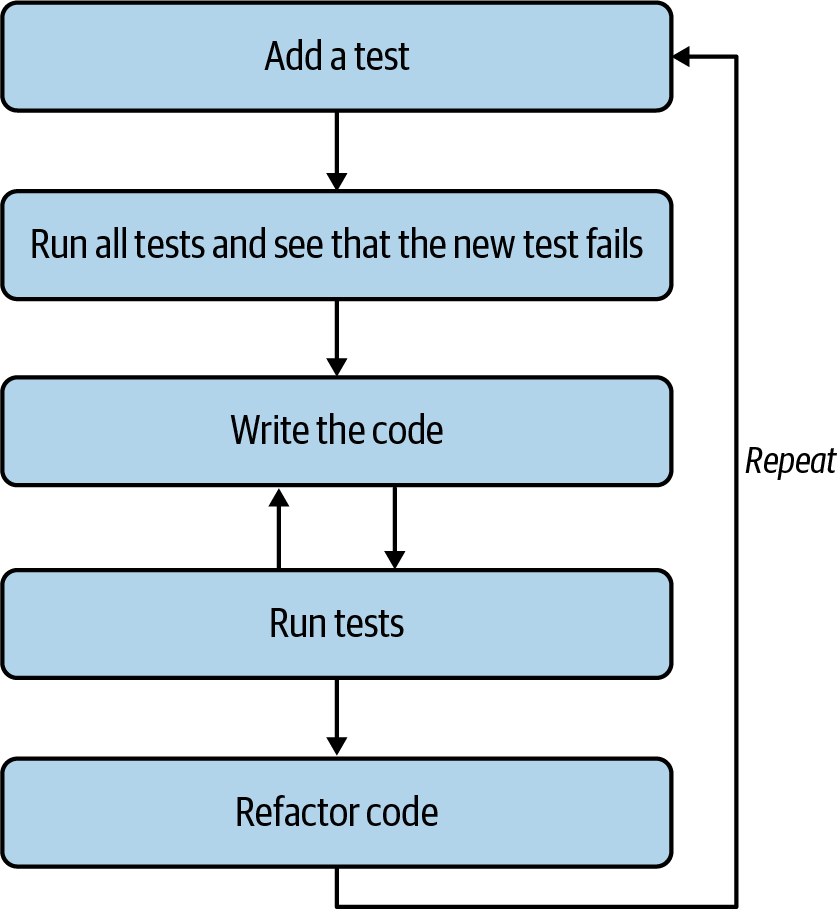
Figure 3-1. The test-driven development cycle starts with writing a test and then the code that passes it.
Copy the 03_catr/tests directory into your new catr directory.
Don’t copy anything but the tests, as you will write the rest of the code yourself.
On a Unix-type system, you can copy this directory and its contents using the cp command with the recursive -r option:
$ cd catr
$ cp -r ~/command-line-rust/03_catr/tests .
Your project directory should have a structure like this:
$ tree -L 2
.
├── Cargo.toml
├── src
│   └── main.rs
└── tests
    ├── cli.rs
    ├── expected
    └── inputs
Run cargo test to download the dependencies, compile your program, and run the tests, all of which should fail.
Starting with this chapter, I’ll get you started with the basics of setting up each program, give you the info you need to write the program, and let you finish writing it using the tests to guide you.
Creating a Library Crate
The programs we’ve written in this book so far have been pretty short. The typical programs you will write in your career will likely be much longer. Starting with this program, I suggest you divide the code into a library in src/lib.rs and a binary in src/main.rs that will call library functions. I believe this organization makes it easier to test and grow applications over time.
I’ll demonstrate how to use a library with the default “Hello, world!” then I’ll show how to use this structure to write echor.
To start, move all the important bits from src/main.rs into a function called run in src/lib.rs.
This function will return a kind of Result to indicate success or failure.
This is similar to the TestResult type alias from Chapter 2, but whereas TestResult always returns the unit type () in the Ok variant, MyResult can return an Ok that contains any type, which is represented using the generic T in the following code:
usestd::error::Error;typeMyResult<T>=Result<T,Box<dynError>>;pubfnrun()->MyResult<()>{println!("Hello, world!");Ok(())}
Import the
Errortrait for representing error values.Create a
MyResultto represent anOkvalue for any typeTor someErrvalue that implements theErrortrait.Define a public (
pub) function that returns eitherOkcontaining the unit type()or some errorErr.Print Hello, world!

Return an indication that the function ran successfully.
Tip
By default, all the variables and functions in a module are private, which means they are accessible only to other code within the same module. In the preceding code, I used pub to make this a public function visible to the rest of the program.
To call the run function, change src/main.rs to the following.
Note that the functions in src/lib.rs are available through the crate named catr:
fnmain(){ifletErr(e)=catr::run(){eprintln!("{}",e);std::process::exit(1);}}
Execute the
catr::runfunction and check if the return value matchesErr(e), whereeis some value that implements theErrortrait, which means, among other things, that it can be printed.Use the
eprintln!(error print line) macro to print the error message toSTDERR.Exit the program with a nonzero value to indicate an error.
Tip
The eprint! and eprintln! macros are just like print! and println! except that they print to STDERR.
If you execute cargo run, you should see Hello, world! as before.
Defining the Parameters
Now that your code has a more formal structure, it’s time to modify it to meet the criteria for echor.
Let’s start by adding the program’s command-line parameters, which I suggest you represent using a struct called Config.
A struct definition is similar to a class definition in object-oriented languages.
In this case, we want a struct that describes the names and types of the arguments to the program.
Specifically, echor requires a list of input filenames and the -n and -b flags for numbering the lines of output.
Add the following struct to src/lib.rs.
It’s common to place such definitions near the top, after the use statements:
#[derive(Debug)]pubstructConfig{files:Vec<String>,number_lines:bool,number_nonblank_lines:bool,}
The
derivemacro adds theDebugtrait so the struct can be printed.Define a public struct called
Config.The
fileswill be a vector of strings.This is a Boolean value to indicate whether or not to print the line numbers.
This is a Boolean to control printing line numbers only for nonblank lines.
To use a struct, you create an instance of it with specific values.
In the following sketch of a get_args function, you can see it finishes by creating a new Config with the runtime values from the user.
Add use clap::{App, Arg} and this function to your src/lib.rs.
Use what you learned from Chapter 2 to complete this function on your own:
pubfnget_args()->MyResult<Config>{letmatches=App::new("catr").version("0.1.0").author("Ken Youens-Clark <kyclark@gmail.com>").about("Rust cat")// What goes here?.get_matches();Ok(Config{files:...,number_lines:...,number_nonblank_lines:...,})}
This is a public function that returns a
MyResultthat will contain either aConfigon success or an error.You should define the parameters here.
Return an
Okvariant containing aConfigusing the supplied values.
This means the run function needs to be updated to accept a Config argument.
For now, print it:
pubfnrun(config:Config)->MyResult<()>{dbg!(config);Ok(())}
The function will accept a
Configstruct and will returnOkwith the unit type if successful.Use the
dbg!(debug) macro to print the configuration.
Following is the structure I will use for src/main.rs for this and all the rest of the programs in this book:
fnmain(){ifletErr(e)=catr::get_args().and_then(catr::run){eprintln!("{}",e);std::process::exit(1);}}
If the
catr::get_argsfunction returns anOk(config)value, useResult::and_thento pass theconfigtocatr::run.If either
get_argsorrunreturns anErr, print it toSTDERR.Exit the program with a nonzero value.
When run with the -h or --help flags, your program should print a usage like this:
$ cargo run --quiet -- --help
catr 0.1.0
Ken Youens-Clark <kyclark@gmail.com>
Rust cat

USAGE:
    catr [FLAGS] [FILE]...

FLAGS:
    -h, --help               Prints help information
    -n, --number             Number lines
    -b, --number-nonblank    Number nonblank lines
    -V, --version            Prints version information

ARGS:
    <FILE>...    Input file(s) [default: -]
With no arguments, your program should print a configuration structure like this:
$ cargo run
[src/lib.rs:52] config = Config {
    files: [
        "-",
    ],
    number_lines: false,
    number_nonblank_lines: false,
}
The default
filesshould contain a dash (-) forSTDIN.The Boolean values should default to
false.
Run it with some arguments and be sure the config looks like this:
$ cargo run -- -n tests/inputs/fox.txt
[src/lib.rs:52] config = Config {
    files: [
        "tests/inputs/fox.txt",
    ],
    number_lines: true,
    number_nonblank_lines: false,
}
The positional file argument is parsed into the
files.The
-noption causesnumber_linesto betrue.
While the BSD version will allow both -n and -b, the challenge program should consider these to be mutually exclusive and generate an error when they’re used together:
$ cargo run -- -b -n tests/inputs/fox.txt
error: The argument '--number-nonblank' cannot be used with '--number'
Note
Stop reading here and get your program working as described so far. Seriously! I want you to try writing your version of this before you read ahead. I’ll wait here until you finish.
All set?
Compare what you have to my get_args function:
pubfnget_args()->MyResult<Config>{letmatches=App::new("catr").version("0.1.0").author("Ken Youens-Clark <kyclark@gmail.com>").about("Rust cat").arg(Arg::with_name("files").value_name("FILE").help("Input file(s)").multiple(true).default_value("-"),).arg(Arg::with_name("number").short("n").long("number").help("Number lines").takes_value(false).conflicts_with("number_nonblank"),).arg(Arg::with_name("number_nonblank").short("b").long("number-nonblank").help("Number non-blank lines").takes_value(false),).get_matches();Ok(Config{files:matches.values_of_lossy("files").unwrap(),number_lines:matches.is_present("number"),number_nonblank_lines:matches.is_present("number_nonblank"),})}
This positional argument is for the files and is required to have at least one value that defaults to a dash (
-).This is an option that has a short name
-nand a long name--number. It does not take a value because it is a flag. When present, it will tell the program to print line numbers. It cannot occur in conjunction with-b.The
-b|--number-nonblankflag controls whether or not to print line numbers for nonblank lines.Because at least one value is required, it should be safe to call
Option::unwrap.The two Boolean options are either present or not.
Tip
Optional arguments have short and/or long names, but positional ones do not. You can define optional arguments before or after positional arguments. Defining positional arguments with
min_values also implies multiple values, but that’s not the case for optional parameters.
You should be able to pass at least a couple of the tests if you execute cargo test at this point.
There will be a great deal of output showing you all the failing test output, but don’t despair.
You will soon see a fully passing test suite.
Iterating Through the File Arguments
Now that you have validated all the arguments, you are ready to process the files and create the correct output.
First, modify the run function in src/lib.rs to print each
filename:
pubfnrun(config:Config)->MyResult<()>{forfilenameinconfig.files{println!("{}",filename);}Ok(())}
Iterate through each filename.
Print the filename.
Run the program with some input files.
In the following example, the bash shell will expand the file glob1 *.txt into all filenames that end with the extension .txt:
$ cargo run -- tests/inputs/*.txt
tests/inputs/empty.txt
tests/inputs/fox.txt
tests/inputs/spiders.txt
tests/inputs/the-bustle.txt
Windows PowerShell can expand file globs using Get-ChildItem:
> cargo run -q -- -n (Get-ChildItem .\tests\inputs\*.txt)
C:\Users\kyclark\work\command-line-rust\03_catr\tests\inputs\empty.txt
C:\Users\kyclark\work\command-line-rust\03_catr\tests\inputs\fox.txt
C:\Users\kyclark\work\command-line-rust\03_catr\tests\inputs\spiders.txt
C:\Users\kyclark\work\command-line-rust\03_catr\tests\inputs\the-bustle.txt
Opening a File or STDIN
The next step is to try to open each filename.
When the filename is a dash, you should open STDIN; otherwise, attempt to open the given filename and handle errors.
For the following code, you will need to expand your imports in src/lib.rs to the
following:
useclap::{App,Arg};usestd::error::Error;usestd::fs::File;usestd::io::{self,BufRead,BufReader};
This next step is a bit tricky, so I’d like to provide an open function for you to use.
In the following code, I’m using the match keyword, which is similar to a switch statement in C.
Specifically, I’m matching on whether the given filename is equal to a dash (-) or something else, which is specified using the wildcard _:
fnopen(filename:&str)->MyResult<Box<dynBufRead>>{matchfilename{"-"=>Ok(Box::new(BufReader::new(io::stdin()))),_=>Ok(Box::new(BufReader::new(File::open(filename)?))),}}
The function will accept a filename and will return either an error or a boxed value that implements the
BufReadtrait.When the filename is a dash (
-), read fromstd::io::stdin.Otherwise, use
File::opento try to open the given file or propagate an error.
If File::open is successful, the result will be a filehandle, which is a mechanism
for reading the contents of a file.
Both a filehandle and std::io::stdin implement
the BufRead trait, which means the values will, for instance, respond to the
BufRead::lines function to produce lines of text.
Note that BufRead::lines will remove any line endings, such as \r\n on Windows and \n on Unix.
Again you see I’m using a Box to create a pointer to heap-allocated memory to hold the filehandle.
You may wonder if this is completely necessary.
I could try to write the function without using Box:
// This will not compilefnopen(filename:&str)->MyResult<dynBufRead>{matchfilename{"-"=>Ok(BufReader::new(io::stdin())),_=>Ok(BufReader::new(File::open(filename)?)),}}
But if I try to compile this code, I get the following error:
error[E0277]: the size for values of type `(dyn std::io::BufRead + 'static)`
cannot be known at compilation time
   --> src/lib.rs:88:28
    |
88  | fn open(filename: &str) -> MyResult<dyn BufRead> {
    |                            ^^^^^^^^^^^^^^^^^^^^^
    |                            doesn't have a size known at compile-time
    |
    = help: the trait `Sized` is not implemented for `(dyn std::io::BufRead
    + 'static)`
The compiler doesn’t have enough information from dyn BufRead to know the size of the return type.
If a variable doesn’t have a fixed, known size, then Rust can’t store it on the stack.
The solution is to instead allocate memory on the heap by putting the return value into a Box, which is a pointer with a known size.
The preceding open function is really dense.
I can appreciate if you think that it’s more than a little complicated; however, it handles basically any error you will encounter.
To demonstrate this, change your run to the following:
pubfnrun(config:Config)->MyResult<()>{forfilenameinconfig.files{matchopen(&filename){Err(err)=>eprintln!("Failed to open {}: {}",filename,err),Ok(_)=>println!("Opened {}",filename),}}Ok(())}
Iterate through the filenames.
Try to open the filename. Note the use of
&to borrow the variable.Print an error message to
STDERRwhenopenfails.Print a success message when
openworks.
Try to run your program with the following:
-
A valid input file such as tests/inputs/fox.txt
-
A nonexistent file
-
An unreadable file
For the last option, you can create a file that cannot be read like so:
$ touch cant-touch-this && chmod 000 cant-touch-this
Run your program and verify your code gracefully prints error messages for bad input files and continues to process the valid ones:
$ cargo run -- blargh cant-touch-this tests/inputs/fox.txt
Failed to open blargh: No such file or directory (os error 2)
Failed to open cant-touch-this: Permission denied (os error 13)
Opened tests/inputs/fox.txt
At this point, you should be able to pass cargo test skips_bad_file.
Now that you are able to open and read valid input files, I want you to finish the program on your own.
Can you figure out how to read the opened file line by line?
Start with tests/inputs/fox.txt, which has only one line.
You should be able to see the following
output:
$ cargo run -- tests/inputs/fox.txt
The quick brown fox jumps over the lazy dog.
Verify that you can read STDIN by default.
In the following command, I use the | to pipe STDOUT from the first command to the STDIN of the second command:
$ cat tests/inputs/fox.txt | cargo run
The quick brown fox jumps over the lazy dog.
The output should be the same when providing a dash as the filename.
In the following command, I will use the bash redirect operator < to take input from the given filename and provide it to STDIN:
$ cargo run -- - < tests/inputs/fox.txt
The quick brown fox jumps over the lazy dog.
Next, try an input file with more than one line and try to number the lines with -n:
$ cargo run -- -n tests/inputs/spiders.txt
     1	Don't worry, spiders,
     2	I keep house
     3	casually.
Then try to skip blank lines in the numbering with -b:
$ cargo run -- -b tests/inputs/the-bustle.txt
     1	The bustle in a house
     2	The morning after death
     3	Is solemnest of industries
     4	Enacted upon earth,—

     5	The sweeping up the heart,
     6	And putting love away
     7	We shall not want to use again
     8	Until eternity.
Using the Test Suite
Now is a good time to examine the tests more closely so you can understand both how to write tests and what they expect of your program.
The tests in tests/cli.rs are similar to those from Chapter 2, but I’ve added a little more organization.
For instance, I use the const keyword to create several constant &str values at the top of that module that I use throughout the crate.
I use a common convention of ALL_CAPS names to highlight the fact that they are scoped or visible throughout the crate:
constPRG:&str="catr";constEMPTY:&str="tests/inputs/empty.txt";constFOX:&str="tests/inputs/fox.txt";constSPIDERS:&str="tests/inputs/spiders.txt";constBUSTLE:&str="tests/inputs/the-bustle.txt";
To test that the program will die when given a nonexistent file, I use the rand crate to generate a random filename that does not exist.
For the following function, I will use rand::{distributions::Alphanumeric, Rng} to import various parts of the crate I need in this function:
fngen_bad_file()->String{loop{letfilename:String=rand::thread_rng().sample_iter(&Alphanumeric).take(7).map(char::from).collect();iffs::metadata(&filename).is_err(){returnfilename;}}}
The function will return a
String, which is a dynamically generated string closely related to thestrstruct I’ve been using.Start an infinite
loop.Create a random string of seven alphanumeric characters.
fs::metadatareturns an error when the given filename does not exist, so return the nonexistent filename.
In the preceding function, I use filename two times after creating it.
The first time I borrow it using &filename, and the second time I don’t use the ampersand.
Try removing the & and running the code.
You should get an error message stating that ownership of the filename value is moved into fs::metadata:
error[E0382]: use of moved value: `filename`
  --> tests/cli.rs:37:20
   |
30 |         let filename: String = rand::thread_rng()
   |             -------- move occurs because `filename` has type `String`,
   |                      which does not implement the `Copy` trait
...
36 |         if fs::metadata(filename).is_err() {
   |                         -------- value moved here
37 |             return filename;
   |                    ^^^^^^^^ value used here after move
Effectively, the fs::metadata function consumes the filename variable, leaving it unusable.
The & shows I only want to borrow a reference to the variable.
Don’t worry if you don’t completely understand that yet.
I’m only showing the gen_bad_file function so that you understand how it is used in the skips_bad_file test:
#[test]fnskips_bad_file()->TestResult{letbad=gen_bad_file();letexpected=format!("{}: .* [(]os error 2[)]",bad);Command::cargo_bin(PRG)?.arg(&bad).assert().success().stderr(predicate::str::is_match(expected)?);Ok(())}
Generate the name of a nonexistent file.
The expected error message should include the filename and the string os error 2 on both Windows and Unix platforms.
Run the program with the bad file and verify that
STDERRmatches the expected pattern.The program should not fail because bad files should only generate warnings and not kill the process.
Tip
In the preceding function, I used the format! macro to generate a new String. This macro works like print! except that it returns the value rather than printing it.
I created a helper function called run to run the program with input arguments and verify that the output matches the text in the file generated by mk-outs.sh:
fnrun(args:&[&str],expected_file:&str)->TestResult{letexpected=fs::read_to_string(expected_file)?;Command::cargo_bin(PRG)?.args(args).assert().success().stdout(expected);Ok(())}
The function accepts a slice of
&strarguments and the filename with the expected output. The function returns aTestResult.Try to read the expected output file.
Execute the program with the arguments and verify it runs successfully and produces the expected output.
I use this function like so:
#[test]fnbustle()->TestResult{run(&[BUSTLE],"tests/expected/the-bustle.txt.out")}
Run the program with the
BUSTLEinput file and verify that the output matches the output produced by mk-outs.sh.
I also wrote a helper function to provide input via STDIN:
fnrun_stdin(input_file:&str,args:&[&str],expected_file:&str,)->TestResult{letinput=fs::read_to_string(input_file)?;letexpected=fs::read_to_string(expected_file)?;Command::cargo_bin(PRG)?.args(args).write_stdin(input).assert().success().stdout(expected);Ok(())}
The first argument is the filename containing the text that should be given to
STDIN.Try to read the input and expected files.
Try to run the program with the given arguments and
STDINand verify the output.
This function is used similarly:
#[test]fnbustle_stdin()->TestResult{run_stdin(BUSTLE,&["-"],"tests/expected/the-bustle.txt.stdin.out")}
Run the program using the contents of the given filename as
STDINand a dash as the input filename. Verify the output matches the expected value.
Solution
I hope you found this an interesting and challenging program to write. I’ll show you how to modify the program step by step to reach a final solution, which you can find in the book’s repository.
Reading the Lines in a File
To start, I will print the lines of files that are opened successfully:
pubfnrun(config:Config)->MyResult<()>{forfilenameinconfig.files{matchopen(&filename){Err(err)=>eprintln!("{}: {}",filename,err),Ok(file)=>{forline_resultinfile.lines(){letline=line_result?;println!("{}",line);}}}}Ok(())}
Print the filename and error when there is a problem opening a file.
Iterate over each
line_resultvalue fromBufRead::lines.Either unpack an
Okvalue fromline_resultor propagate an error.Print the line.
Note
When reading the lines from a file, you don’t get the lines directly from the filehandle but instead get a std::io::Result, which is a type “broadly used across std::io for any operation which may produce an error.” Reading and writing files falls into the category of I/O (input/output), which depends on external resources like the operating and filesystems. While it’s unlikely that reading a line from a filehandle will fail, the point is that it could fail.
If you run cargo test at this point, you should pass about half of the tests, which is not bad for so few lines of code.
Printing Line Numbers
Next is to add the printing of line numbers for the -n|--number option.
One solution that will likely be familiar to C programmers would be something like this:
pubfnrun(config:Config)->MyResult<()>{forfilenameinconfig.files{matchopen(&filename){Err(err)=>eprintln!("{}: {}",filename,err),Ok(file)=>{letmutline_num=0;forline_resultinfile.lines(){letline=line_result?;line_num+=1;ifconfig.number_lines{println!("{:>6}\t{}",line_num,line);}else{println!("{}",line);}}}}}Ok(())}
Initialize a mutable counter variable to hold the line number.
Add 1 to the line number.
Check if the user wants line numbers.
If so, print the current line number in a right-justified field six characters wide followed by a tab character and then the line of text.
Otherwise, print the line.
Recall that all variables in Rust are immutable by default, so it’s necessary to add mut to line_num, as I intend to change it.
The += operator is a compound assignment that adds the righthand value 1 to line_num to increment it.2
Of note, too, is the formatting syntax {:>6} that indicates the width of the field as six characters with the text aligned to the right.
(You can use < for left-justified and ^ for centered text.)
This syntax is similar to printf in C, Perl, and Python’s string formatting.
If I run the program at this point, it looks pretty good:
$ cargo run -- tests/inputs/spiders.txt -n
     1	Don't worry, spiders,
     2	I keep house
     3	casually.
While this works adequately, I’d like to point out a more idiomatic solution using Iterator::enumerate.
This method will return a tuple containing the index position and value for each element in an iterable, which is something that can produce values until exhausted:
pubfnrun(config:Config)->MyResult<()>{forfilenameinconfig.files{matchopen(&filename){Err(err)=>eprintln!("{}: {}",filename,err),Ok(file)=>{for(line_num,line_result)infile.lines().enumerate(){letline=line_result?;ifconfig.number_lines{println!("{:>6}\t{}",line_num+1,line);}else{println!("{}",line);}}}}}Ok(())}
The tuple values from
Iterator::enumeratecan be unpacked using pattern matching.Numbering from
enumeratestarts at 0, so add 1 to mimiccat, which starts at 1.
This will create the same output, but now the code avoids using a mutable value.
I can execute cargo test fox to run all the tests with the word fox in their name, and I find that two out of three pass.
The program fails on the -b flag, so next I need to handle printing the line numbers only for nonblank lines.
Notice in this version, I’m also going to remove line_result and shadow the line variable:
pubfnrun(config:Config)->MyResult<()>{forfilenameinconfig.files{matchopen(&filename){Err(err)=>eprintln!("{}: {}",filename,err),Ok(file)=>{letmutlast_num=0;for(line_num,line)infile.lines().enumerate(){letline=line?;ifconfig.number_lines{println!("{:>6}\t{}",line_num+1,line);}elseifconfig.number_nonblank_lines{if!line.is_empty(){last_num+=1;println!("{:>6}\t{}",last_num,line);}else{println!();}}else{println!("{}",line);}}}}}Ok(())}
Initialize a mutable variable for the number of the last nonblank line.
Shadow the
linewith the result of unpacking theResult.Handle printing line numbers.
Handle printing line numbers for nonblank lines.
If the line is not empty, increment
last_numand print the output.
If the line is empty, print a blank line.

If there are no numbering options, print the line.
Note
Shadowing a variable in Rust is when you reuse a variable’s name and set it to a new value. Arguably the line_result/line code may be more explicit and readable, but reusing line in this context is more Rustic code you’re likely to encounter.
If you run cargo test, you should pass all the tests.
Going Further
You have a working program now, but you don’t have to stop there.
If you’re up for an additional challenge, try implementing the other options shown in the manual pages for both the BSD and GNU versions.
For each option, use cat to create the expected output file, then expand the tests to check that your program creates this same
output.
I’d also recommend you check out bat, which is another Rust clone of cat (“with wings”), for a more complete implementation.
The numbered lines output of cat -n is similar in ways to nl, a “line numbering filter.”
cat is also a bit similar to programs that will show you a page or screen full of text at a time, so-called pagers like more and less.3
Consider implementing these programs.
Read the manual pages, create the test output, and copy the ideas from this project to write and test your versions.
Summary
You made big strides in this chapter, creating a much more complex program than in the previous chapters. Consider what you learned:
-
You separated your code into library (src/lib.rs) and binary (src/main.rs) crates, which can make it easier to organize and encapsulate ideas.
-
You created your first struct, which is a bit like a class declaration in other languages. This struct allowed you to create a complex data structure called
Configto describe the inputs for your program. -
By default, all values and functions are immutable and private. You learned to use
mutto make a value mutable andpubto make a value or function public. -
You used a testing-first approach where all the tests exist before the program is even written. When the program passes all the tests, you can be confident your program meets all the specifications encoded in the tests.
-
You saw how to use the
randcrate to generate a random string for a nonexistent file. -
You figured out how to read lines of text from both
STDINand regular files. -
You used the
eprintln!macro to print toSTDERRandformat!to dynamically generate a new string. -
You used a
forloop to visit each element in an iterable. -
You found that the
Iterator::enumeratemethod will return both the index and the element as a tuple, which is useful for numbering the lines of text. -
You learned to use a
Boxthat points to a filehandle to readSTDINor a regular file.
In the next chapter, you’ll learn a good deal more about reading files by lines, bytes, or characters.
1 Glob is short for global, an early Unix program that would expand wildcard characters into filepaths. Nowadays, the shell handles glob patterns directly.
2 Note that Rust does not have a unary ++ operator, so you cannot use line_num++ to increment a variable by 1.
3 more shows you a page of text with “More” at the bottom to let you know you can continue. Obviously someone decided to be clever and named their clone less, but it does the same thing.