Chapter 14. Elless Island
Now you know that the girls are just making it up
Now you know that the boys are just pushing their luck
Now you know that my ride doesn’t really exist
And my name’s not really on that listThey Might Be Giants, “Prevenge” (2004)
In this final chapter, you’ll create a Rust clone of the list command, ls (pronounced ell-ess), which I think is perhaps the hardest-working program in Unix.
I use it many times every day to view the contents of a directory or inspect the size or permissions of some files.
The original program has more than three dozen options, but the challenge program will implement only a few features, such as printing the contents of directories or lists of files along with their permissions, sizes, and modification times.
Note that this challenge program relies on ideas of files and ownership that are specific to Unix and so will not work on Windows.
I suggest Windows users install Windows Subsystem for Linux to write and test the program in that environment.
In this chapter, you will learn how to do the following:
-
Query and visually represent a file’s permissions
-
Add a method to a custom type using an implementation
-
Create modules in separate files to organize code
-
Use text tables to create aligned columns of output
-
Create documentation comments
How ls Works
To see what will be expected of the challenge program, start by looking at the manual page for the BSD ls.
You’ll see that it has 39 options.
I’ll include only the first part, as the documentation is rather long, but I encourage you to read the whole thing:
LS(1)                     BSD General Commands Manual                    LS(1)

NAME
     ls -- list directory contents

SYNOPSIS
     ls [-ABCFGHLOPRSTUW@abcdefghiklmnopqrstuwx1%] [file ...]

DESCRIPTION
     For each operand that names a file of a type other than directory, ls
     displays its name as well as any requested, associated information.  For
     each operand that names a file of type directory, ls displays the names
     of files contained within that directory, as well as any requested, asso-
     ciated information.

     If no operands are given, the contents of the current directory are dis-
     played.  If more than one operand is given, non-directory operands are
     displayed first; directory and non-directory operands are sorted sepa-
     rately and in lexicographical order.
If you execute ls with no options, it will show you the contents of the current working directory.
For instance, change into the 14_lsr directory and try it:
$ cd 14_lsr
$ ls
Cargo.toml         set-test-perms.sh* src/               tests/
The challenge program will implement only two option flags, the -l|--long and
-a|--all options.
Per the manual page:
The Long Format
 If the -l option is given, the following information is displayed for
 each file: file mode, number of links, owner name, group name, number of
 bytes in the file, abbreviated month, day-of-month file was last modi-
 fied, hour file last modified, minute file last modified, and the path-
 name.  In addition, for each directory whose contents are displayed, the
 total number of 512-byte blocks used by the files in the directory is
 displayed on a line by itself, immediately before the information for the
 files in the directory.
Execute ls -l in the source directory.
Of course, you will have different metadata, such as owners and modification times, than what I’m showing:
$ ls -l
total 16
-rw-r--r--  1 kyclark  staff  217 Aug 11 08:26 Cargo.toml
-rwxr-xr-x  1 kyclark  staff  447 Aug 12 17:56 set-test-perms.sh*
drwxr-xr-x  5 kyclark  staff  160 Aug 26 09:44 src/
drwxr-xr-x  4 kyclark  staff  128 Aug 17 08:42 tests/
The -a all option will show entries that are normally hidden.
For example, the current directory . and the parent directory .. are not usually shown:
$ ls -a
./                 Cargo.toml         src/
../                set-test-perms.sh* tests/
You can specify these individually, like ls -a -l, or combined, like ls -la.
These flags can occur in any order, so -la or -al will work:
$ ls -la
total 16
drwxr-xr-x   6 kyclark  staff  192 Oct 15 07:52 ./
drwxr-xr-x  24 kyclark  staff  768 Aug 24 08:22 ../
-rw-r--r--   1 kyclark  staff  217 Aug 11 08:26 Cargo.toml
-rwxr-xr-x   1 kyclark  staff  447 Aug 12 17:56 set-test-perms.sh*
drwxr-xr-x   5 kyclark  staff  160 Aug 26 09:44 src/
drwxr-xr-x   4 kyclark  staff  128 Aug 17 08:42 tests/
Tip
Any entry (directory or file) with a name starting with a dot (.) is hidden, leading to the existence of so-called dotfiles, which are often used to store program state and metadata. For example, the root directory of the source code repository contains a directory called .git that has all the information Git needs to keep track of the changes to files. It’s also common to create .gitignore files that contain filenames and globs that you wish to exclude from Git.
You can provide the name of one or more directories as positional arguments to see their contents:
$ ls src/ tests/
src/:
lib.rs    main.rs   owner.rs

tests/:
cli.rs	inputs
The positional arguments can also be files:
$ ls -l src/*.rs
-rw-r--r--  1 kyclark  staff  8917 Aug 26 09:44 src/lib.rs
-rw-r--r--  1 kyclark  staff   136 Aug  4 14:18 src/main.rs
-rw-r--r--  1 kyclark  staff   313 Aug 10 08:54 src/owner.rs
Different operating systems will return the files in different orders. For example, the .hidden file is shown before all the other files on macOS:
$ ls -la tests/inputs/
total 16
drwxr-xr-x  7 kyclark  staff  224 Aug 12 10:29 ./
drwxr-xr-x  4 kyclark  staff  128 Aug 17 08:42 ../
-rw-r--r--  1 kyclark  staff    0 Mar 19  2021 .hidden
-rw-r--r--  1 kyclark  staff  193 May 31 16:43 bustle.txt
drwxr-xr-x  4 kyclark  staff  128 Aug 10 18:08 dir/
-rw-r--r--  1 kyclark  staff    0 Mar 19  2021 empty.txt
-rw-------  1 kyclark  staff   45 Aug 12 10:29 fox.txt
On Linux, the .hidden file is listed last:
$ ls -la tests/inputs/
total 20
drwxr-xr-x. 3 kyclark staff 4096 Aug 21 12:13 ./
drwxr-xr-x. 3 kyclark staff 4096 Aug 21 12:13 ../
-rw-r--r--. 1 kyclark staff  193 Aug 21 12:13 bustle.txt
drwxr-xr-x. 2 kyclark staff 4096 Aug 21 12:13 dir/
-rw-r--r--. 1 kyclark staff    0 Aug 21 12:13 empty.txt
-rw-------. 1 kyclark staff   45 Aug 21 12:13 fox.txt
-rw-r--r--. 1 kyclark staff    0 Aug 21 12:13 .hidden
Tip
Due to these differences, the tests will not check for any particular ordering.
Notice that errors involving nonexistent files are printed first, and then the results for valid arguments. As usual, blargh is meant as a nonexistent file:
$ ls Cargo.toml blargh src/main.rs
ls: blargh: No such file or directory
Cargo.toml   src/main.rs
This is about as much as the challenge program should implement.
A version of ls dates back to the original AT&T Unix, and both the BSD and GNU versions have had decades to evolve.
The challenge program won’t even scratch the surface of replacing ls, but it will give you a chance to consider some really interesting aspects of operating systems and information storage.
Getting Started
The challenge program should be named lsr (pronounced lesser or lister, maybe) for a Rust version of ls.
I suggest you start by running cargo new lsr.
My solution will use the following dependencies that you should add to your Cargo.toml:
[dependencies]chrono="0.4"clap="2.33"tabular="0.1.4"users="0.11"[dev-dependencies]assert_cmd="2"predicates="2"rand="0.8"


tabularwill be used to present a text table for the long listing.
userswill be used to get the user and group names of the owners.
Copy 14_lsr/tests into your project, and then run cargo test to build and test your program.
All the tests should fail.
Next, you must run the bash script 14_lsr/set-test-perms.sh to set the file and directory permissions of the test inputs to known values.
Run with -h|--help for usage:
$ ./set-test-perms.sh --help
Usage: set-test-perms.sh DIR
You should give it the path to your new lsr.
For instance, if you create the project under ~/rust-solutions/lsr, run it like so:
$ ./set-test-perms.sh ~/rust-solutions/lsr
Done, fixed files in "/Users/kyclark/rust-solutions/lsr".
Defining the Arguments
I suggest you modify src/main.rs to the following:
fnmain(){ifletErr(e)=lsr::get_args().and_then(lsr::run){eprintln!("{}",e);std::process::exit(1);}}
I recommend you start src/lib.rs by defining a Config struct to hold the program arguments along with other code you’ve used before to represent MyResult:
useclap::{App,Arg};usestd::error::Error;typeMyResult<T>=Result<T,Box<dynError>>;#[derive(Debug)]pubstructConfig{paths:Vec<String>,long:bool,show_hidden:bool,}
The
pathsargument will be a vector of strings for files and directories.The
longoption is a Boolean for whether or not to print the long listing.The
show_hiddenoption is a Boolean for whether or not to print hidden entries.
There’s nothing new in this program when it comes to parsing and validating the arguments.
Here is an outline for get_args you can use:
pubfnget_args()->MyResult<Config>{letmatches=App::new("lsr").version("0.1.0").author("Ken Youens-Clark <kyclark@gmail.com>").about("Rust ls")// What goes here?.get_matches();Ok(Config{paths:...,long:...,show_hidden:...,})}
Start your run function by printing the arguments:
pubfnrun(config:Config)->MyResult<()>{println!("{:?}",config);Ok(())}
Make sure your program can print a usage like the following:
$ cargo run -- -h
lsr 0.1.0
Ken Youens-Clark <kyclark@gmail.com>
Rust ls

USAGE:
    lsr [FLAGS] [PATH]...

FLAGS:
    -a, --all        Show all files
    -h, --help       Prints help information
    -l, --long       Long listing
    -V, --version    Prints version information

ARGS:
    <PATH>...    Files and/or directories [default: .]
Run your program with no arguments and verify that the default for paths is a list containing the dot (.), which represents the current working directory.
The two Boolean values should be false:
$ cargo run
Config { paths: ["."], long: false, show_hidden: false }
Try turning on the two flags and giving one or more positional arguments:
$ cargo run -- -la src/*
Config { paths: ["src/lib.rs", "src/main.rs"], long: true, show_hidden: true }
Note
Stop reading and get your program working to this point.
I assume you figured that out, so here is my get_args.
It’s similar to that used in previous programs, so I’ll eschew commentary:
pubfnget_args()->MyResult<Config>{letmatches=App::new("lsr").version("0.1.0").author("Ken Youens-Clark <kyclark@gmail.com>").about("Rust ls").arg(Arg::with_name("paths").value_name("PATH").help("Files and/or directories").default_value(".").multiple(true),).arg(Arg::with_name("long").takes_value(false).help("Long listing").short("l").long("long"),).arg(Arg::with_name("all").takes_value(false).help("Show all files").short("a").long("all"),).get_matches();Ok(Config{paths:matches.values_of_lossy("paths").unwrap(),long:matches.is_present("long"),show_hidden:matches.is_present("all"),})}
Finding the Files
On the face of it, this program seems fairly simple.
I want to list the given files and directories, so I’ll start by writing a find_files function as in several previous chapters.
The found files can be represented by strings, as in Chapter 9, but I’ve chosen to use a PathBuf, like I did Chapter 12.
If you want to follow this idea, be sure to add use std::path::PathBuf to your imports:
fnfind_files(paths:&[String],show_hidden:bool,)->MyResult<Vec<PathBuf>>{unimplemented!();}
show_hiddenindicates whether or not to include hidden files in directory listings.The result might be a vector of
PathBufvalues.
My find_files function will iterate through all the given paths and check if the value exists using std::fs::metadata.
If there is no metadata, then I print an error message to STDERR and move to the next entry, so only existing files and directories will be returned by the function.
The printing of these error messages will be checked by the integration tests, so the function itself should return just the valid entries.
The metadata can tell me if the entry is a file or directory.
If the entry is a file, I create a PathBuf and add it to the results.
If the entry is a directory, I use fs::read_dir to read the contents of the directory.
The function should skip hidden entries with filenames that begin with a dot (.) unless show_hidden is true.
Tip
The filename is commonly called basename in command-line tools, and its corollary is dirname, which is the leading path information without the filename. There are command-line tools called basename and dirname that will return these elements:
$ basename 14_lsr/src/main.rs
main.rs
$ dirname 14_lsr/src/main.rs
14_lsr/src
Following are two unit tests for find_files that check for listings that do and do not include hidden files.
As noted in the chapter introduction, the files may be returned in a different order depending on your OS, so the tests will sort the entries to disregard the ordering.
Note that the find_files function is not expected to recurse into subdirectories.
Add the following to your src/lib.rs to start a tests module:
#[cfg(test)]modtest{usesuper::find_files;#[test]fntest_find_files(){// Find all nonhidden entries in a directoryletres=find_files(&["tests/inputs".to_string()],false);assert!(res.is_ok());letmutfilenames:Vec<_>=res.unwrap().iter().map(|entry|entry.display().to_string()).collect();filenames.sort();assert_eq!(filenames,["tests/inputs/bustle.txt","tests/inputs/dir","tests/inputs/empty.txt","tests/inputs/fox.txt",]);// Find all entries in a directoryletres=find_files(&["tests/inputs".to_string()],true);assert!(res.is_ok());letmutfilenames:Vec<_>=res.unwrap().iter().map(|entry|entry.display().to_string()).collect();filenames.sort();assert_eq!(filenames,["tests/inputs/.hidden","tests/inputs/bustle.txt","tests/inputs/dir","tests/inputs/empty.txt","tests/inputs/fox.txt",]);// Any existing file should be found even if hiddenletres=find_files(&["tests/inputs/.hidden".to_string()],false);assert!(res.is_ok());letfilenames:Vec<_>=res.unwrap().iter().map(|entry|entry.display().to_string()).collect();assert_eq!(filenames,["tests/inputs/.hidden"]);// Test multiple path argumentsletres=find_files(&["tests/inputs/bustle.txt".to_string(),"tests/inputs/dir".to_string(),],false,);assert!(res.is_ok());letmutfilenames:Vec<_>=res.unwrap().iter().map(|entry|entry.display().to_string()).collect();filenames.sort();assert_eq!(filenames,["tests/inputs/bustle.txt","tests/inputs/dir/spiders.txt"]);}}
Look for the entries in the tests/inputs directory, ignoring hidden files.
Collect the display names into a
Vec<String>.
Sort the entry names in alphabetical order.

Verify that the four expected files were found.

Look for the entries in the tests/inputs directory, including hidden files.
Following is the test for hidden files:
#[cfg(test)]modtest{usesuper::find_files;#[test]fntest_find_files(){}// Same as before#[test]fntest_find_files_hidden(){letres=find_files(&["tests/inputs".to_string()],true);assert!(res.is_ok());letmutfilenames:Vec<_>=res.unwrap().iter().map(|entry|entry.display().to_string()).collect();filenames.sort();assert_eq!(filenames,["tests/inputs/.hidden","tests/inputs/bustle.txt","tests/inputs/dir","tests/inputs/empty.txt","tests/inputs/fox.txt",]);}}
Include hidden files in the results.
The .hidden file should be included in the results.
Note
Stop here and ensure that cargo test find_files passes both tests.
Once your find_files function is working, integrate it into the run function to print the found entries:
pubfnrun(config:Config)->MyResult<()>{letpaths=find_files(&config.paths,config.show_hidden)?;forpathinpaths{println!("{}",path.display());}Ok(())}
Look for the files in the provided paths and specify whether to show hidden entries.
Iterate through each of the returned paths.
Use
Path::displayfor safely printing paths that may contain non-Unicode data.
If I run the program in the source directory, I see the following output:
$ cargo run
./Cargo.toml
./target
./tests
./Cargo.lock
./src
The output from the challenge program is not expected to completely replicate the original ls.
For example, the default listing for ls will create columns:
$ ls tests/inputs/
bustle.txt  dir/        empty.txt   fox.txt
If your program can produce the following output, then you’ve already implemented the basic directory listing. Note that the order of the files is not important. This is the output I see on macOS:
$ cargo run -- -a tests/inputs/
tests/inputs/.hidden
tests/inputs/empty.txt
tests/inputs/bustle.txt
tests/inputs/fox.txt
tests/inputs/dir
And this is what I see on Linux:
$ cargo run -- -a tests/inputs/
tests/inputs/empty.txt
tests/inputs/.hidden
tests/inputs/fox.txt
tests/inputs/dir
tests/inputs/bustle.txt
Provide a nonexistent file such as the trusty old blargh and check that your program prints a message to STDERR:
$ cargo run -q -- blargh 2>err
$ cat err
blargh: No such file or directory (os error 2)
Formatting the Long Listing
The next step is to handle the -l|--long listing option, which lists metadata for each entry.
Figure 14-1 shows example output with the columns numbered in bold font; the column numbers are not part of the expected output.
Note that the output from your program will have different owners and modification times.

Figure 14-1. The long listing of the program will include eight pieces of metadata.
The metadata displayed in the output, listed here by column number, is as follows:
-
The entry type, which should be
dfor directory or a dash (-) for anything else -
The permissions formatted with
rfor read,wfor write, andxfor execute for user, group, and other -
The number of links pointing to the file
-
The name of the user that owns the file
-
The name of the group that owns the file
-
The size of the file or directory in bytes
-
The file’s last modification date and time
-
The path to the file
Creating the output table can be tricky, so I decided to use tabular to handle this for me.
I wrote a function called format_output that accepts a list of PathBuf values and might return a formatted table with columns of metadata.
If you want to follow my lead on this, be sure to add use tabular::{Row, Table} to your imports.
Note that my function doesn’t exactly replicate the output from BSD ls, but it meets the expectations of the test suite:
fnformat_output(paths:&[PathBuf])->MyResult<String>{// 1 2 3 4 5 6 7 8letfmt="{:<}{:<} {:>} {:<} {:<} {:>} {:<} {:<}";letmuttable=Table::new(fmt);forpathinpaths{table.add_row(Row::new().with_cell("")// 1 "d" or "-".with_cell("")// 2 permissions.with_cell("")// 3 number of links.with_cell("")// 4 user name.with_cell("")// 5 group name.with_cell("")// 6 size.with_cell("")// 7 modification.with_cell("")// 8 path);}Ok(format!("{}",table))}
You can find much of the data you need to fill in the cells with PathBuf::metadata.
Here are some pointers to help you fill in the various
columns:
-
metadata::is_dirreturns a Boolean for whether or not the entry is a directory. -
metadata::modewill return au32representing the permissions for the entry. In the next section, I will explain how to format this information into a display string. -
You can find the number of links using
metadata::nlink. -
For the user and group owners, add
use std::os::unix::fs::MetadataExtso that you can callmetadata::uidto get the user ID of the owner andmetadata::gidto get the group ID. Both the user and group IDs are integer values that must be converted into actual user and group names. For this, I recommend you look at theuserscrate that contains the functionsget_user_by_uidandget_group_by_gid. -
Use
metadata::lento get the size of a file or directory. -
Displaying the file’s
metadata::modifiedtime is tricky. This method returns astd::time::SystemTimestruct, and I recommend that you usechrono::DateTime::formatto format the date usingstrftimesyntax, a format that will likely be familiar to C and Perl programmers. -
Use
Path::displayfor the file or directory name.
I have unit tests for this function, but first I need to explain more about how to display the permissions.
Displaying Octal Permissions
The file type and permissions will be displayed using a string of 10 characters like drwxr-xr-x, where each letter or dash indicates a specific piece of information.
The first character is either a d for directory or a dash for anything else.
The standard ls will also use l for a link, but the challenge program will not distinguish links.
The other nine characters represent the permissions for the entry. In Unix, each file and directory has three levels of sharing for a user, a group, and other for everyone else. Only one user and one group can own a file at a time. For each ownership level, there are permissions for reading, writing, and executing, as shown in Figure 14-2.
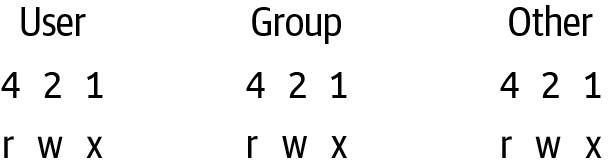
Figure 14-2. Each level of ownership (user, group, and other) has permissions for read, write, and execute.
These three permissions are either on or off and can be represented with three bits using 1 and 0, respectively.
This means there are three combinations of two choices, which makes eight possible outcomes because 23 = 8.
In binary encoding, each bit position corresponds to a power of 2, so 001 is the number 1 (20), and 010 is the number 2 (21).
To represent the number 3, both bits are added, so the binary version is 011.
You can verify this with Rust by using the prefix 0b to represent a binary
number:
assert_eq!(0b001+0b010,3);
The number 4 is 100 (22), and so 5 is 101 (4 + 1).
Because a three-bit value can represent only eight numbers, this is called octal notation.
You can see the binary representation of the first eight numbers with the following loop:
fornin0..=7{println!("{} = {:03b}",n,n);}
The
..=range operator includes the ending value.Print the value
nas is and in binary format to three places using leading zeros.
The preceding code will print this:
0 = 000
1 = 001
2 = 010
3 = 011
4 = 100
5 = 101
6 = 110
7 = 111
Figure 14-3 shows that each of the three bit positions corresponds to a permission.
The 4 position is for read, the 2 position for write, and the 1 position for execute.
Octal notation is commonly used with the chmod command I mentioned in Chapters 2 and 3.
For example, the command chmod 775 will enable the read/write/execute bits for the user and group of a file but will enable only read and execute for everyone else.
This allows anyone to execute a program, but only the owner or group can modify it.
The permission 600, where only the owner can read and write a file, is often used for sensitive data like SSH keys.
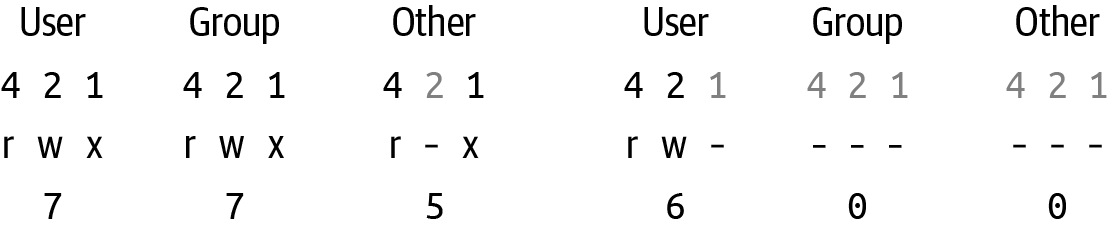
Figure 14-3. The permissions 775 and 600 in octal notation translate to read/write/execute permissions for user/group/other.
I recommend you read the documentation for metadata::mode to get a file’s permissions.
That documentation shows you how to mask the mode with a value like 0o200 to determine if the user has write access.
(The prefix 0o is the Rust way to write in octal notation.)
That is, if you use the binary
AND operator & to combine two binary values, only those bits that are both set (meaning they have a value of 1) will produce a 1.
As shown in Figure 14-4, if you & the values 0o700 and 0o200, the write bits in position 2 are both set and so the result is 0o200.
The other bits can’t be set because the zeros in 0o200 will mask or hide those values, hence the term masking for this
operation.
If you & the values 0o400 and 0o200, the result is 0 because none of the three positions contains a 1 in both operands.
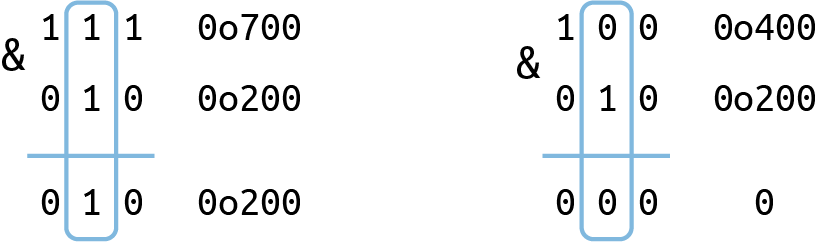
Figure 14-4. The binary AND operator & will set bit values in the result where both bits are set in the operands.
I wrote a function called format_mode to create the needed output for the permissions.
It accepts the u32 value returned by mode and returns a String of nine
characters:
/// Given a file mode in octal format like 0o751,/// return a string like "rwxr-x--x"fnformat_mode(mode:u32)->String{unimplemented!();}
The preceding function needs to create three groupings of rwx for user, group, and other using the mask values shown in Table 14-1.
| Owner | Read | Write | Execute |
|---|---|---|---|
User |
|
|
|
Group |
|
|
|
Other |
|
|
|
It might help to see the unit test that you can add to your tests module:
#[cfg(test)]modtest{usesuper::{find_files,format_mode};#[test]fntest_find_files(){}// Same as before#[test]fntest_find_files_hidden(){}// Same as before#[test]fntest_format_mode(){assert_eq!(format_mode(0o755),"rwxr-xr-x");assert_eq!(format_mode(0o421),"r---w---x");}}
Import the
format_modefunction.These are two spot checks for the function. Presumably the function works if these two pass.
Testing the Long Format
It’s not easy to test the output from the format_output function, because the output on your system will necessarily be different from mine.
For instance, you will likely have a different user name, group name, and file modification times.
We should still have the same permissions (if you ran the set-test-perms.sh script), number of links, file sizes, and paths, so I have written the tests to inspect only those columns.
In addition, I can’t rely on the specific widths of the columns or any delimiting characters, as user and group names will vary. The unit tests I’ve created for the format_output function should help you write a working solution while also providing enough flexibility to account for the differences in our systems.
The following helper function, which you can add to your tests module in src/lib.rs, will inspect the long output for any one directory entry:
fnlong_match(line:&str,expected_name:&str,expected_perms:&str,expected_size:Option<&str>,){letparts:Vec<_>=line.split_whitespace().collect();assert!(parts.len()>0&&parts.len()<=10);letperms=parts.get(0).unwrap();assert_eq!(perms,&expected_perms);ifletSome(size)=expected_size{letfile_size=parts.get(4).unwrap();assert_eq!(file_size,&size);}letdisplay_name=parts.last().unwrap();assert_eq!(display_name,&expected_name);}
The function takes a line of the output along with the expected values for the permissions, size, and path.
Split the line of text on whitespace.
Verify that the line split into some fields.
Verify the permissions string, which is in the first column.
Verify the file size, which is in the fifth column. Directory sizes are not tested, so this is an optional argument.
Verify the filepath, which is in the last column.
Note
I use Iterator::last rather than try to
use a positive offset because the modification date column has
whitespace.
Expand the tests with the following unit test for the format_output function that checks the long listing for one file.
Note that you will need to add use std::path::PathBuf and format_output to the imports:
#[test]fntest_format_output_one(){letbustle_path="tests/inputs/bustle.txt";letbustle=PathBuf::from(bustle_path);letres=format_output(&[bustle]);assert!(res.is_ok());letout=res.unwrap();letlines:Vec<&str>=out.split("\n").filter(|s|!s.is_empty()).collect();assert_eq!(lines.len(),1);letline1=lines.first().unwrap();long_match(&line1,bustle_path,"-rw-r--r--",Some("193"));}
Create a
PathBufvalue for tests/inputs/bustle.txt.Break the output on newlines and verify there is just one line.
Use the helper function to inspect the permissions, size, and path.
The following unit test passes two files and checks both lines for the correct output:
#[test]fntest_format_output_two(){letres=format_output(&[PathBuf::from("tests/inputs/dir"),PathBuf::from("tests/inputs/empty.txt"),]);assert!(res.is_ok());letout=res.unwrap();letmutlines:Vec<&str>=out.split("\n").filter(|s|!s.is_empty()).collect();lines.sort();assert_eq!(lines.len(),2);letempty_line=lines.remove(0);long_match(&empty_line,"tests/inputs/empty.txt","-rw-r--r--",Some("0"),);letdir_line=lines.remove(0);long_match(&dir_line,"tests/inputs/dir","drwxr-xr-x",None);}
Execute the function with two arguments, one of which is a directory.
Verify that two lines are returned.
Verify the expected values for the empty.txt file.
Verify the expected values for the directory listing. Don’t bother checking the size, as different systems will report different sizes.
Solution
This became a surprisingly complicated program that needed to be decomposed into several smaller functions.
I’ll show you how I wrote each function, starting with find_files:
fnfind_files(paths:&[String],show_hidden:bool)->MyResult<Vec<PathBuf>>{letmutresults=vec![];fornameinpaths{matchfs::metadata(name){Err(e)=>eprintln!("{}: {}",name,e),Ok(meta)=>{ifmeta.is_dir(){forentryinfs::read_dir(name)?{letentry=entry?;letpath=entry.path();letis_hidden=path.file_name().map_or(false,|file_name|{file_name.to_string_lossy().starts_with('.')});if!is_hidden||show_hidden{results.push(entry.path());}}}else{results.push(PathBuf::from(name));}}}}Ok(results)}
Initialize a mutable vector for the results.
Attempt to get the metadata for the path.
In the event of an error such as a nonexistent file, print an error message to
STDERRand move to the next file.If so, use
fs::read_dirto read the entries.
Use
DirEntry::pathto get thePathvalue for the entry.
Check if the basename starts with a dot and is therefore hidden.

If the entry should be displayed, add a
PathBufto the results.
Next, I’ll show how to format the permissions.
Recall Table 14-1 with the nine masks needed to handle the nine bits that make up the permissions.
To encapsulate this data, I created an enum type called Owner, which I define with variants for User, Group, and Other.
Additionally, I want to add a method to my type that will return the masks needed to create the permissions string.
I would like to group this code into a separate module called owner, so I will place the following code into the file src/owner.rs:
#[derive(Clone, Copy)]pubenumOwner{User,Group,Other,}implOwner{pubfnmasks(&self)->[u32;3]{matchself{Self::User=>[0o400,0o200,0o100],Self::Group=>[0o040,0o020,0o010],Self::Other=>[0o004,0o002,0o001],}}}
This is an implementation (
impl) block forOwner.Define a method called
masksthat will return an array of the mask values for a given owner.selfwill be one of theenumvariants.These are the read, write, and execute masks for
User.These are the read, write, and execute masks for
Group.These are the read, write, and execute masks for
Other.
Note
If you come from an object-oriented background, you’ll find this syntax is suspiciously similar to a class definition and an object method declaration, complete with a reference to self as the
invocant.
To use this module, add mod owner to the top of src/lib.rs, then add use owner::Owner to the list of imports.
As you’ve seen in almost every chapter, the mod keyword is used to create new modules, such as the tests module for unit tests.
In this case, adding mod owner declares a new module named owner.
Because you haven’t specified the contents of the module here, the Rust compiler knows to look in src/owner.rs for the module’s code.
Then, you can import the Owner type into the root module’s scope with use owner::Owner.
Tip
As your programs grow more complicated, it’s useful to organize code into modules. This will make it easier to isolate and test ideas as well as reuse code in other projects.
Following is a list of all the imports I used to finish the program:
modowner;usechrono::{DateTime,Local};useclap::{App,Arg};useowner::Owner;usestd::{error::Error,fs,os::unix::fs::MetadataExt,path::PathBuf};usetabular::{Row,Table};useusers::{get_group_by_gid,get_user_by_uid};
I added the following mk_triple helper function to src/lib.rs, which creates part of the permissions string given the file’s mode and an Owner variant:
/// Given an octal number like 0o500 and an [`Owner`],/// return a string like "r-x"pubfnmk_triple(mode:u32,owner:Owner)->String{let[read,write,execute]=owner.masks();format!("{}{}{}",ifmode&read==0{"-"}else{"r"},ifmode&write==0{"-"}else{"w"},ifmode&execute==0{"-"}else{"x"},)}
Use the
format!macro to create a newStringto return.If the
modemasked with thereadvalue returns0, then the read bit is not set. Show a dash (-) when unset andrwhen set.Likewise, mask the
modewith thewritevalue and displaywif set and a dash otherwise.Mask the
modewith theexecutevalue and returnxif set and a dash otherwise.
Following is the unit test for this function, which you can add to the tests module.
Be sure to add super::{mk_triple, Owner} to the list of imports:
#[test]fntest_mk_triple(){assert_eq!(mk_triple(0o751,Owner::User),"rwx");assert_eq!(mk_triple(0o751,Owner::Group),"r-x");assert_eq!(mk_triple(0o751,Owner::Other),"--x");assert_eq!(mk_triple(0o600,Owner::Other),"---");}
Finally, I can bring this all together in my format_mode function:
/// Given a file mode in octal format like 0o751,/// return a string like "rwxr-x--x"fnformat_mode(mode:u32)->String{format!("{}{}{}",mk_triple(mode,Owner::User),mk_triple(mode,Owner::Group),mk_triple(mode,Owner::Other),)}
The function takes a
u32value and returns a new string.The returned string will be made of three triple values, like
rwx.Create triples for user, group, and other.
Tip
You’ve seen throughout the book that Rust uses two slashes (//) to indicate that all text that follows on the line will be ignored. This is commonly called a comment because it can be used to add commentary to your code, but it’s also a handy way to temporarily disable lines of code. In the preceding functions, you may have noticed the use of three slashes (///) to create a special kind of comment that has the #[doc] attribute. Note that the doc comment should precede the function declaration. Execute
cargo doc --open --document-private-items to have Cargo create documentation for your code. This should cause your web browser to open with HTML documentation as shown in Figure 14-5, and the triple-commented text should be displayed next to the function name.
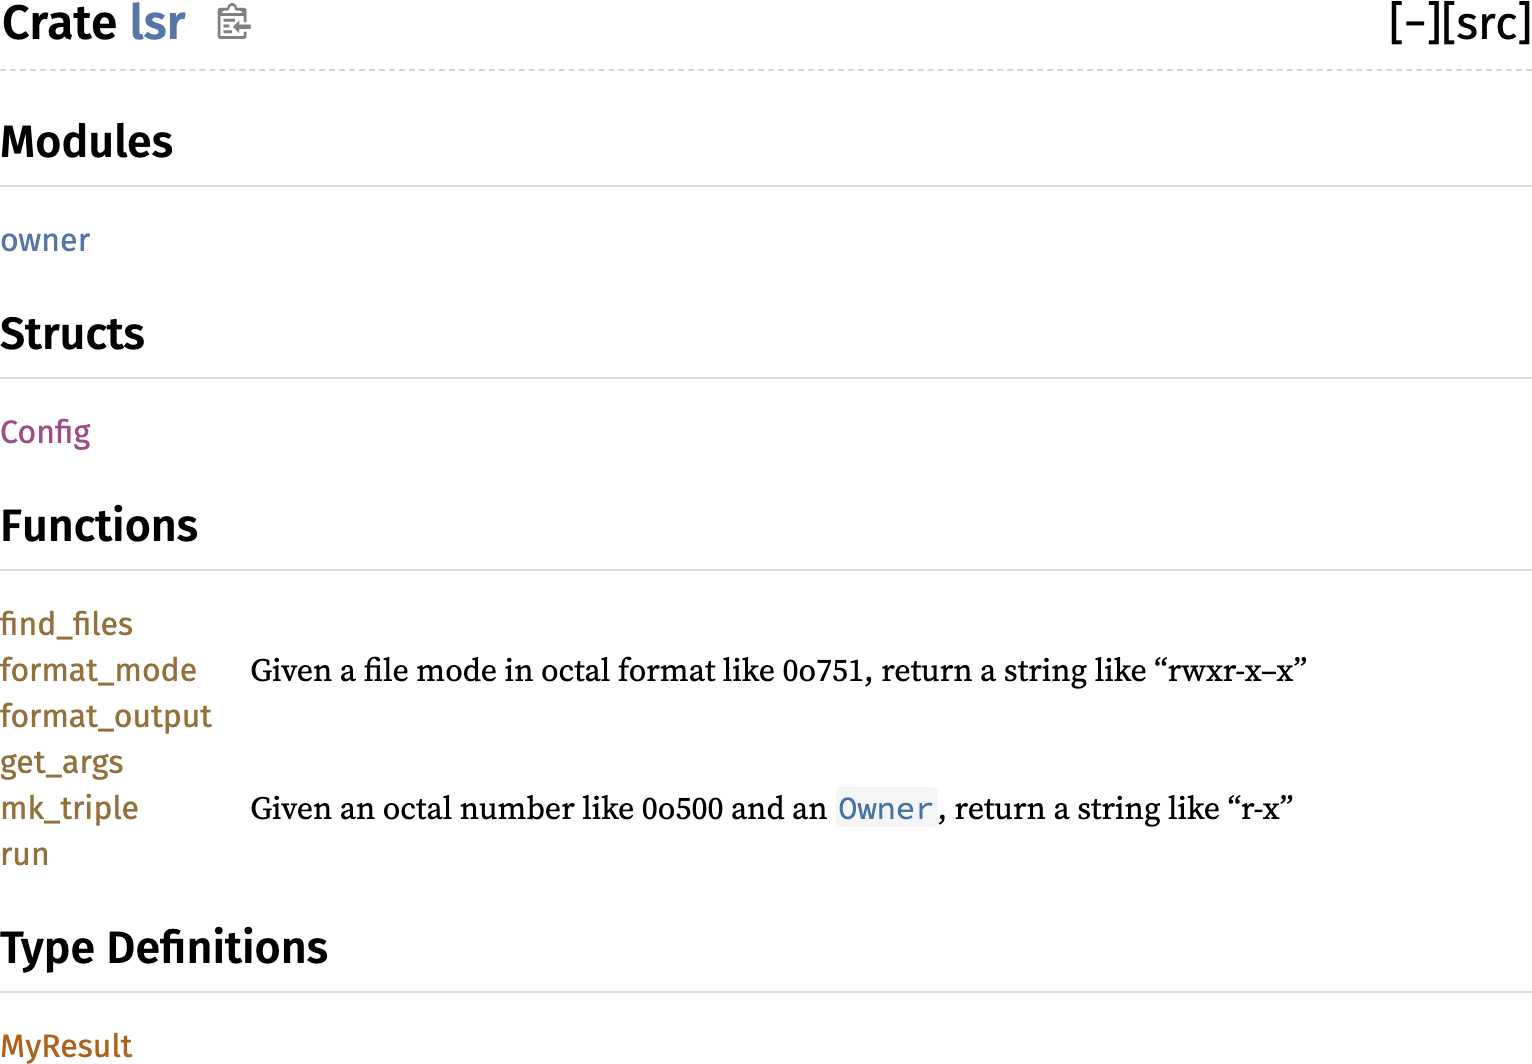
Figure 14-5. The documentation created by Cargo will include comments that begin with three slashes.
Following is how I use the format_mode function in the format_output function:
fnformat_output(paths:&[PathBuf])->MyResult<String>{// 1 2 3 4 5 6 7 8letfmt="{:<}{:<} {:>} {:<} {:<} {:>} {:<} {:<}";letmuttable=Table::new(fmt);forpathinpaths{letmetadata=path.metadata()?;letuid=metadata.uid();letuser=get_user_by_uid(uid).map(|u|u.name().to_string_lossy().into_owned()).unwrap_or_else(||uid.to_string());letgid=metadata.gid();letgroup=get_group_by_gid(gid).map(|g|g.name().to_string_lossy().into_owned()).unwrap_or_else(||gid.to_string());letfile_type=ifpath.is_dir(){"d"}else{"-"};letperms=format_mode(metadata.mode());letmodified:DateTime<Local>=DateTime::from(metadata.modified()?);table.add_row(Row::new().with_cell(file_type)// 1.with_cell(perms)// 2.with_cell(metadata.nlink())// 3.with_cell(user)// 4.with_cell(group)// 5.with_cell(metadata.len())// 6.with_cell(modified.format("%b %d %y %H:%M"))// 7.with_cell(path.display()),// 8);}Ok(format!("{}",table))}
Create a new
tabular::Tableusing the given format string.Attempt to get the entry’s metadata. This should not fail because of the earlier use of
fs::metadata. This method is an alias to that function.Get the user ID of the owner from the metadata. Attempt to convert to a user name and fall back on a string version of the ID.
Do likewise for the group ID and name.
Choose whether to print a
dif the entry is a directory or a dash (-) otherwise.Use the
format_modefunction to format the entry’s permissions.Create a
DateTimestruct using the metadata’smodifiedvalue.Add a new
Rowto the table using the given cells.Use
metadata::nlinkto find the number of links.Use
metadata::lento get the size.
Use
strftimeformat options to display the modification time.
Convert the table to a string to return.
Finally, I bring it all together in the run function:
pubfnrun(config:Config)->MyResult<()>{letpaths=find_files(&config.paths,config.show_hidden)?;ifconfig.long{println!("{}",format_output(&paths)?);}else{forpathinpaths{println!("{}",path.display());}}Ok(())}
Find all the entries in the given list of files and directories.
If the user wants the long listing, print the results of
format_output.Otherwise, print each path on a separate line.
At this point, the program passes all the tests, and you have implemented a simple replacement for ls.
Notes from the Testing Underground
In this last chapter, I’d like you to consider some of the challenges of writing tests, as I hope this will become an integral part of your coding skills.
For example, the output from your lsr program will necessarily always be different from what I see when I’m creating the tests because you will have different owners and modification times.
I’ve found that different systems will report different sizes for directories, and the column widths of the output will be different due to the fact that you are likely to have shorter or longer user and group names.
Really, the most that testing can do is verify that the filenames, permissions, and sizes are the expected values while basically assuming the layout is kosher.
If you read tests/cli.rs, you’ll see I borrowed some of the same ideas from the unit tests for the integration tests.
For the long listing, I created a run_long function to run for a particular file, checking for the permissions, size, and path:
fnrun_long(filename:&str,permissions:&str,size:&str)->TestResult{letcmd=Command::cargo_bin(PRG)?.args(&["--long",filename]).assert().success();letstdout=String::from_utf8(cmd.get_output().stdout.clone())?;letparts:Vec<_>=stdout.split_whitespace().collect();assert_eq!(parts.get(0).unwrap(),&permissions);assert_eq!(parts.get(4).unwrap(),&size);assert_eq!(parts.last().unwrap(),&filename);Ok(())}
The function accepts the filename and the expected permissions and size.
Run
lsrwith the--longoption for the given filename.Convert
STDOUTto UTF-8.Break the output on whitespace and collect into a vector.
Check that the first column is the expected permissions.
Check that the fifth column is the expected size.
Check that the last column is the given path.
I use this function like so:
#[test]fnfox_long()->TestResult{run_long(FOX,"-rw-------","45")}
Checking the directory listings is tricky, too.
I found I needed to ignore the directory sizes because different systems report different sizes.
Here is my dir_long function that handles this:
fndir_long(args:&[&str],expected:&[(&str,&str,&str)])->TestResult{letcmd=Command::cargo_bin(PRG)?.args(args).assert().success();letstdout=String::from_utf8(cmd.get_output().stdout.clone())?;letlines:Vec<&str>=stdout.split("\n").filter(|s|!s.is_empty()).collect();assert_eq!(lines.len(),expected.len());letmutcheck=vec![];forlineinlines{letparts:Vec<_>=line.split_whitespace().collect();letpath=parts.last().unwrap().clone();letpermissions=parts.get(0).unwrap().clone();letsize=matchpermissions.chars().next(){Some('d')=>"",_=>parts.get(4).unwrap().clone(),};check.push((path,permissions,size));}forentryinexpected{assert!(check.contains(entry));}Ok(())}
The function accepts the arguments and a slice of tuples with the expected results.
Run
lsrwith the given arguments and assert it is successful.Convert
STDOUTto a string.Break
STDOUTinto lines, ignoring any empty lines.Check that the number of lines matches the expected number.
Initialize a mutable vector of items to check.
Break the line on whitespace and extract the path, permissions, and size.
Ignore the size of directories.
Ensure that each of the expected paths, permissions, and sizes is present in the
checkvector.
I use the dir_long utility function in a test like this:
#[test]fndir1_long_all()->TestResult{dir_long(&["-la","tests/inputs"],&[("tests/inputs/empty.txt","-rw-r--r--","0"),("tests/inputs/bustle.txt","-rw-r--r--","193"),("tests/inputs/fox.txt","-rw-------","45"),("tests/inputs/dir","drwxr-xr-x",""),("tests/inputs/.hidden","-rw-r--r--","0"),],)}
These are the arguments to
lsr.The empty.txt file should have permissions of
644and a file size of0.The fox.txt file’s permissions should be set to
600by set-test-perms.sh. If you forget to run this script, then you will fail this test.The dir entry should report
dand permissions of755. Ignore the size.
In many ways, the tests for this program were as challenging as the program itself. I hope I’ve shown throughout the book the importance of writing and using tests to ensure a working program.
Going Further
The challenge program works fairly differently from the native ls programs.
Modify your program to mimic the ls on your system, then start trying to implement all the other options, making sure that you add tests for every feature.
If you want inspiration, check out the source code for other Rust implementations of ls, such as exa and lsd.
Write Rust versions of the command-line utilities basename and dirname, which will print the filename or directory name of given inputs, respectively.
Start by reading the manual pages to decide which features your programs will implement.
Use a test-driven approach where you write tests for each feature you add to your programs.
Release your code to the world, and reap the fame and fortune that inevitably follow open source development.
In Chapter 7, I suggested writing a Rust version of tree, which will find and display the tree structure of files and directories.
The program can also display much of the same information as ls:
$ tree -pughD
.
├── [-rw-r--r-- kyclark  staff     193 May 31 16:43]  bustle.txt
├── [drwxr-xr-x kyclark  staff     128 Aug 10 18:08]  dir
│   └── [-rw-r--r-- kyclark  staff      45 May 31 16:43]  spiders.txt
├── [-rw-r--r-- kyclark  staff       0 Mar 19  2021]  empty.txt
└── [-rw------- kyclark  staff      45 Aug 12 10:29]  fox.txt

1 directory, 4 files
Use what you learned from this chapter to write or expand that program.
Summary
One of my favorite parts of this challenge program is the formatting of the octal permission bits. I also enjoyed finding all the other pieces of metadata that go into the long listing. Consider what you did in this chapter:
-
You learned how to summon the metadata of a file to find everything from the file’s owners and size to the last modification time.
-
You found that directory entries starting with a dot are normally hidden from view, leading to the existence of dotfiles and directories for hiding program data.
-
You delved into the mysteries of file permissions, octal notation, and bit masking and came through more knowledgeable about Unix file ownership.
-
You discovered how to add
impl(implementation) to a custom typeOwneras well as how to segregate this module into src/owner.rs and declare it withmod ownerin src/lib.rs. -
You learned to use three slashes (
///) to create doc comments that are included in the documentation created by Cargo and that can be read usingcargo doc. -
You saw how to use the
tabularcrate to create text tables. -
You explored ways to write flexible tests for programs that can create different output on different systems and when run by different people.